If you weren’t aware of the variety of possibilities associated with Google Sheets, this online version of Microsoft Excel can do a lot. In order to properly utilize it, however, you need to introduce yourself to some of the basic functions.
Alphabetizing and keeping the rows together certainly fall into that category. In this article, we’ll show you how to perform both of these primary functions in Google Sheets.
Alphabetizing
The most straightforward way to alphabetize your spreadsheet is by using the Sort function. This allows you to alphabetize a selected range of data, a column, or multiple columns.
Single Columns
To alphabetize a single column of data in the A-to-Z order, you’re going to need to enter the formula that does this automatically. The Sort function can take many more arguments, but if you want to do a quick, ascending, alphabetical sort, use the “=SORT(A2:A12)” function.
Keep in mind that this formula is an array. What this means is that the formula occupies the range that’s exactly the same in size as the input range. Use this formula, and you won’t be able to change anything within the array. You won’t be able to delete a single cell from the result. You can delete the whole formula result, but not a cell value.

Multiple Columns
If you have a dataset of multiple columns, the Sort function can still help you arrange the cells alphabetically. There is a formula that will help you do this. Enter the “=SORT(A2:B12,1,FALSE)” function to alphabetize multiple columns according to your preference. The mentioned formula works with three arguments.
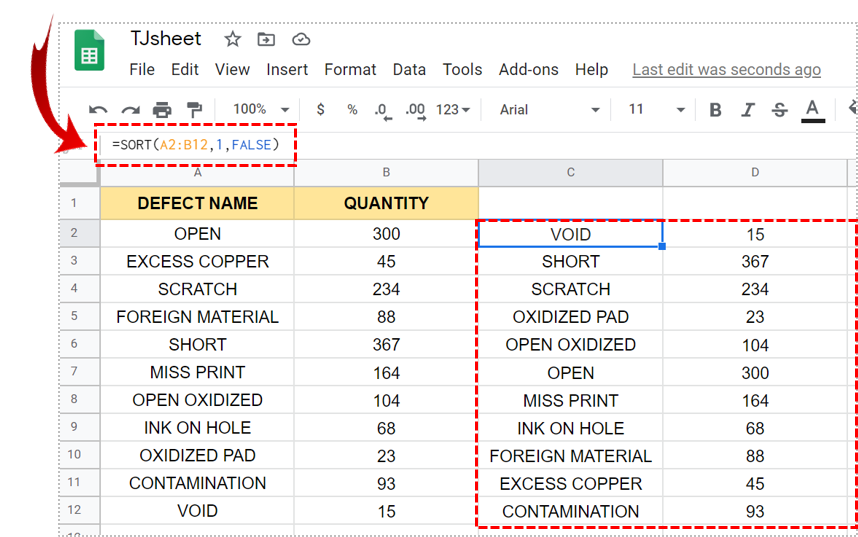
The first argument is range. Essentially, the range of entries that you wish to sort. In turn, this allows you to select the columns that you want to sort.
The second argument is the column on which you wish to sort the results. It’s called sort_column.
The third argument is the is_ascending argument. It can have either of the two values: TRUE or FALSE. TRUE means that the sort will be performed in the ascending order. FALSE means that the sort will be performed in the descending order.
Built-In Sort Options
You might want to alphabetize the available data and get static values, instead of dynamic ones. The Sort function can’t do this, but there is a built-in tool in Google Sheets that allows you to get static alphabetized information. This is probably the simplest way to alphabetize in Google Sheets, but it won’t do you too much good if you constantly update the list. If you want to change the static values of cells inside a column, here’s how to do it.
It’s as simple as selecting the entire column (click the corresponding column letter) and navigating to the Data entry in the top menu.

If you select sort range, the tool will sort the selected range in the ascending/descending order. If you select any of the two sort sheet options, it will sort the entire sheet in the ascending/descending fashion.
You can access more options for alphabetizing by selecting Advance range sorting options under the Sort range menu. This makes sorting easier if you have many columns to choose from. When you’re done, select Sort.

Alphabetizing a Dataset Based on One Column
Start by selecting the dataset in question and make sure that you’ve included the headers as well. Then, go to Data, select Sort range, and Advance range sorting options from the dropdown menu. Enable the Data has header row option. Then, Under Sort by, select the header that you want. Select the A-Z or Z-A options for and ascending/descending sort (respectively). Click Sort.

Freezing
Sometimes, you might want to keep your rows and columns the way you set them and list other columns in an alphabetical fashion. This is entirely possible. You can either freeze rows or entire columns. Once frozen, the selected rows/columns are separated with a thick grey line. This means that, regardless of how you try sorting any part of the document, the select rows/columns are going to stay in place, the way you designated them.
This is very simple to do. Select a cell in the row/column that you want to freeze. Then, navigate to the View entry in the upper menu of Google Sheets. Hover over the Freeze function. You have four options for rows and columns each.
No rows will cancel the freezing and you’ll see the corresponding thick grey line disappear from the sheet. 1 row will freeze the first row. 2 rows will freeze the first two rows. Up to current row (x) will freeze everything up to the row that you’ve selected (number x, where x is the number of the row in question).
The same goes for columns. You get No columns, 1 column, 2 columns, and Up to current column (y), where “y” is the letter of the selected column.
After you’ve selected the rows/columns/both, you can go to Data, alphabetize everything, and you’ll see that the “frozen” rows/columns won’t change their value. This is a handy option and it can be used in various creative ways.

Alphabetizing and Keeping Columns and Rows Intact
There are two main ways to alphabetize in Google Sheets. The first uses various formulas and is pretty dynamic. It also allows you to do a variety of things with your spreadsheets. However, it’s relatively complex. If you want to alphabetize your sheet, use the second method. Don’t worry. You can lock rows and columns in place with the Freeze function.
Has this guide been helpful? Did you manage to do what you wanted with your spreadsheet? Feel free to hit the comments section below with any questions you have. Our community is ready with all the answers you need.


Disclaimer: Some pages on this site may include an affiliate link. This does not effect our editorial in any way.