Is Google Sheets your main spreadsheet program? Have you ever wondered how to add numbers to your spreadsheets?
We’ll show you multiple ways to add numbers in Google Sheets. Apart from this, you’ll learn how to use functions, create lists, and other important features that will improve your workflow in Google Sheets.
How to Add Numbers in Google Sheets
Working with numbers is typically the reason why people work with Google Sheets. For instance, it can help you to add them properly. Here’s how you find the SUM of a set of numbers in Google Sheets:
- Open Google Sheets and input the data you’d like to add in a cell.
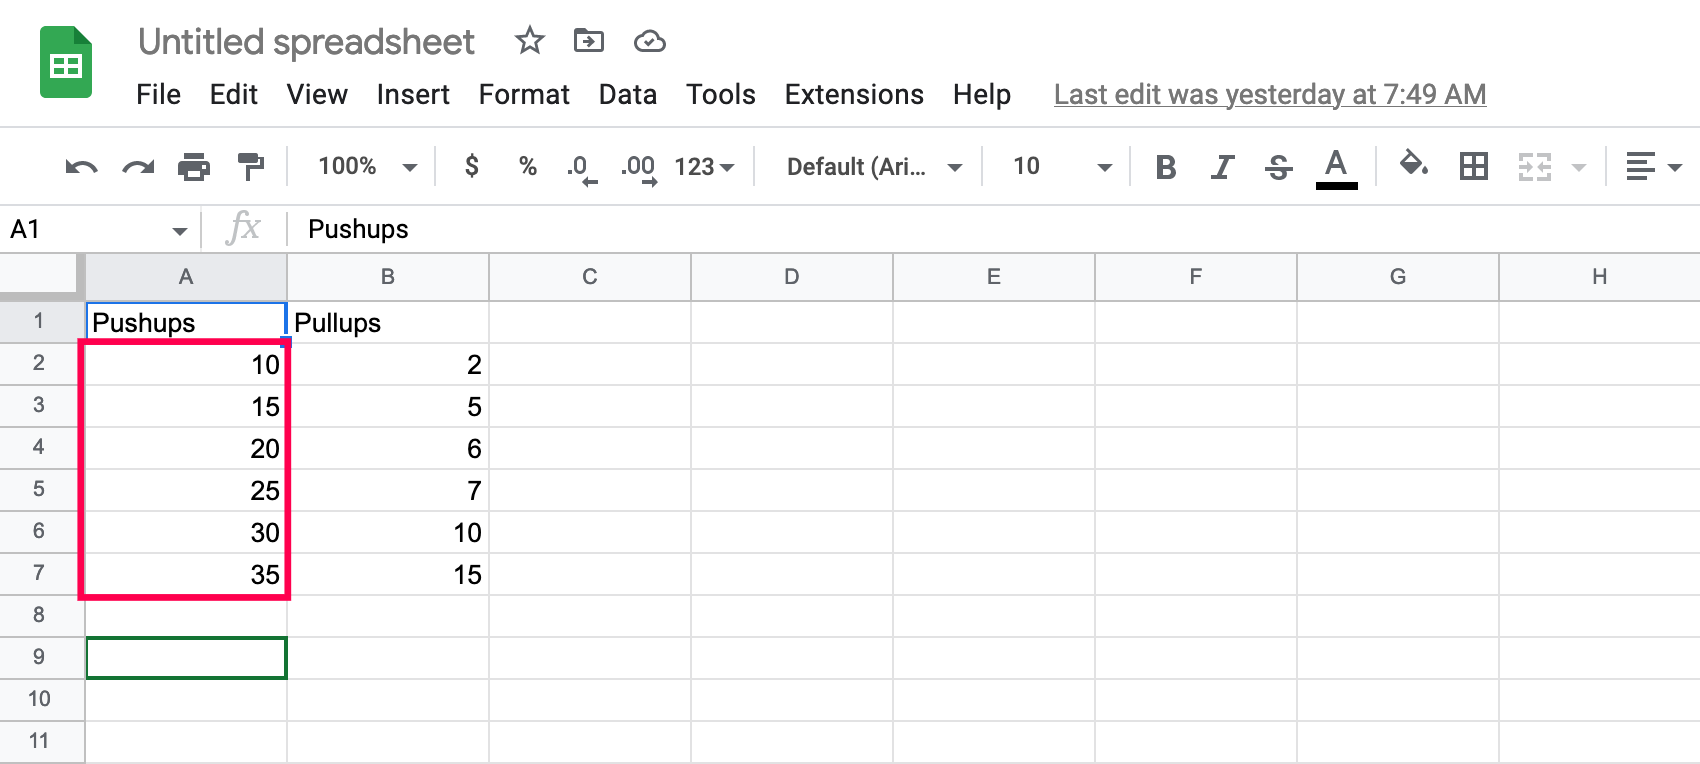
- Highlight the cells. Then, click Insert in the menu at the top.

- Click Functions. Then, click SUM at the top.
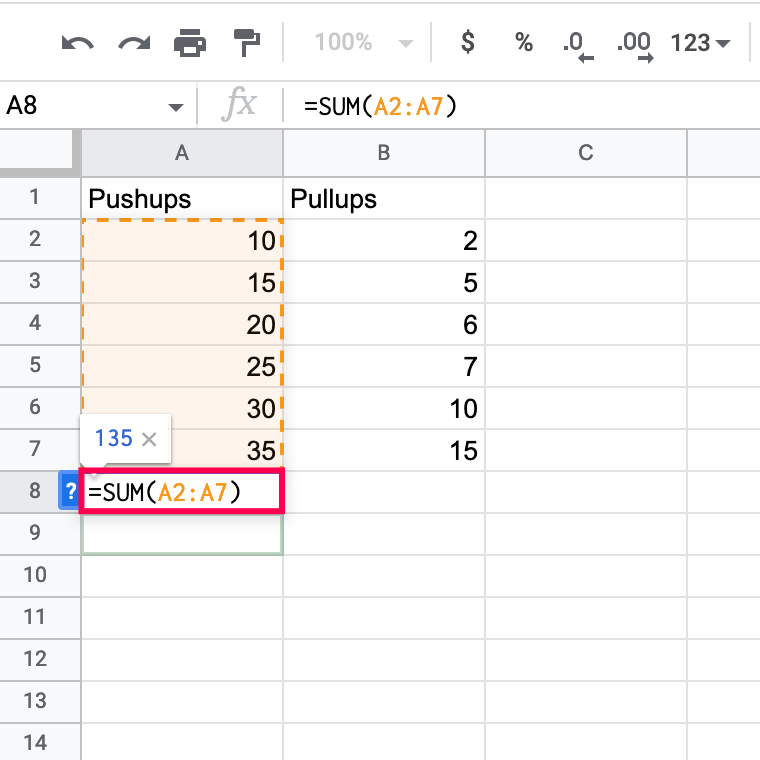
- You will see the =SUM formula appear on your Sheet. It will look something like =SUM(A2:A7). Click the box where you see your formula.
- Now, you’ll see the SUM for that row.


You can do this for multiple rows and columns. All you need to do is highlight all of the cells you want to add, then input the function. Or, type =SUM(Columns+Rows : Columns+Rows).
How to Divide in Google Sheets?
There are two options to divide numbers in Google Sheets. You can either use the Divide function, which has a limit of only two numbers divided at a time. Or you can use the divide formula to divide multiple numbers at once.
- Use the Divide function in a single cell
- Open a spreadsheet in Google Sheets.
- Click on a cell where you want to use the divide function.
- Type in “
=DIVIDE(10,5)” and press “Enter.”
Note: The numbers 10 and 5 are examples. Replace the dividend “10” and divisor “5” with the numbers you want to divide.
- Use the Divide function for two cells
- Open a spreadsheet in Google Docs.
- Click on a cell where you want to use the divide function.
- Type in “
=DIVIDE (A1, B1)” and press “Enter.”
Note: Instead of “A1” and “B1”, enter cell notations that contain your dividend and divisor. Also, you can use a combination of a cell value and a number (e.g., “=DIVIDE (A1,4)”).
- Use the divide formula.
- Go to your Google Sheets.
- Click on a cell where you want to divide numbers.
- Type in “
=20/5” and press “Enter.”


When using the divide formula, you can use more than two numbers (e.g., “=10/4/3”).

Also, you can use a combination of cell notations and numbers, like “=C11/5/B2.”
How to Subtract in Google Sheets?
The methods for subtracting numbers in Google Sheets are very similar to dividing. You can use the MINUS function (limited to two numbers!) or the minus formula.
- Use the minus formula.
- Open your spreadsheet in Google Sheets.
- Click on a cell where you want to subtract numbers.
- Type in “=20-C4-3” and press “Enter.”
As you can see, Google Sheets enables you to combine cell notations and values when writing a subtraction.
- Use the Minus function
- Open your Google Sheets.
- Click on a cell where you want to subtract numbers.
- Type in “=MINUS(C4,C3)” and press “Enter.”
Note: Replace “C4” and “C3” with cell notations of your own or numbers. You can always use a combination of both (e.g., “=MINUS(C4,2)”).


Additional FAQs
Google Sheets can intimidate new users and even more experienced users. Here are the answers to more questions about Google Sheets.
How Do I Add a List of Values in Google Sheets?
Sometimes, you want the user to enter only a value from a list you’ve created. Fortunately, you can add a drop-down list of values to any cell(s) on your spreadsheet.
1. Go to Google Sheets.
2. Select the cell(s) for which you want to create a list of values.
3. In the horizontal toolbar at the top of the screen, click on “Data.”

4. Click “Data validation.”

5. In the dialog box, you can select a criterion. Note: We’ll choose “List of items” because you can enter custom numbers and text, but feel free to explore other options as well.
6. Type in the values you want. Separate them by using a comma.

7. Click “Save.”

Now, click on the small arrow button in a cell to which you added a list of values, and you’ll be able to select one of your custom values.
What Is the Multiplication Formula in Google Sheets?
Whenever you want to multiply numbers or cell values in Google Sheets, you need to use the multiplication formula.
For Google Sheets to recognize that you’re typing a formula in a cell, you need to start the formula with the equals sign (=). Then, you can add the numbers and/or cell notations you want to multiply and write an asterisk () between them. A typical multiplication formula in Google Sheets cell would look like this:
“=23*A6”
To get the product of any multiplication formula, press “Enter.”
How to Multiply on Google Sheets?
The multiplication formula is only one way of multiplying values in your spreadsheet. The Multiply function operates similarly, while the Array function gives you the option to multiply a selection of rows or columns at once. Still, we’ll describe each method.
· Use the multiplication formula
1. Open your spreadsheet in Google Sheets.
2. Click on the cell where you want to insert the multiplication formula.
3. Type in “=20*3*C4” and press “Enter.”

Replace the values in the example with your values. Note: You can use as many values as you want.
· Use the Multiply function
1. Go to Google Sheets.
2. Click on a cell where you want to use the Multiply function.
3. Type in “=MULTIPLY(2,B3)” and press “Enter.”

Again, replace the values in the example with your values. Note: With the Multiply function, you can use only two values.
· Use the Array function for rows or columns
1. Open Google Sheets.
2. Click on a cell where you want to enter the Array function.
3. Type in “ARRAYFORMULA(A1:A10*B1:B10)” and press “Enter.”
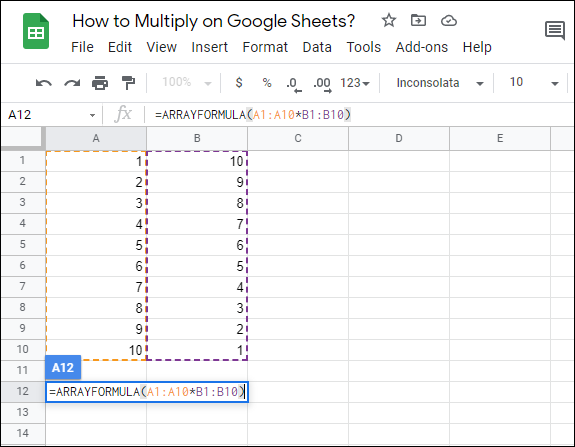
In this case, we selected two ranges of cells (A1:A10 and B1:B10) in two different columns for our Array function. You can select a range of cells in any row or column in your spreadsheet.
How Do I Automatically Add Numbers in Google Sheets?
Google Sheets gives you the option to add numbers to multiple cells. But this option has its limits. It functions like a copy-paste feature, so you can only add the same numbers you’ve initially entered. Here’s how to do it:
1. Open Google Sheets.
2. Enter the numbers in two or more cells adjacent to one another. These cells need to be in the same row or column.
3. Highlight the cells.
4. Click and drag the small blue box in the direction contrary to number orientation. In this case, drag the blue box in the column direction.

Note: For numbers that are in a column, drag the cells in the row direction.
How to Use the Sum Function in Google Sheets?
The Sum function can be applied to rows, columns, or independent cells. You can either manually select the Sum function or type it directly in the cell, as we did in previous examples. For this demonstration, we’ll select the Sum function in the toolbar, so you’ll learn how to use this method as well.
· Apply the Sum function to rows and cells
1. Open your spreadsheet in Google Sheets.
2. Click on the cell where you want to apply the Sum function.
3. In the horizontal toolbar at the top of the screen, click the “Functions” button.

4. Click “SUM.”

5. Select the range of cells whose values you want to sum. You can select both rows and cells.

6. Press “Enter.”
· Apply the Sum function to separate cells
1. Open your spreadsheet.
2. Click on the cell where you want to apply the Sum function.
3. In the horizontal toolbar at the top of the screen, click the “Functions” button.

4. Click “SUM.”

5. Click on every single cell whose values you want to sum.

6. Press “Enter.”
What Are the Formulas for Google Sheets?
There is a notable difference between functions and formulas in Google Sheets. If you’ve used Microsoft Excel in the past, then you are already familiar with this distinction. If not, here’s what you should know.
A formula is any math equation that you manually insert in a cell or the formula bar. It can contain any mathematical operations that are set in any order, provided that the order of operations is mathematically correct. The only important thing is that your formula starts with the equals sign (=).
Functions, on the other hand, are predefined formulas. You can apply them to cells in the same way you would apply formulas, but they can sometimes have limited features. As described earlier, if you use the Multiply function, you can only use two values. Using the multiply formula, however, enables you to insert more than two values in the equation.
To wrap up, the formulas that you can use in Google Sheets depend on how you create them, so their number is potentially limitless. The choice of functions is not. Check out the list of Google Sheets functions to see what options there are.
Adding Numbers in Google Sheets
Though Google Sheets is very easy to use, sometimes the most obvious actions don’t come intuitively and need explaining. Now you know how to add numbers in Google Sheets using different methods. Also, you can use the Minus, Multiply, Divide, Subtract, and Sum functions, which are sufficient for performing basic spreadsheet operations. On top of that, you’ve learned how to add a list of values to your cell(s), which can be useful if you share your spreadsheet with colleagues and want them to use your custom values.
As for the formulas and functions in Google Sheets, you’re free to create your own formula or choose one of the functions that Google Sheets has provided.
How did you add numbers in Google Sheets? Did you use a formula, a function, or some other method? Let us know in the comments section below.


Disclaimer: Some pages on this site may include an affiliate link. This does not effect our editorial in any way.