Google Sheets is a versatile, multipurpose spreadsheet application that organizes and manages information, data, and projects through online spreadsheets. The checkbox function allows for interactivity, letting users tick off completed items.
If you’re trying to keep track of team progress and want to know how to count the number of checked boxes within a spreadsheet, you’re not alone.
In this article, you’ll see the formula to use to total the number of cells checked in your spreadsheet, how to count checked boxes based on conditions, and how to convert that data into a dynamic chart. Let’s get started.
Using COUNTIF to Count Checkboxes in Google Sheets
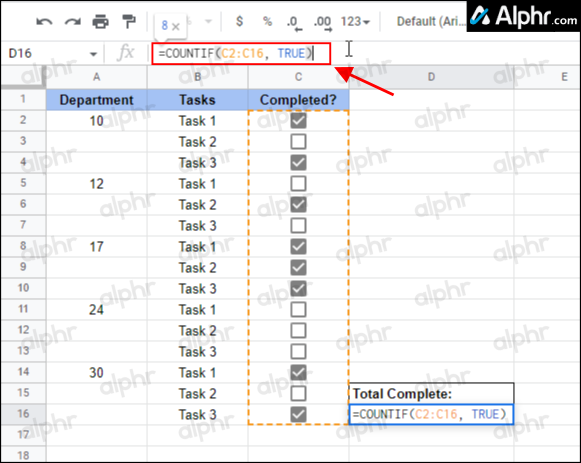
Whenever a checkbox is ticked, the cell’s value is set to “TRUE.” Unchecked cells get set to “FALSE.” Therefore, to count all the checked cells, you’ll ask for the total number of “TRUE” cells in a range.
How to Count Checked-Off Boxes in Sheets
Let’s pretend all the checkboxes are within the A2 to A22 cell range. To count the number of checked boxes, do the following:
- Click on the cell in the spreadsheet where you want the total to display.

- Next, type”
=COUNTIF“followed by the range of cells to check for a “true” value, e.g., “(A2:A22, TRUE).” Your formula should look something like the following:”=COUNTIF(A2:A22, TRUE).”
- Press “Enter” to save the formula in the cell. The cell should now count the number of checked (TRUE) boxes.

How to Count Unchecked Boxes in Sheets
Counting unchecked boxes uses the same process as checked-off ones, except you change “TRUE” to “FALSE.”
- Select the cell where you want the count results to display.
- Enter the following formula using your desired cell range:.”
=COUNTIF(B2:B22, FALSE)“to count checkboxes that are not checked. - Press “Enter” to save the formula. The number of unchecked boxes now appears.


How to Count Checkboxes Based on Conditions
Pretend that the data in your spreadsheet ranges from “Column B to Column D” and “Rows 3 to 17” and is set up as follows:
- Column B lists the “department numbers”
- Column C lists the “tasks.”
- Column D contains the completed “checkboxes.”
If you want to know the number of completed tasks (checked boxes) from a specific department, do the following:
- Click on the cell where you want the total completed count to appear.
- Copy and paste the following string (do not press enter!):
=COUNTIFS(D2:D22, TRUE,B2:B22,E3)
Notice the plural form of “COUNTIF” in the formula. - Edit the ranges in the formula to suit your needs. Orange is cells to check for completion, purple is labels (departments) to associate with orange cells, and light blue is the filtered results (Dept. 10) to check for TRUE values.
- Press “Enter” if not done already. The results should show the checked-off cell count (completed tasks) for “Dept. 10.”
- To replicate the first formula cell (the Dpt. 10 group) for other groups (Dept. 12, 17, etc.), copy/paste it into the respective cells, one at a time. Google Sheets adjusts the formula automatically and intelligently.

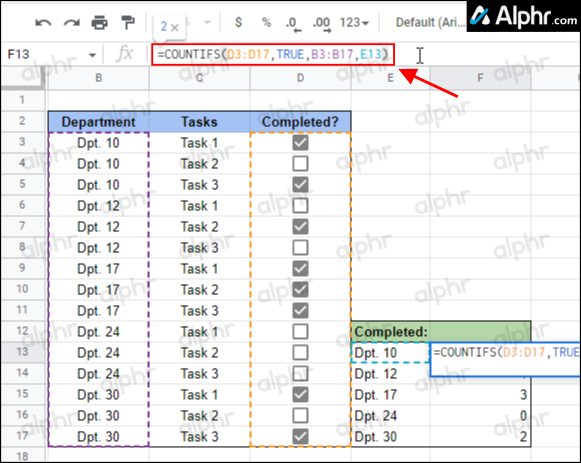


The above formula does the following:
- Cells D3 to D17 get checked for “TRUE” (checked off) values.
- The “TRUE” cells associate with the specific department number within B3 to B17.
- The results get filtered, so it only counts and displays’ Dpt. 10 data’ in cell F13.
- The ‘Dpt. 10 formula cell’ (F13) gets copied and pasted into other department formula cells (F14 to F17), and the formula automatically changes to the respective department (Dpt. 12, 17, 24, or 30).
As you can see, Google Sheets can easily count and report checked or unchecked boxes/cells and even break that data down into subsections based on applied conditions. The formulas in this article help you sort or tally items you labeled based on their completion status but feel free to branch off into other uses. You can use checkboxes for just about anything!
FAQs: Counting Google Sheets Checkboxes
How do I make a chart with the data gathered from checkboxes in Google Sheets?
Google Sheets can automatically recognize new rows added to a chart area and update a chart accordingly with dynamic ranges.
Let’s pretend the data in our project spreadsheet ranges from A through C, and cell “2” down to cell “22,” and is set up as follows:
· Column A lists the phases
· Column B lists the tasks, and
· Column C contains the checkboxes
We’ll create a dynamic range chart to accommodate two extra columns and a limitless number of rows. In this scenario, the data range would be A1 to E.
1. Select the cell range of your data, e.g., A1:E.
2. Click on “Insert” then “Chart.”
3. Via the “Chart Editor” under the “Data” tab, select the “Chart type,” e.g., “Column Chart.”
4. Ensure the following:
· The “Use row 1 as labels” and “Switch rows/columns” options are checked.
· The “Switch rows/columns” option is unchecked.
5. Under the “Horizontal Axis” option, select “Treat labels as text.”
How do I add custom values to checkboxes?
1. Launch your spreadsheet, then select the cells you want as checkboxes.
2. Select “Data” then “Data validation.”
3. Beside “Criteria,” select “Checkbox.”
4. Click on the “Use custom cell values” option.
5. Next to “Checked,” enter a number. Optionally, enter a number beside “Unchecked.”
6. Next to “On invalid data,” select a validation option. To display a validation message whenever you hover over the checkbox, choose “Show validation help text” next to “Appearance,” then add your message.
7. Select “Save.”


Disclaimer: Some pages on this site may include an affiliate link. This does not effect our editorial in any way.