The p-value is one of the most important concepts in statistics. When working on research projects, this is the output data scientists often use to find the statistical significance of two data sets.
But how do you calculate the p-value in Google Spreadsheets?
This article will show you everything you need to know about the topic. By the end of the article, you will be able to calculate the p-value and check your results easily.
What Is the P-Value?
The p-value is used to determine whether certain hypotheses are correct or not. Basically, scientists will choose a value or range of values that express the normal, expected result when data isn’t correlated. After calculating the p-value of their data sets, they will know just how close they are to these results.
The constant that represents the expected results is called the significance level. Although you can choose this number based on previous research, it is usually set to 0.05.
If the calculated p-value is way below the significance level, then the expected results are statistically significant. The lower the p-value, the more likely it is that your data expresses some kind of correlation.
Simple Summary
If you’re new to Google Sheets or formulas, we’ll break it down, so it’s easy to understand.
Functions are simple formulas that tell Google Sheets what data you want to extract from a set of numbers.
To find the P-Value (whether a set of numbers is statistically significant), we’ll use the T-Test function. If the outcome is lower than .05, the data is statistically significant. If it is higher than .05, we need more data.
To avoid the risk of ending up with false results due to flawed calculations, it is best to use tools like Google Sheets. Since the p-value is so significant, the developers have included a function that will calculate it directly. The following section will show you how to do it.
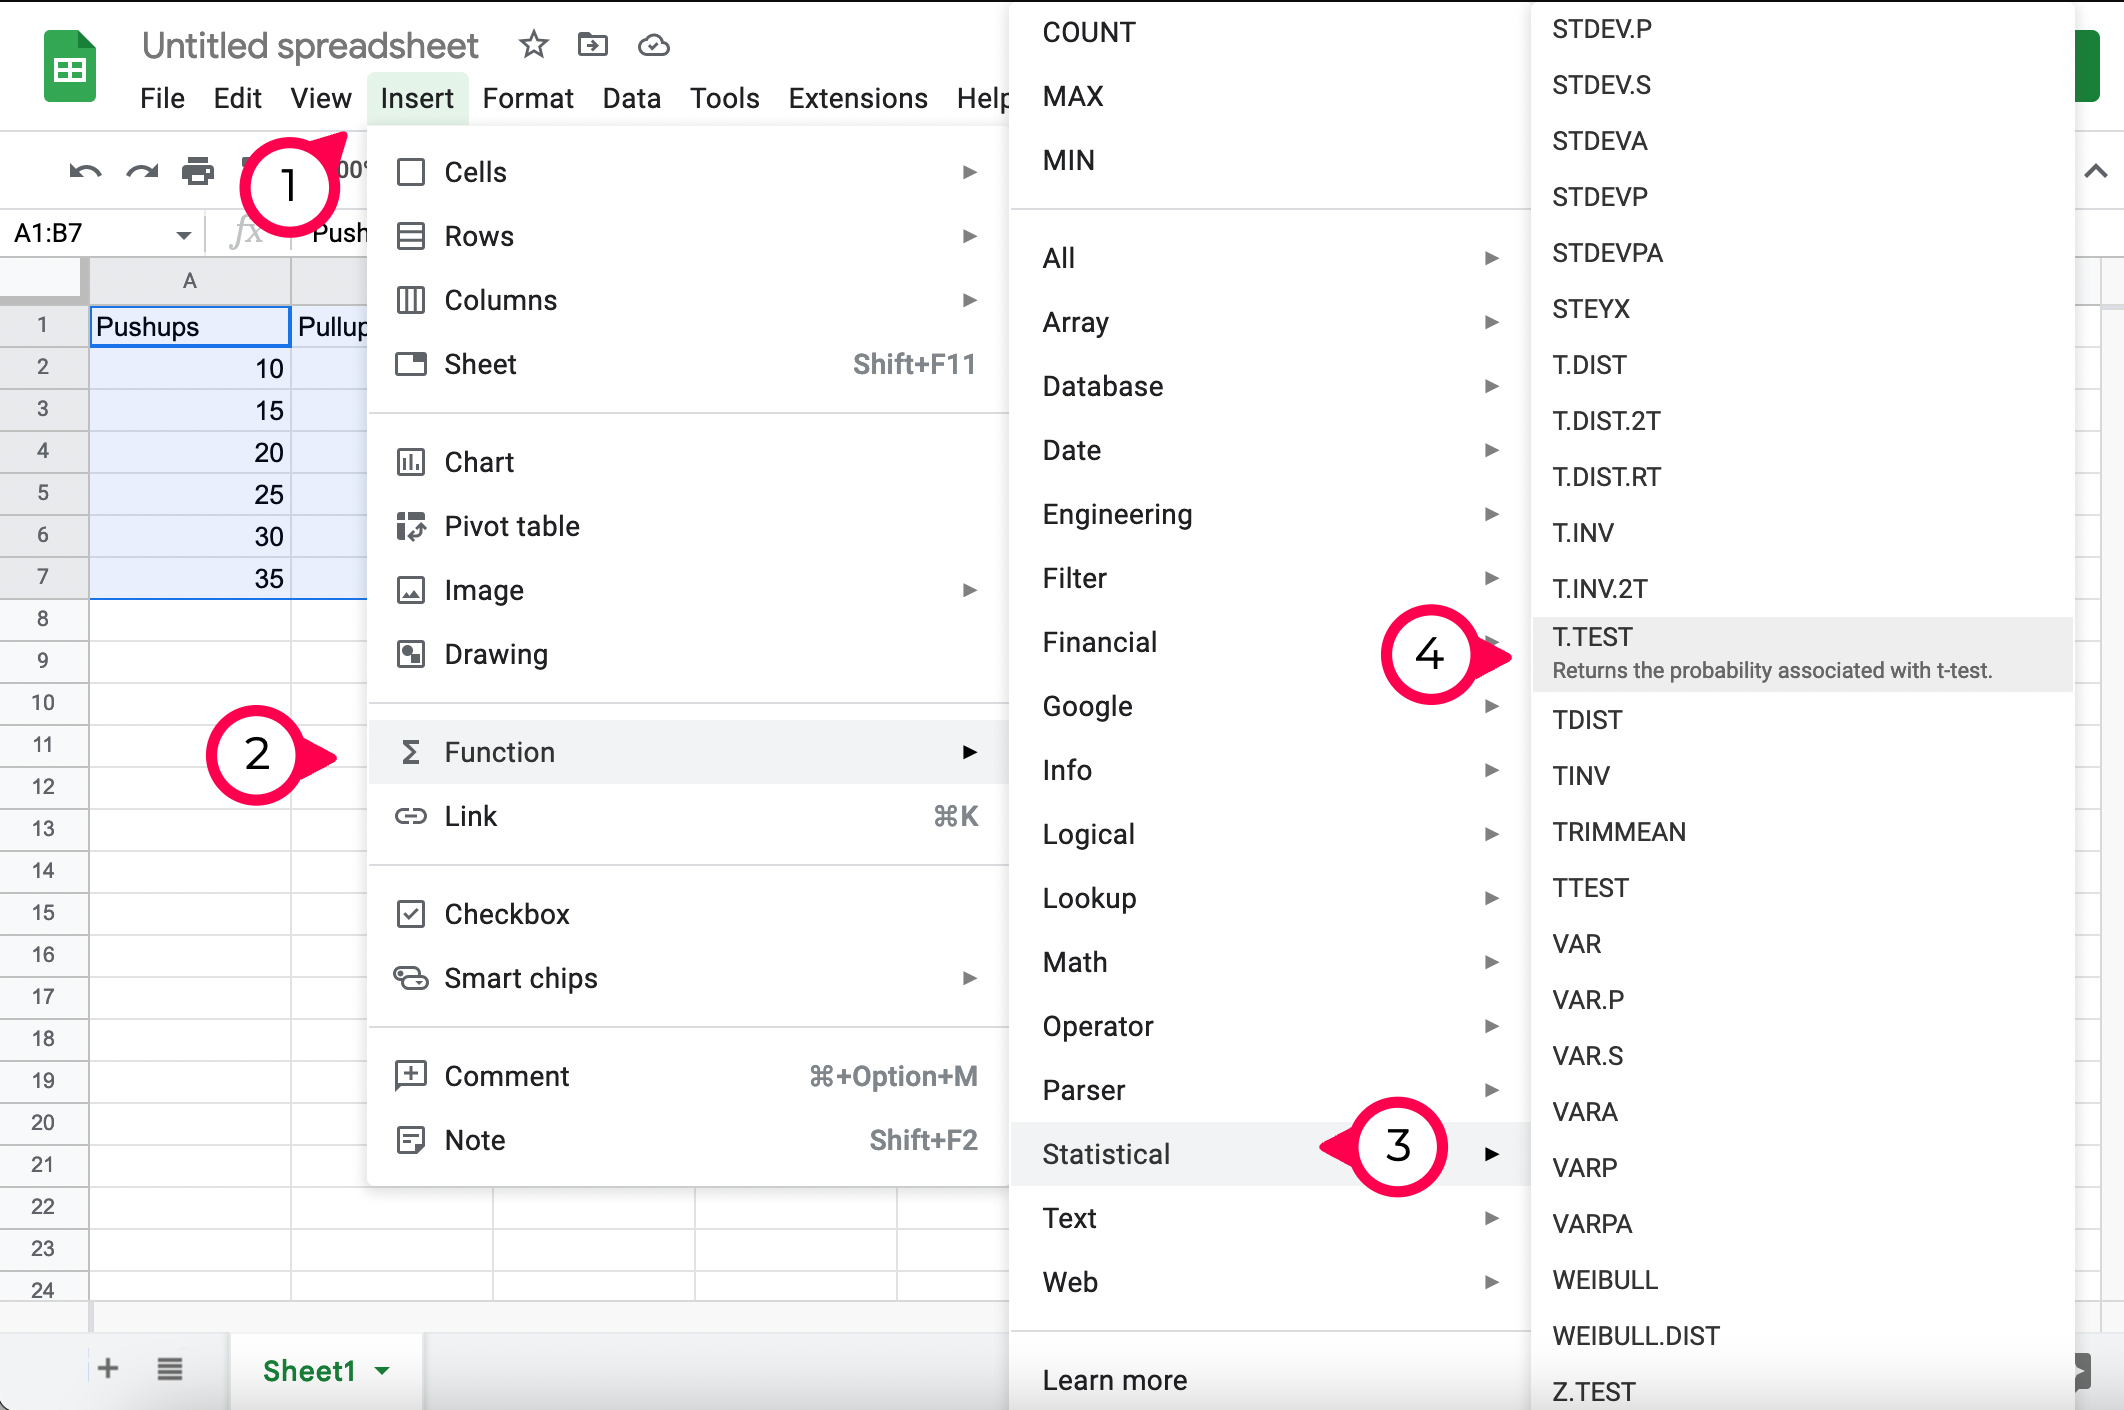
Here’s how to input data into the T-Test function and get the results:
- Click the box you want to input the formula.

- Click Insert at the top. Then, Select Function and Statistical. Then, click to insert the T.Test function.

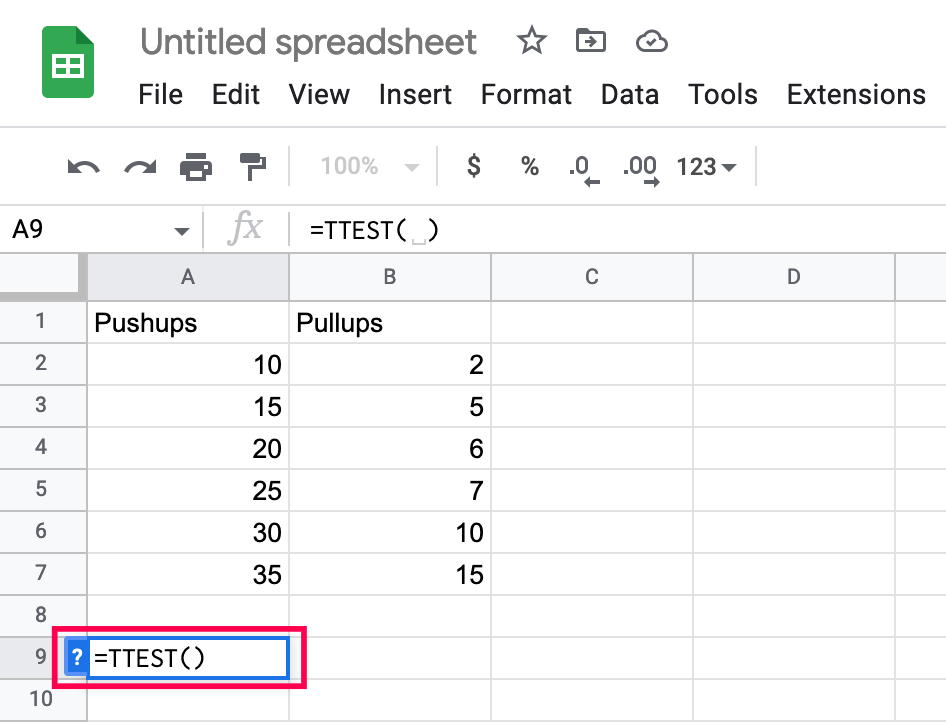
Now that you’ve inserted the T-Test function, here’s how to input the data:
List the first set of columns and rows:
- Input the first set as Column Number + Row Number.
- Include a comma after the first set.
- It should look like A2:A7 for our example.
Then, list the second set of columns and rows:
- Input the second set as Column Number + Row Number.
- Include a comma after the second set.
- Per our example, it would be B2:B7
Tell Google about the Distribution Tails:
- The number 1 means you’re working with One Distribution tail.
- The number 2 means you’re working with Two Distribution tails.
- Include a comma after 1 or 2.
Input 1, 2, or 3 as the final number:
- 1 is parameters for a paired test.
- 2 is for an equal two-sample test.
- 3 is for an unequal two-sample test.
- Include a comma after 1, 2, or 3.
Now that you understand how the function works let’s see if your data set is greater than or less than 0.5.
Calculating the p-Value in Google Sheets
The best way to explain this is through an example you can follow. If you already have an existing table, simply apply what you learn from the following tutorial.
We will start by making two sets of data. After that, we will compare the created data sets to see if they have statistical significance.
Let’s say that we need to examine data for a personal trainer. The personal trainer provided us with their client’s numbers regarding their pushup and pull-up progression, and we have entered them into Google Spreadsheet.

The table is very basic, but it will serve the purposes of this article.
To compare these two sets of data, we will need to use Google Spreadsheet’s T-TEST function.
This function’s syntax looks like this: TTEST(array1,array2,tails,type) but you can also use the syntax T.TEST(array1,array2,tails,type) – both refer to the same function.
Array1 is the first data set. In our case, that would be the entire Pushups column (except for the column name, of course).
Array2 is the second data set, which is everything under the Pull-ups column.
Tails represent the number of tails that are used for the distribution. You only have two options here:
1 – one-tailed distribution
2 – two-tailed distribution
Type represents an integer value which can be 1 (paired T-TEST), 2 (two-sampled equal variance T-Test), or 3 (two-sample unequal variance T-Test).
We will follow these steps to work through the example p-test:
- Name a column of our choosing, TTEST, and display this function’s results in the column next to it.
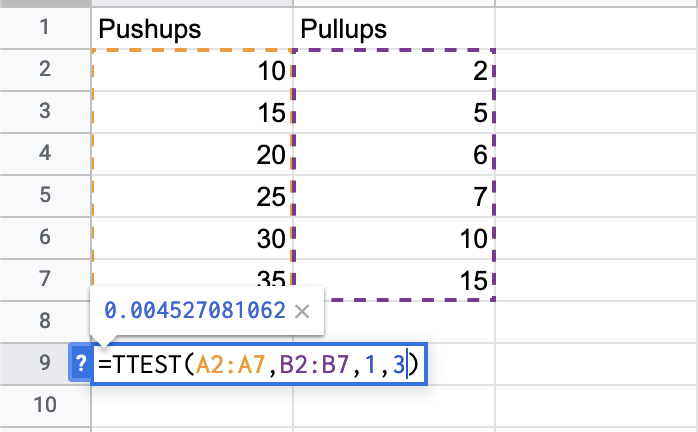
- Click on the empty column where you want the p-values to be displayed, and enter the formula that you need.
- Enter the following formula: =TTEST(A2:A7,B2:B7,1,3). As you can see, A2:A7 signifies the starting and ending point of our first column. You can simply hold your cursor at the first position (A2) and drag it to the bottom of your column, and Google Spreadsheets will automatically update your formula.
- Add a comma to your formula and do the same thing for the second column as well.
Notice the filled columns are now highlighted. - Fill in the tails and type arguments (separated by commas), and hit Enter.
Note: See the previous section for more explanation.

Your result should appear in the column where you have typed the formula.
Common Error Messages
If you have made a mistake typing your TTEST formula, you have probably seen one of these error messages:
- #N/A – displayed if your two data sets have different lengths.
- #NUM – displayed if the entered tails argument isn’t equal to 1 or 2. It can also be displayed if the type argument isn’t equal to 1, 2, or 3.
- #VALUE! – displayed if you have entered non-numeric values for tails or type arguments.
Calculating Data Has Never Been Easier with Google Spreadsheets
Hopefully, you have now added another Google Spreadsheets function to your arsenal. Learning about this online tool’s possibilities and features will make you better at analyzing data, even if you aren’t a statistician.
Do you have an alternative method that you use for calculating the p-value? Feel free to tell us all about it in the comments below.


Disclaimer: Some pages on this site may include an affiliate link. This does not effect our editorial in any way.