Echo devices bring Alexa into your home, allowing you to shop, control household electronics, and do dozens of other tasks. Sometimes, you’ll just be in the mood to hear a few songs from your Mac. Amazon’s Echo devices can also function as speakers and can easily connect to other electronics, taking your music library to anywhere Alexa is.
This article will show you how to connect your Mac to an Echo device and how to sync Alexa with Apple Music.
How to Pair an Amazon Echo Device with Mac Music Library
An Echo device has a lot of functions built into it, yet the easiest way to connect to your Mac is also one of the simplest functions it offers. Echo devices function very well as Bluetooth speakers, allowing for offline music to be played easily. There are many ways to pair your Mac with an Echo device via Bluetooth, each with a few different steps involved.
Cable Pairing
This is a quick and easy method to get your Mac to recognize your Echo device. Here’s what to do.
- Connect the Echo device with your Mac via USB.
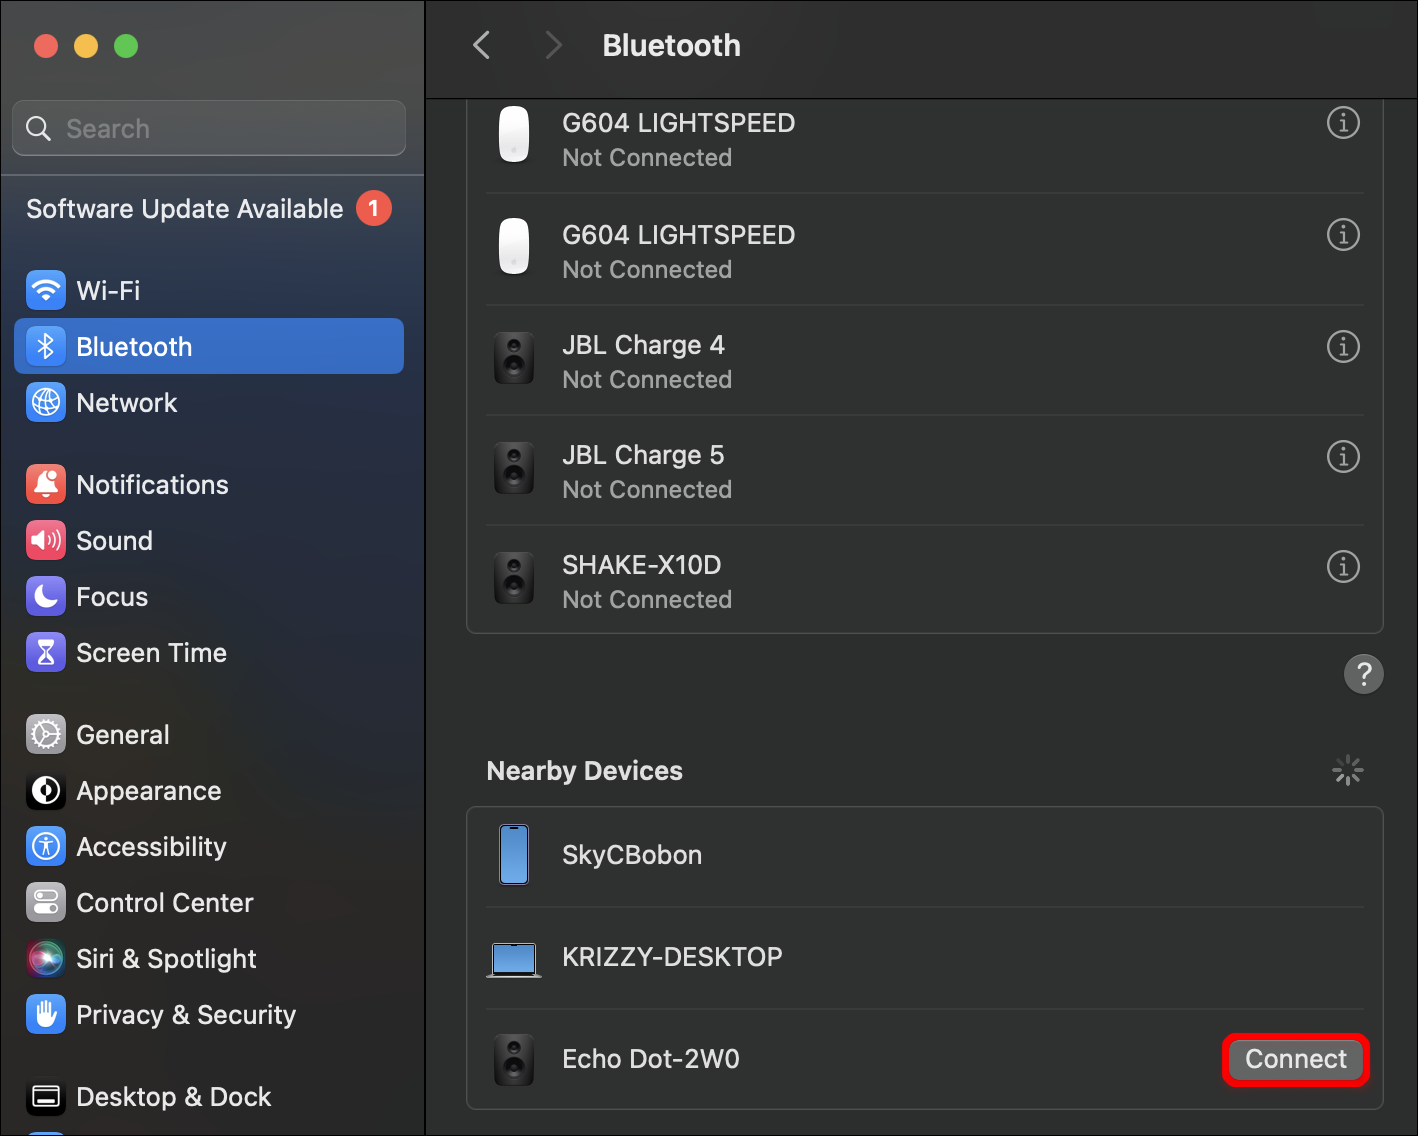
- Click the Apple logo in the top menu and select System Preferences.

- Select Bluetooth.

- Click the Turn Bluetooth On button.
- You’ll see a list of devices currently detectable by your Mac’s Bluetooth. Your Echo device should appear. If it doesn’t, tell Alexa to pair my device.
- Once your Echo device appears on the Bluetooth list, click the Connect button next to its name.
- You’ll hear a tone from your Echo device which indicates that the two devices are paired. Play some music to test.


Pairing via Alexa Account
You can also pair your two devices with your Alexa account. To do this, you’ll need to access its settings via your browser. Here’s how:
- Go to your Alexa account at alexa.amazon.com and log in.
- Select Settings in the sidebar.
- Find the device on the list and select it.
- Click Bluetooth, then select the blue Pair a New Device button.
- Your Echo Device will begin searching for Bluetooth devices close by.
- Click the Apple logo in your top menu, then System Preferences.
- Go to Bluetooth, then ensure that your Bluetooth is on.
- You should see your Echo device listed under Devices. Click the Connect button.
- Your two devices should then pair and you’ll hear a tone confirming this on your Echo device.


Using the App
Alexa also comes with its own dedicated app, which can be downloaded to your iPhone or iPad for a smoother pairing process. While the app doesn’t yet have a Mac version, the iOS app can act as a middleman for getting your Echo device paired with your Mac. If you already have the app, skip the first two steps. Here’s what to do:
- Go to the App Store and search for Alexa. Download the app.
- Open the app and enter your login details.
- In your app, select Echo Devices.
- Select the Echo device to pair with your Mac.
- Tap Connect a device.
- Open Bluetooth in your Mac’s System Preferences and you should see your Echo device listed.
- Click on Connect, and your devices should be paired if you hear a tone.
- You should now be able to play music.


You can also use the app to pair your iPhone or iPad with Alexa at any time. Just repeat the process, but pair your mobile device instead of the PC.
Pair Your Echo Device With Apple Music
If you access most of your music on Mac via an Apple Music membership, then you can also get your Echo Device to sync directly with the service. It also means you don’t have to keep the Mac open to play music.
To do this, you’ll need an active Apple Music subscription and the Alexa app installed on an iOS device. You’ll first need to configure Alexa. Here’s what you need to do:
- Open the Alexa app on your smart device.
- Tap the More button, then select Skills & Games.
- Type Apple Music into the search bar.
- Press Enable To Use.
- You’ll have to link your Apple account with your Echo device. Tap Settings, then Link Account.
- Follow the prompts and sign in with your Apple ID.


To play Apple Music songs on your Echo device, you’ll need to prompt Alexa by saying, “play [song title] on Apple Music.” You may also need to include the author to get a correct result. If you want to streamline the prompt, you can always make Apple Music your default music player. Here’s how:
- In the Alexa app, tap the More button.
- Go to Settings, then Music & Podcasts.
- Choose Default Services, then select Apple Music.
- Your Echo device should now play Apple Music by default.


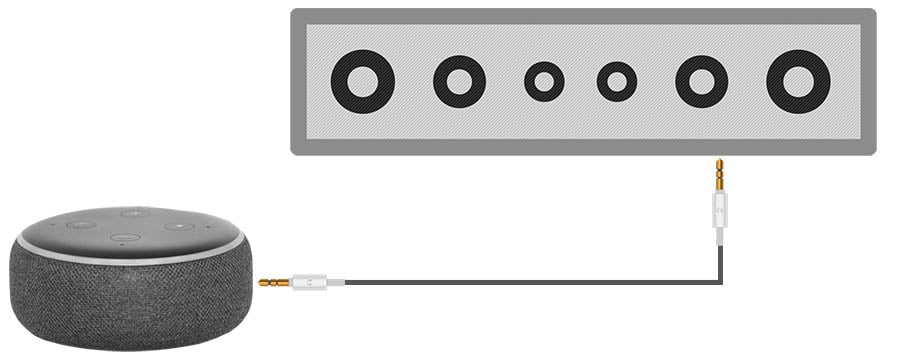
Linking Your Echo to Other Speakers
You may want to listen to music from another room in the house, or you may feel that your current music needs a little extra kick. In either case, it’s also simple to link Alexa to other Bluetooth speakers, either by audio cable or Bluetooth. This is done by directly connecting an Echo device to a different speaker.
To connect via cable:
- Get a 3.5 mm male-to-male audio cable.
- Plug one end into the Aux Out port of your Echo device.
- Put the other end into the Aux In port of your external speaker.
- Play music to test the connection.

For the wireless alternative with more range, you can use the Bluetooth connection, but you’ll need to make sure that your Bluetooth speaker is compatible with your Echo device. Here are the steps to follow:
- Access the Alexa App on your smart device and select Echo Devices.
- Choose your device and tap Connect a device under the Bluetooth heading.
- Ensure that your other speaker is nearby and its Bluetooth is enabled.
- Tap the speaker when it appears on the app to pair with your Echo device.
- A tone should sound on both speakers. Play a song to test the connection.


Turn Up the Music
Music is a great addition to any task or chore, and Amazon makes linking its Echo devices to your Mac or Apple Music very easy to do. While Alexa won’t be able to sync fully with your Mac’s systems, you can simply use its function as a Bluetooth speaker to play your iTunes library offline or online. All that’s left to do now is to pick your favorite song.
What’s your default music player on your Echo device? Do you prefer linking your Mac or Apple Music? Let us know in the comment section below.


Disclaimer: Some pages on this site may include an affiliate link. This does not effect our editorial in any way.