Device Links
A single Zoom meeting can involve hundreds of participants. But what if you need to accurately verify who’s attended a class or work meeting? Luckily, as an admin user of a paid Zoom account, you’ll have access to attendance reports for the meetings you’ve hosted over the past 12 months.
In this article, we’ll explain how to obtain meeting attendance reports, registration reports, and poll results when accessing your Zoom account from your web browser and personal devices.
How to View Who Attended a Zoom Meeting on a PC
Depending on the size of the meeting, the report is typically generated approximately 30 minutes after the meeting has ended. But do note that it could take up to one hour for larger meetings. To access your meeting attendance report, follow these steps:
- Sign in to Zoom from your web browser.

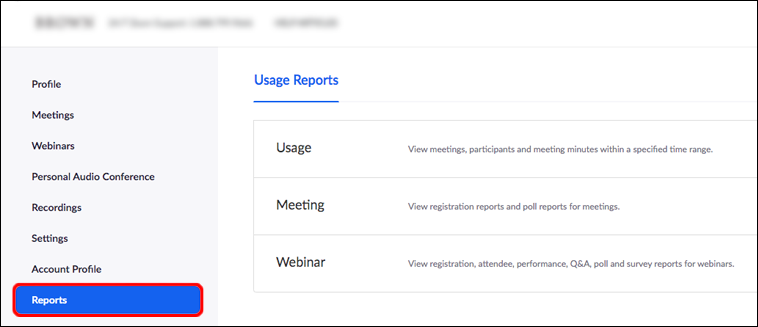
- Click on Reports from the left menu.

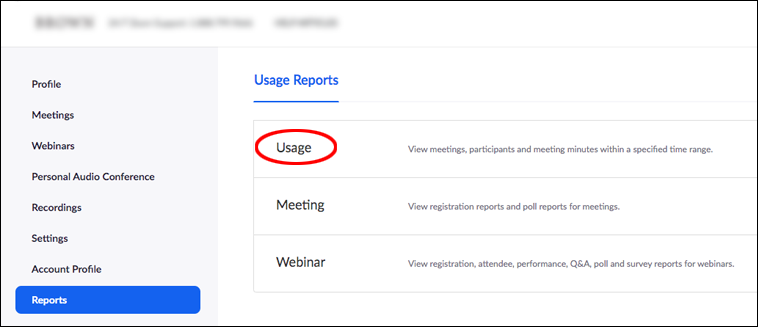
- Click Usage.
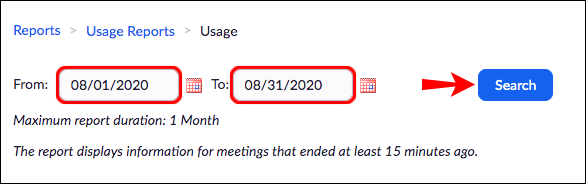
- Enter the date range for the meeting you wish to view a report for, then Search.
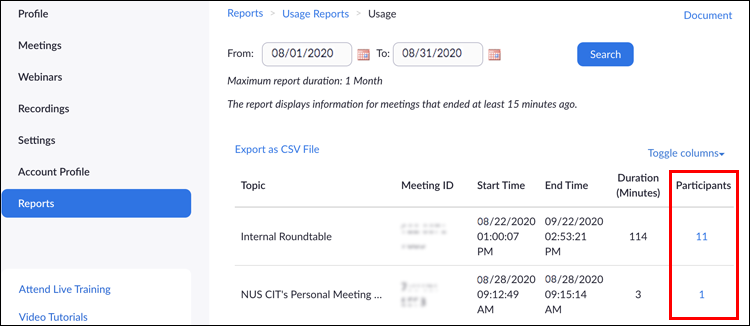
- Find the meeting, then scroll to the right to see the Participants column.
- Click on the blue number of participants.
- In the Meeting Participants popup window, check the Export with meeting data to include meeting information.
- To consolidate the list to unique users, check the Show Unique Users option. Should a participant leave and rejoin the meeting a few times, the report will only show their total attendance time.
- To download the report, click Export.


How to View Who Attended a Zoom Meeting on the iPhone?
In the same way as PCs, you can generate a detailed participant report on an iPhone 30 minutes after the meeting. But for large meetings, it could take up to one hour. Access your meeting attendance report by following these steps:
- Open a web browser and sign in to your Zoom account.
- Tap on Reports from the left menu.
- Tap Usage.
- Enter the date range for the meeting report you want to see, then Search.
- Go to the meeting then scroll right to the Participants column.
- Click on the blue number of participants.
- In the Meeting Participants window, check the Export with meeting data checkbox to include meeting information.
- To consolidate the list to unique users (not including participants leaving and re-joining, for example) check the Show Unique Users checkbox.
- Tap Export.
How to View Who Attended a Zoom Meeting on an Android Device
Again, the meeting attendance report is usually generated 30 minutes after the meeting ends. However, for larger meetings, it could take up to one hour. Use the steps below to access your meeting attendance report:
- Sign in to Zoom from your web browser.
- Tap Reports from the left menu.
- Tap Usage.
- Enter the date range for the meeting you wish to view a report for, then tap Search.
- Go to the meeting then scroll right to the Participants column.
- Tap the blue number of participants.
- In the Meeting Participants window, check the Export with meeting data checkbox to include the meeting information.
- To include participants’ total meeting attendance time, check the Show Unique Users checkbox.
- To download the report, tap Export.
Additional FAQs
How do I view a meeting registration report?
Scheduling meeting registration is great for capturing additional information about your attendees. You can verify who attended and have contact details should you want to contact them after the meeting. To set this up, you must first enable it in Zoom. Here’s how it’s done:
1. Sign in to your Zoom account.
2. Click on Meetings via the menu.
3. Select Schedule a Meeting or edit an existing meeting.
4. From the Registration section ensure the Required check box is checked.
5. Once you’ve scheduled a meeting, the Registration and Branding tabs will appear.
To see who has registered for a meeting:
1. Select Reports then Usage.
2. Click Meeting. A list of future and past meetings will display.
3. Beside Report Type choose Registration Report.
4. Click on the drop-down menu beneath Report Type then to search by:
· Time range select Search by time range.
· Meeting ID select Search by meeting ID.
5. Click Search.
6. Click Generate in the last column. Or use the checkboxes to select multiple reports.
Zoom will open a new browser window and begin downloading your registration report.
How do I view a meeting poll report?
The poll report shows a basic breakdown of the results for each question. You can see who voted for each option by downloading a full report. To see the poll results for your meeting, follow the steps below:
1. Sign in to your Zoom account from a web browser.
2. Select Reports from the left menu.
3. Click Usage.
4. Select Meeting, a list of previous and future meetings will display.
5. Beside Report Type click Poll Report.
6. Click on the drop-down menu beneath Report Type then to search by:
· Time range, choose Search by time range.
· Meeting ID, choose Search by meeting ID.
7. Click on Search.
8. Select the blue Download link for the poll report you wish to see.
Zoom will open your default browser, then begin to download the full poll report.
Checking Up on Attendance
Meetings and webinars held via Zoom’s video conferencing platform can cater to hundreds of connections in one meeting. It is a powerful meeting reporting tool that accurately provides information on attendance, registration, and opinion poll results.
These features are useful should you need to check attendance, confirm pre-meeting interest, or keep a record of people who registered for an event but did not attend. All reports are accessible for your own meetings when you have admin permissions for a paid account.
How do you think Zoom’s features contribute to the smooth running of meetings? Could they improve their video conferencing experience? Let us know in the comments section below.


Disclaimer: Some pages on this site may include an affiliate link. This does not effect our editorial in any way.