The monitor is the most visible and often underappreciated part of any computer system. It’s where your movies play, your spreadsheets are displayed, and your gaming adventures come to life. Over the last twenty years, LCD and LED monitors’ slow but sure development and improvement have put top-quality displays within reach of even the most limited budgets. The older CRT monitors are all but extinct from the marketplace.
Monitor flicker, unfortunately, hasn’t followed CRT monitors onto the ash heap of history. Although the new monitors are far more reliable than the old CRT technology, it is still possible for them to develop a flicker, but don’t panic. If your computer monitor does start flickering, it doesn’t automatically mean it’s the death of that piece of hardware. It could just mean a driver refresh is required or that you or someone else previously made changes to the Windows configuration.
In this article, you’ll troubleshoot your flickering monitor so that you can find out what’s wrong and fix the issue.
Why an LED Computer Monitor Flickers
Even though the display on your computer screen looks like a static picture, it’s not. Instead, the image gets redrawn constantly and erased rapidly so your eyes can’t perceive it. If you’ve ever tried to take a picture of an LED monitor, you may have seen some degree of flicker in the form of lines. This scenario is especially prevalent in 60Hz monitors. Regardless, a modern screen can refresh up to 100 times per second or even more with new technology. This action refers to the refresh rate, which is measured in Hertz. The lower the refresh rate, the more flicker you may experience.
Another reason your monitor flickers is the brightness and contrast levels. The darker the screen, the easier it is to see flickering.
Lastly, the backlighting on many budget-friendly monitors uses PWM (pulse width modulation) for the backlights, leading to more noticeable flickering.
Monitor Refresh Rates Explained
When you look at monitor specifications, you will see a number such as 60Hz, 100Hz, or something else. The number indicates how many refreshes occur per second. On a 60Hz monitor, the screen refresh runs 60 times per second. A 100Hz monitor will refresh 100 times per second. The faster the refresh rate, the quicker the display reacts to changes and the smoother the experience. This outcome is why 100Hz TVs became so popular and why 100Hz computer monitors are ideal for gaming, where the display changes constantly.
Some people are keener on refresh rates than others. A gamer considers a higher refresh rate better for their gaming experience, mainly because a lot of movement and fast action occurs. Some people can run monitors as slow as 60Hz and still feel satisfied, such as businesses that only use the monitor for customer service or office spreadsheets. Like video editors, other people prefer high refresh rates to produce better clarity in their editing processes.
Pulse Width Modulation Explained
Many monitors use PWM (pulse width modulation) backlighting techniques, which lead to rapid flickering, even if the eye cannot see it. PWM turns the lighting on and off rapidly and is designed for adjusting LED brightness levels. PWM’s method for dimming backlighting is to change the speed of the on/off action, which creates pulses that make the LEDs appear dimmer. As the brightness gets reduced, the flicker is generally more noticeable. Many monitors on the market use PWM to save money, but there are some bargains on non-PWM models. You have to do your homework. Flickering generally leads to eye strain, headaches, and more. Overall, flicker-free backlighting helps prevent health issues and improves visual performance.
Steps to Fix a Flickering Computer Monitor
1. Check The Monitor Cable
Both sides of a monitor DVI cable have screws to hold them in place, but not everybody uses them. Ensure both ends of the connectors are tightly held in place. The cable may be defective if securing the connection doesn’t fix the flicker. Grab a spare one and swap them to see if that resolves the problem.
2. Check the Power
Check that both ends of the power cable are also secure. A loose power cable can sometimes cause a screen to flicker; usually, a buzzing sound accompanies it.
3. Check Display Settings (Windows)
If you have recently updated your graphics driver, check the display settings to ensure nothing has changed.
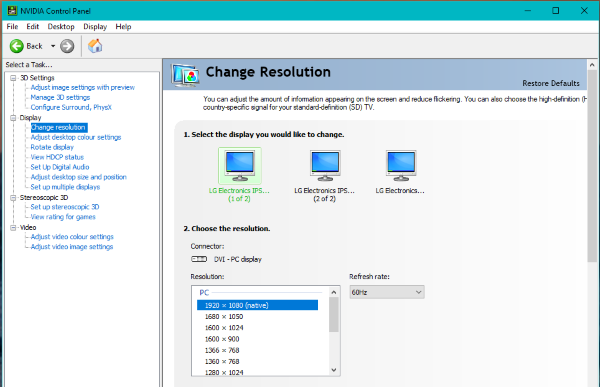
- Right-click a blank space on the desktop and select your graphics card, such as NVIDIA Control Panel. The menu option will vary depending on the manufacturer of your video card.

- Within the graphics control panel, click on “Change resolution.” Select the flickering monitor in the options and make sure the refresh rate is at least 60Hz. If you have a 100Hz monitor, set it to that. Save any changes and retest.
You can also check through Windows 10 Settings.
- Navigate to “Settings” and click on “System.”

- Scroll down and select “Advanced display settings.”
- Select “Display adapter properties for Display [#]” for the correct monitor.
- Select the “Monitor” tab and check the refresh rate from there.


4. Check Your Graphics Card
Issues with the graphics card can sometimes cause a monitor to flicker. These situations are unusual, but it is a possibility. The problem isn’t your graphics card if you have multiple monitors and only one screen acts up. If all monitors, or your only monitor, flickers, it is worth checking out the hardware and connections.
Ensure your graphics card has no accumulated dirt and dust on the surface. Ensure the cooling fan is working and that all case fans are running when they should. Use Speedfan or a similar program to monitor the temperature of your graphics card, as overheating is a prime cause of most issues. If all looks okay, it might not be your graphics card causing the flickering.
5. Check The Monitor
The final potential cause of your computer monitor flickering is the monitor itself. You can try testing it by changing the port you are using. If you use a DVI connection, use the VGA or DisplayPort output. If nothing changes, you may need to borrow another monitor to test or test your monitor on another computer that you know works fine. If the monitor flickers on another computer or with a different hardware connection, then sad to say, your monitor has probably reached the end of its life.
Monitors are repairable, but the repair will likely cost more than buying a new one unless your monitor is very high-end and expensive.
In closing, there are several reasons why a monitor can start flickering. Thankfully, it doesn’t always mean you need to buy a new monitor. Often enough, a simple tweaking of display settings will remedy the situation. Hopefully, these suggestions will help you diagnose your monitor flicker problem.
Related Posts
 How To Force a Program to Open on a Specific Monitor
 How to Use a Tablet or iPad as a Second Monitor
 How to Use an Android Device as a Second Monitor
 How To Turn Off Your Monitor With Keyboard
 How To Lock a Mouse to One Monitor
 How to Match Screen Colors on a Multiple Monitor Setup
 How to Move Your Dock to Another Monitor on Mac
 How to Close a MacBook and Use Monitor
Disclaimer: Some pages on this site may include an affiliate link. This does not effect our editorial in any way.