Device Links
Streaming Netflix is possible over various devices, platforms, and apps, and Discord users have developed a creative way to do so. Discord is a platform that lets gaming enthusiasts gather around similar interests and communicate while streaming content.
In this article, we’ll talk about using Discord to stream movies and TV shows from Netflix and how to solve problems with video and audio. Furthermore, you’ll find out what Go Live is and why it might be the best solution for you and your friends.
How to Stream Netflix on Discord from a PC
Streaming Netflix through Discord allows you to communicate with your friends while watching something together, even if you’re far apart. If you’re using Discord on your Mac or Windows computer, here’s what you have to do to stream Netflix:
- Open your web browser and navigate to the Netflix website.

- At the same time, open Discord and ensure it’s connected to a server.

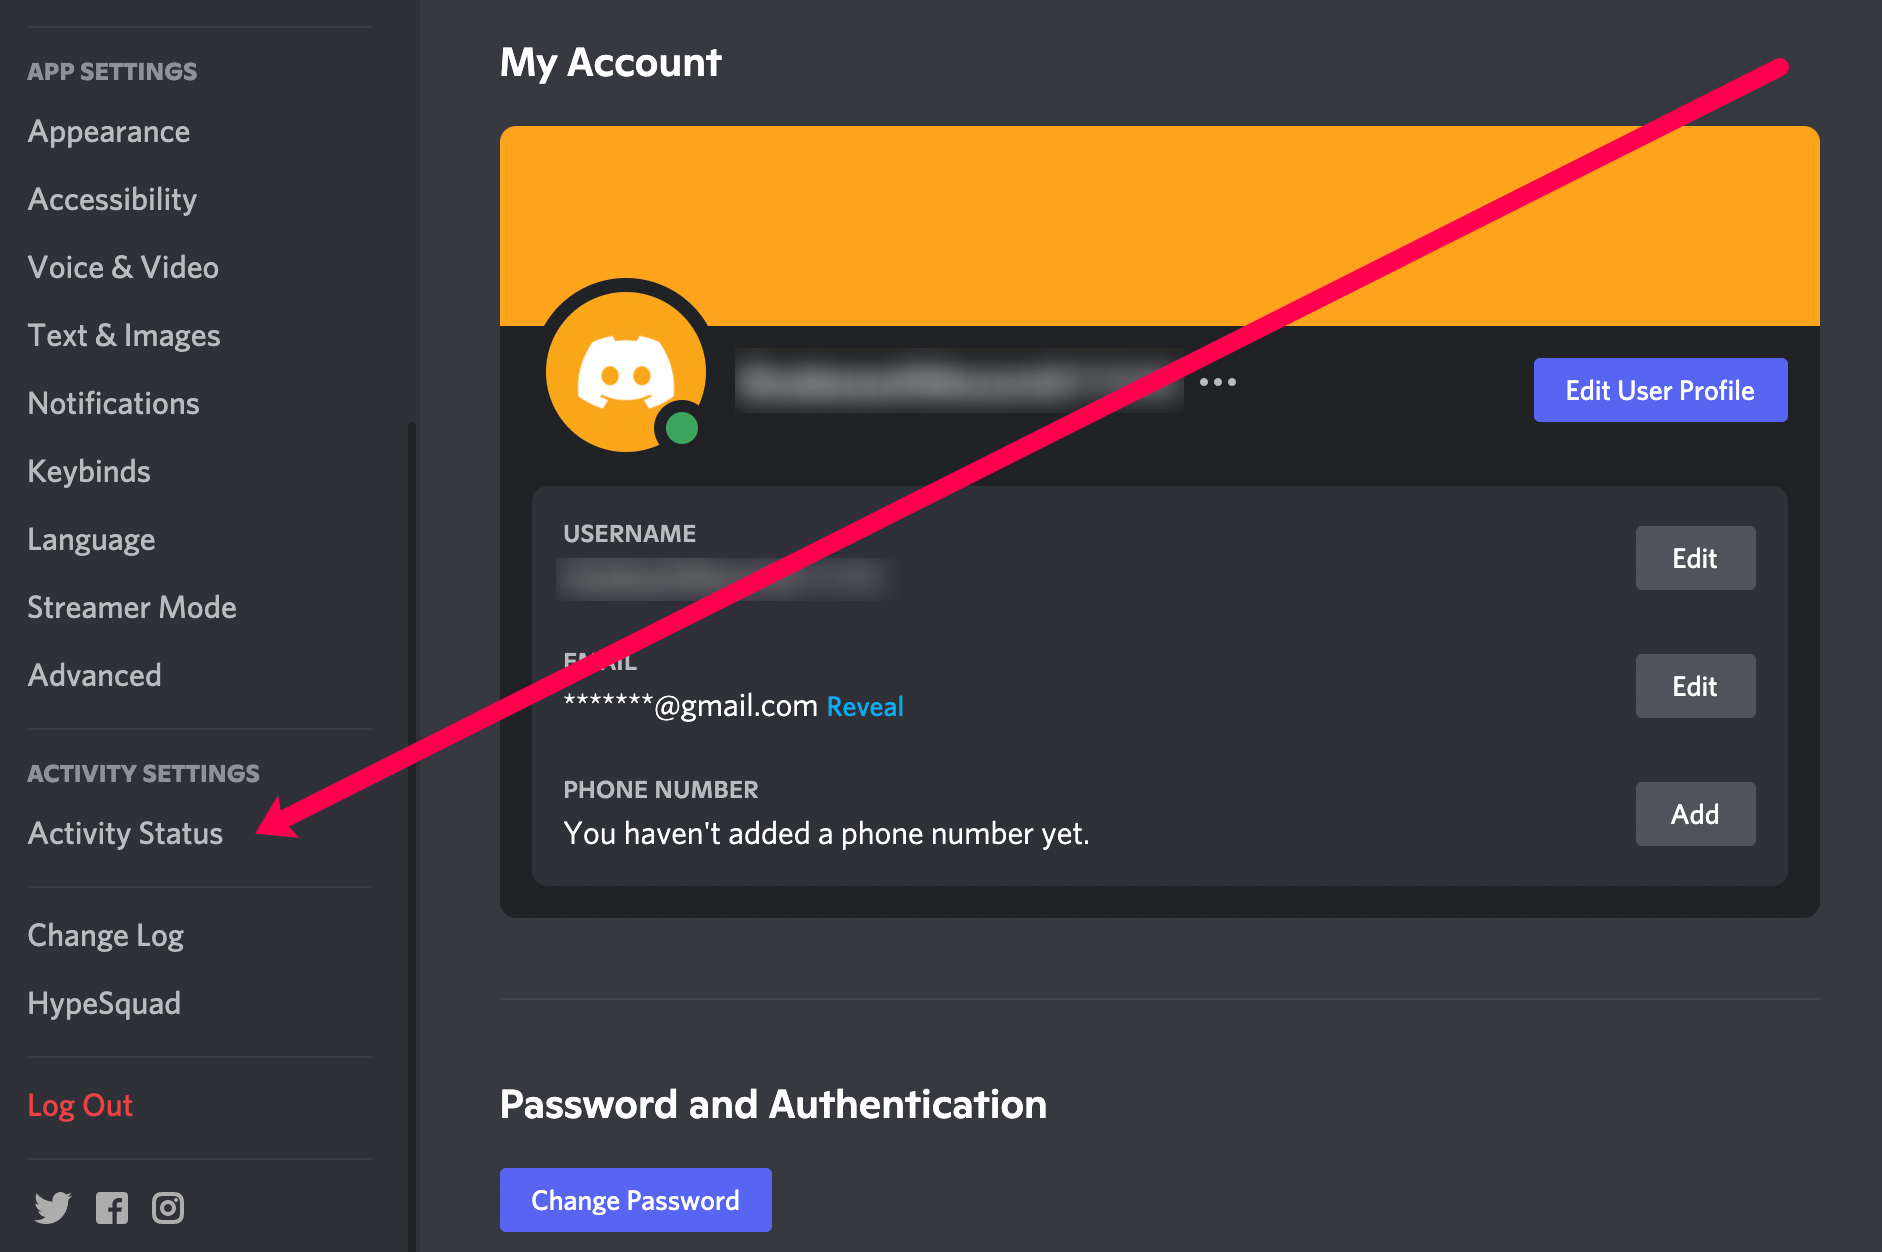
- Click on Settings at the bottom of the page and decide which Activity Status you’d like to use.
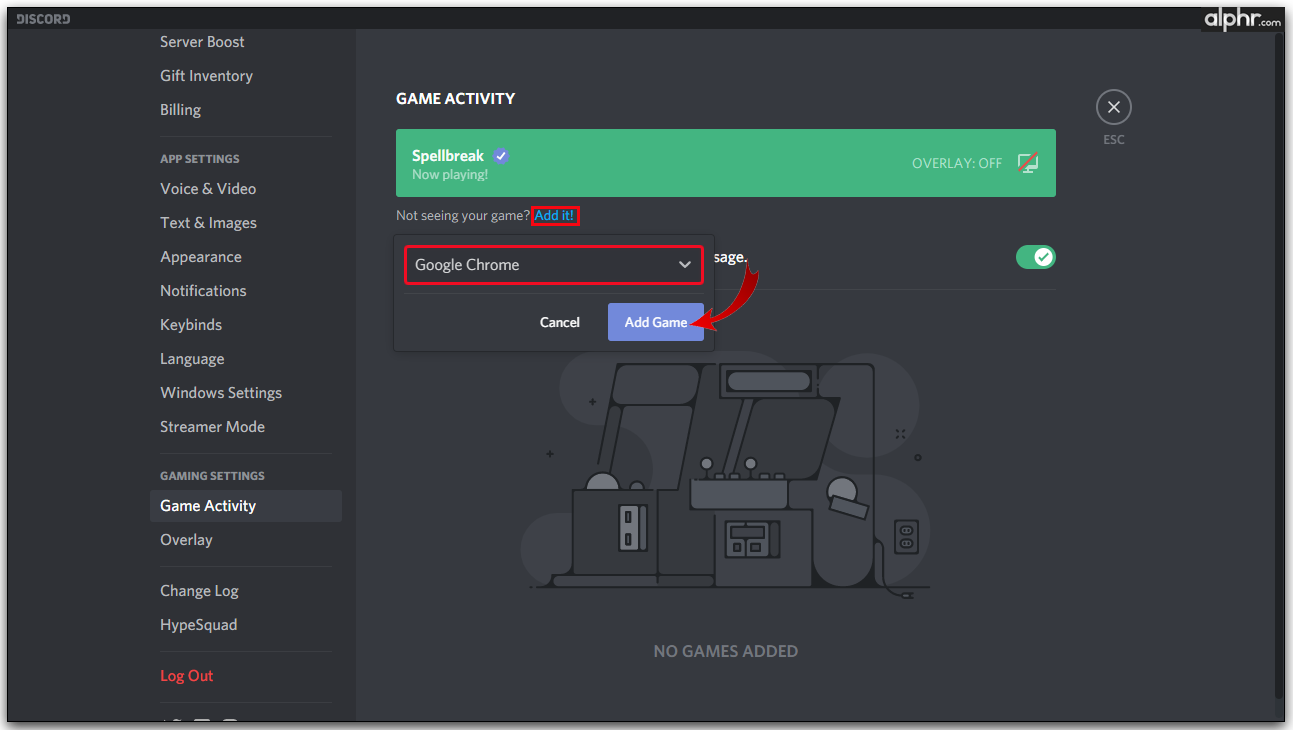
- Click on Add it and select the tab in your browser with an active streaming service. When you select Netflix, click on Add Game.
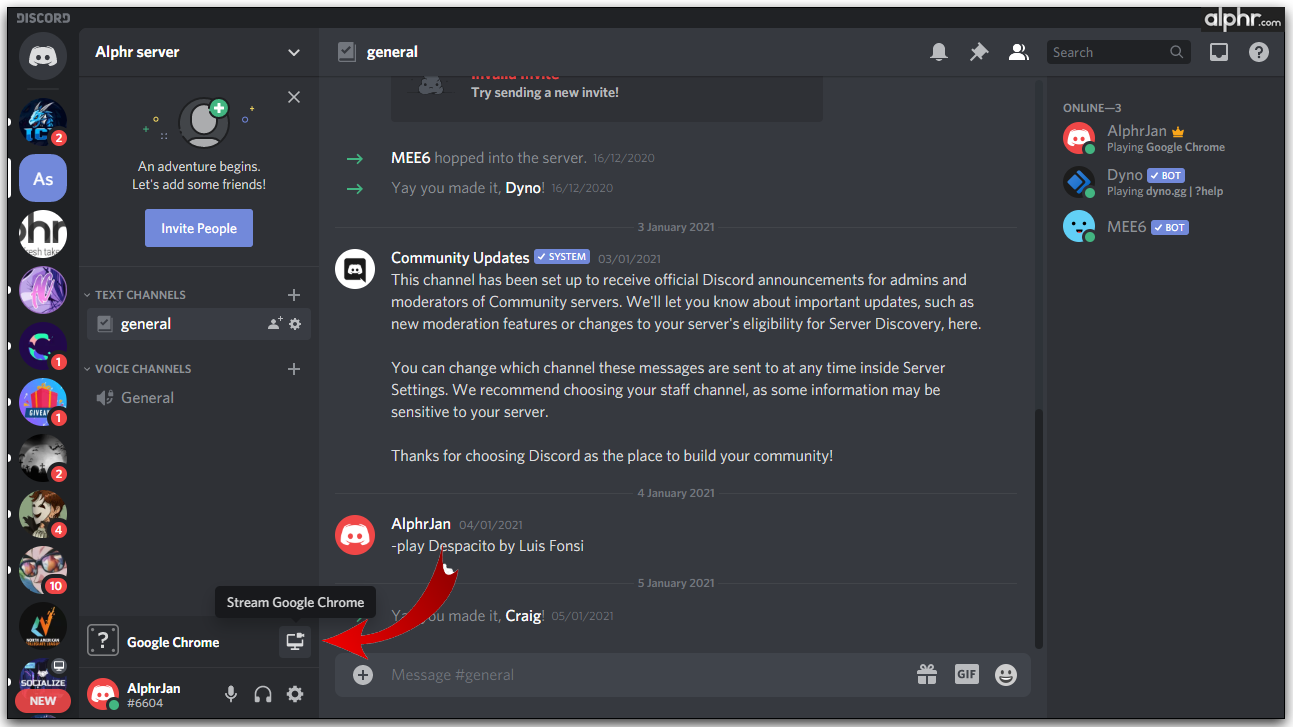
- Once you leave Settings, click on the screen icon in the lower-left corner.
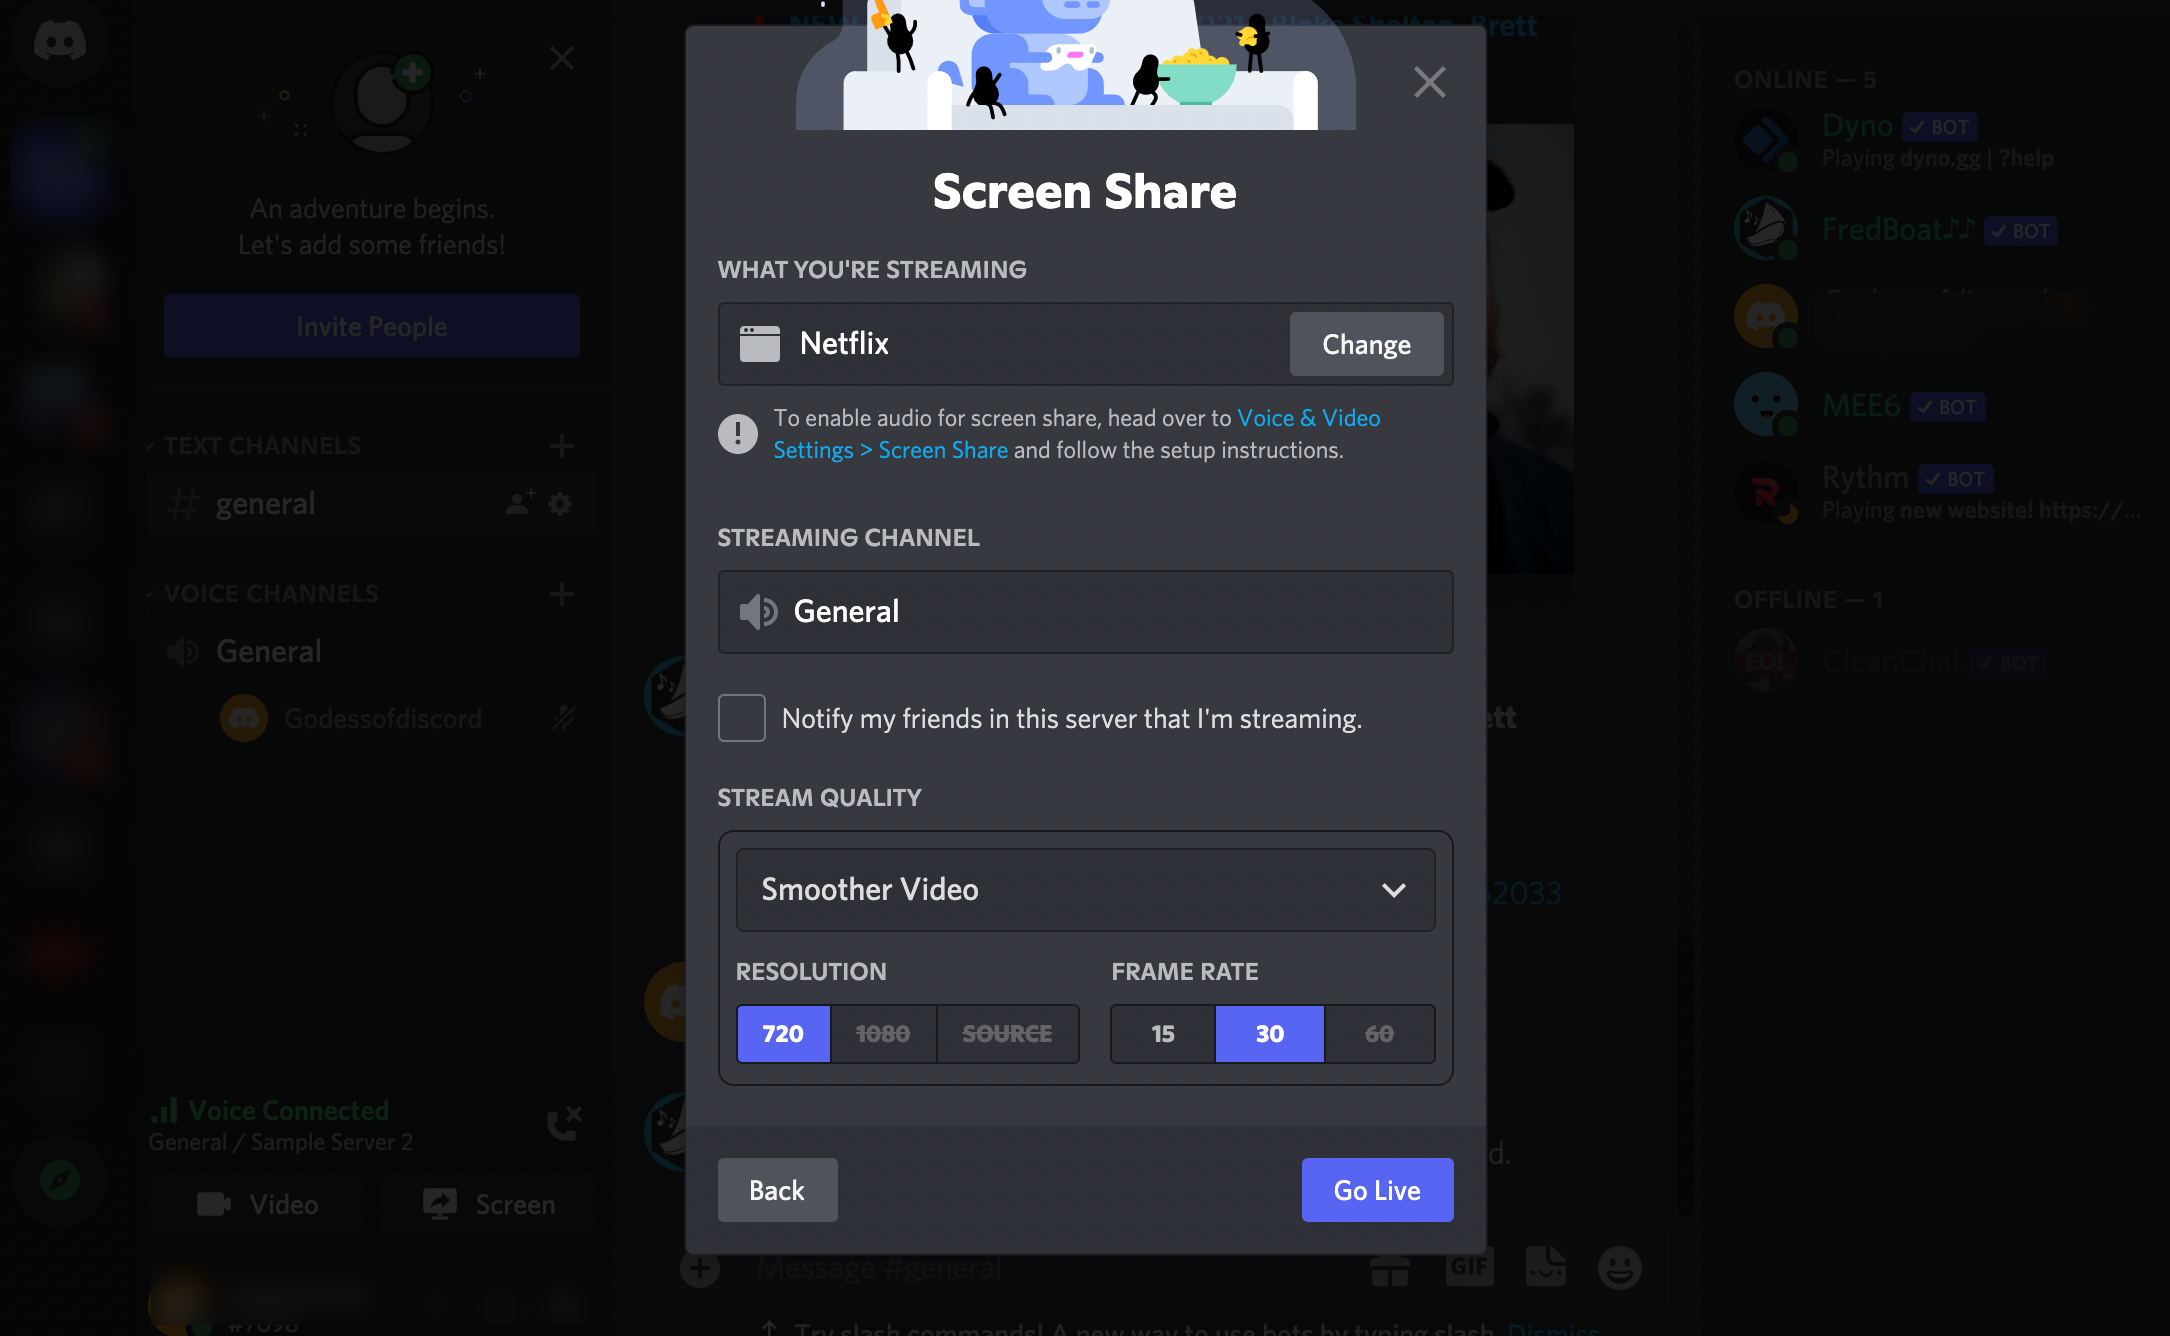
- In the Screen Share pop-up, select the browser tab you want to stream.
- Adjust the streaming settings.
- Click on Go Live and start streaming Netflix.
- Now, head back to Netflix and play the title you’d like to share.


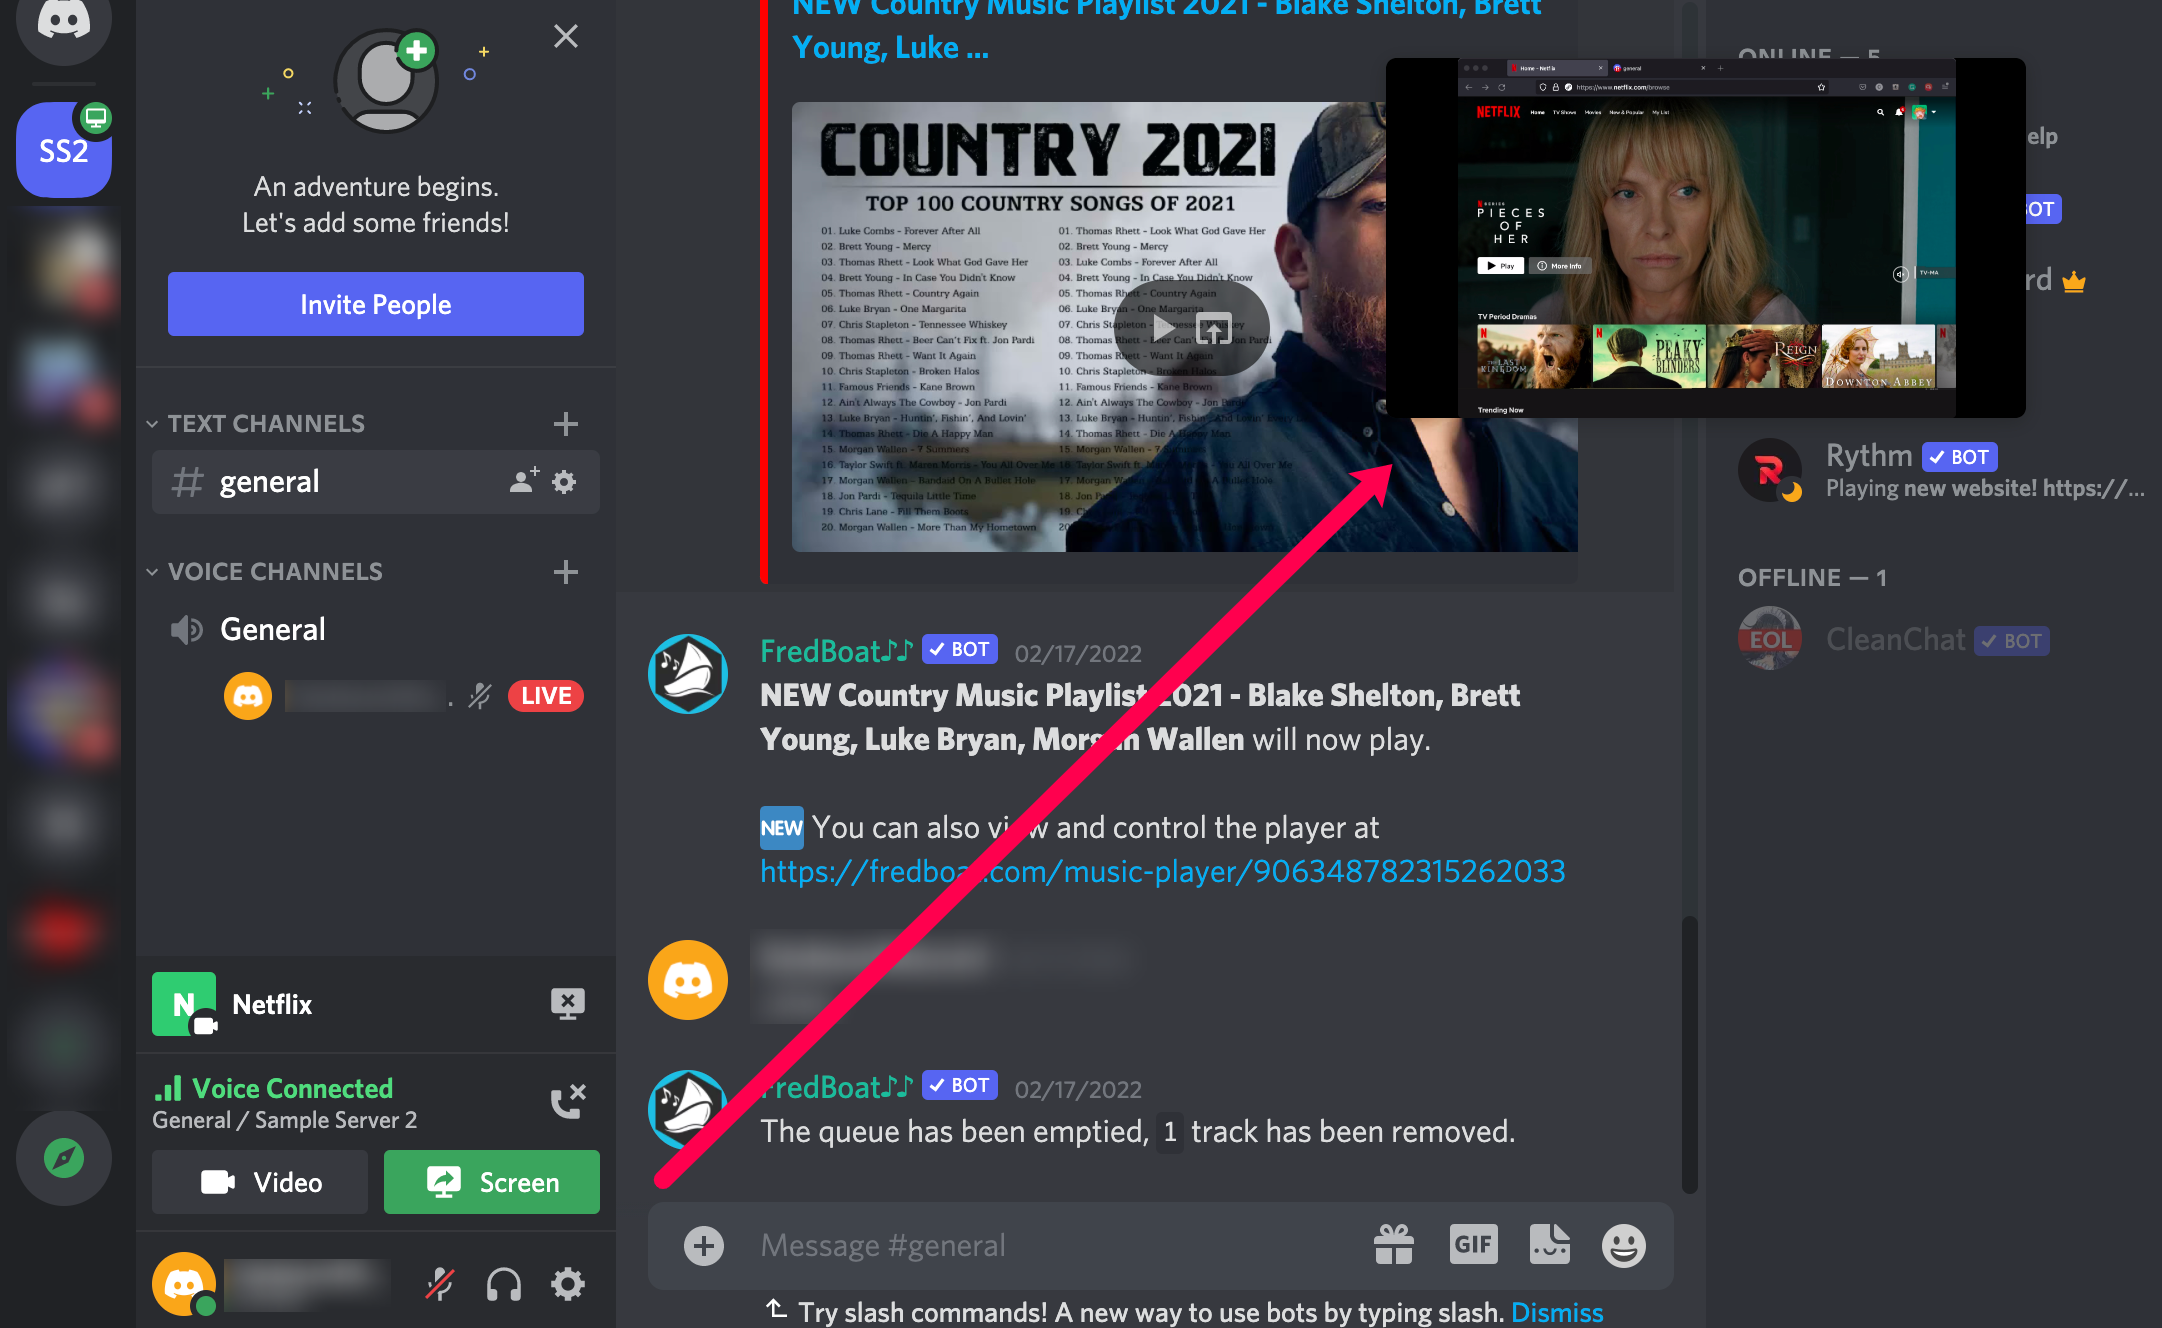
The thing that makes Discord streaming so interesting is that you can stream a movie or a TV program, leave your camera on, and let your friends see your reactions to what’s happening on the screen.
How to Stream Netflix on Discord with Audio
Audio issues are some of the most common problems among players and viewers on Discord, and it’s essential to figure out what’s causing them before you go live. There are several reasons you can sometimes stream content from another platform but can’t hear any sound.
One of the most common reasons is that Discord often needs administrative access to your computer. If your drivers are not functioning, you won’t be able to watch a movie or be a part of the game, as you won’t be able to hear anything.
Another issue that users have reported is malfunctioning audio drivers on their devices. When this happens, it usually means that the drivers are corrupt. In that case, you’ll see the images clearly, but unfortunately, without any sound.
Lastly, the Screen Share feature lacks stability and can create problems with the audio signal even in its initial phases. Ensure you’ve enabled all your audio devices and given Discord permission to use them.
Note: If you’re having trouble streaming with audio on a Mac, some extra steps are needed to incorporate audio functionality. View Discord: audio streaming on a Mac for more information.
How to Stream Netflix on Discord Without Black Screen
If you’re using Discord, there’s a high chance you’ve experienced a black screen while trying to stream your games or other content. Usually, the reason is your graphics drivers. If you often experience these problems, there are several things you can try to fix this issue:
- Update your Discord app.
- Turn on/off your hardware acceleration settings.
- Turn off all unnecessary programs while streaming.
- Clear the cache folder in Discord.


You may have to reinstall Discord if none of these solutions improve the situation. Installing an updated version of Discord may solve your problem. Remember, old computers can also create problems, so you might have to consider getting a newer one if Discord doesn’t work correctly.
How to Stream Netflix on Discord on Android
Streaming Netflix through the Discord app on your Android phone is not possible, but you can always use it to make voice and video calls. Once you install Discord on your phone, you’ll have to log in or create a new account to talk to your friends.
All you need to do is create a public or private server and invite your friends to join. Most users prefer private servers, ideal for teams or friends. However, public groups are also interesting if you want to meet new people and learn new gaming tactics.
How to Stream Netflix on Discord on iPhone
Discord does not allow iPhone users to stream or screen-share their gaming activities. You can do so only if you’re using Discord on your Windows or Mac computer. On your iPhone, you’re limited only to voice and video calls. However, they’ll have perfect-quality sound and almost no lag. The video quality is quite good on all 4G and 5G networks. You can’t share your screen just yet, but that option might be possible with future updates.
How to Schedule a Watch Party on Discord
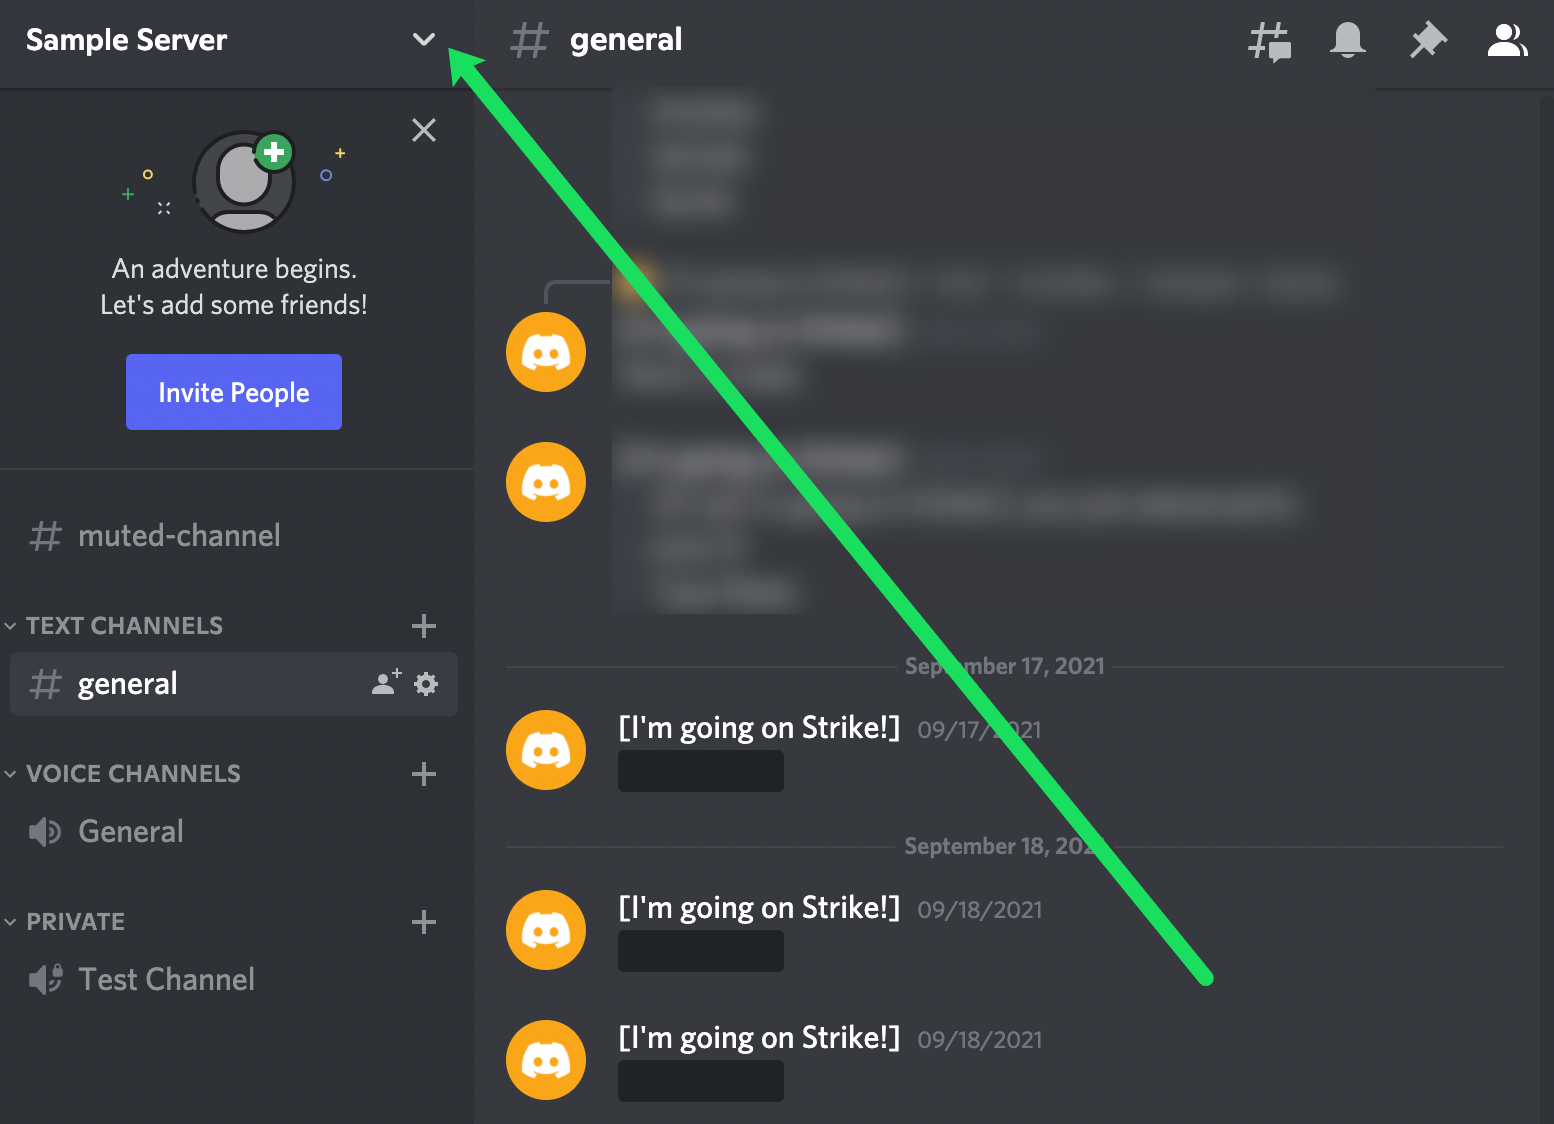
You can pre-schedule your Netflix watch party anytime you want on Discord, thanks to the Create Event feature. All you need to do is click on the Discord server, where you’ll host your watch party. Then, follow these steps:
- Click on the arrow icon in the upper left-hand corner to access the dropdown menu.
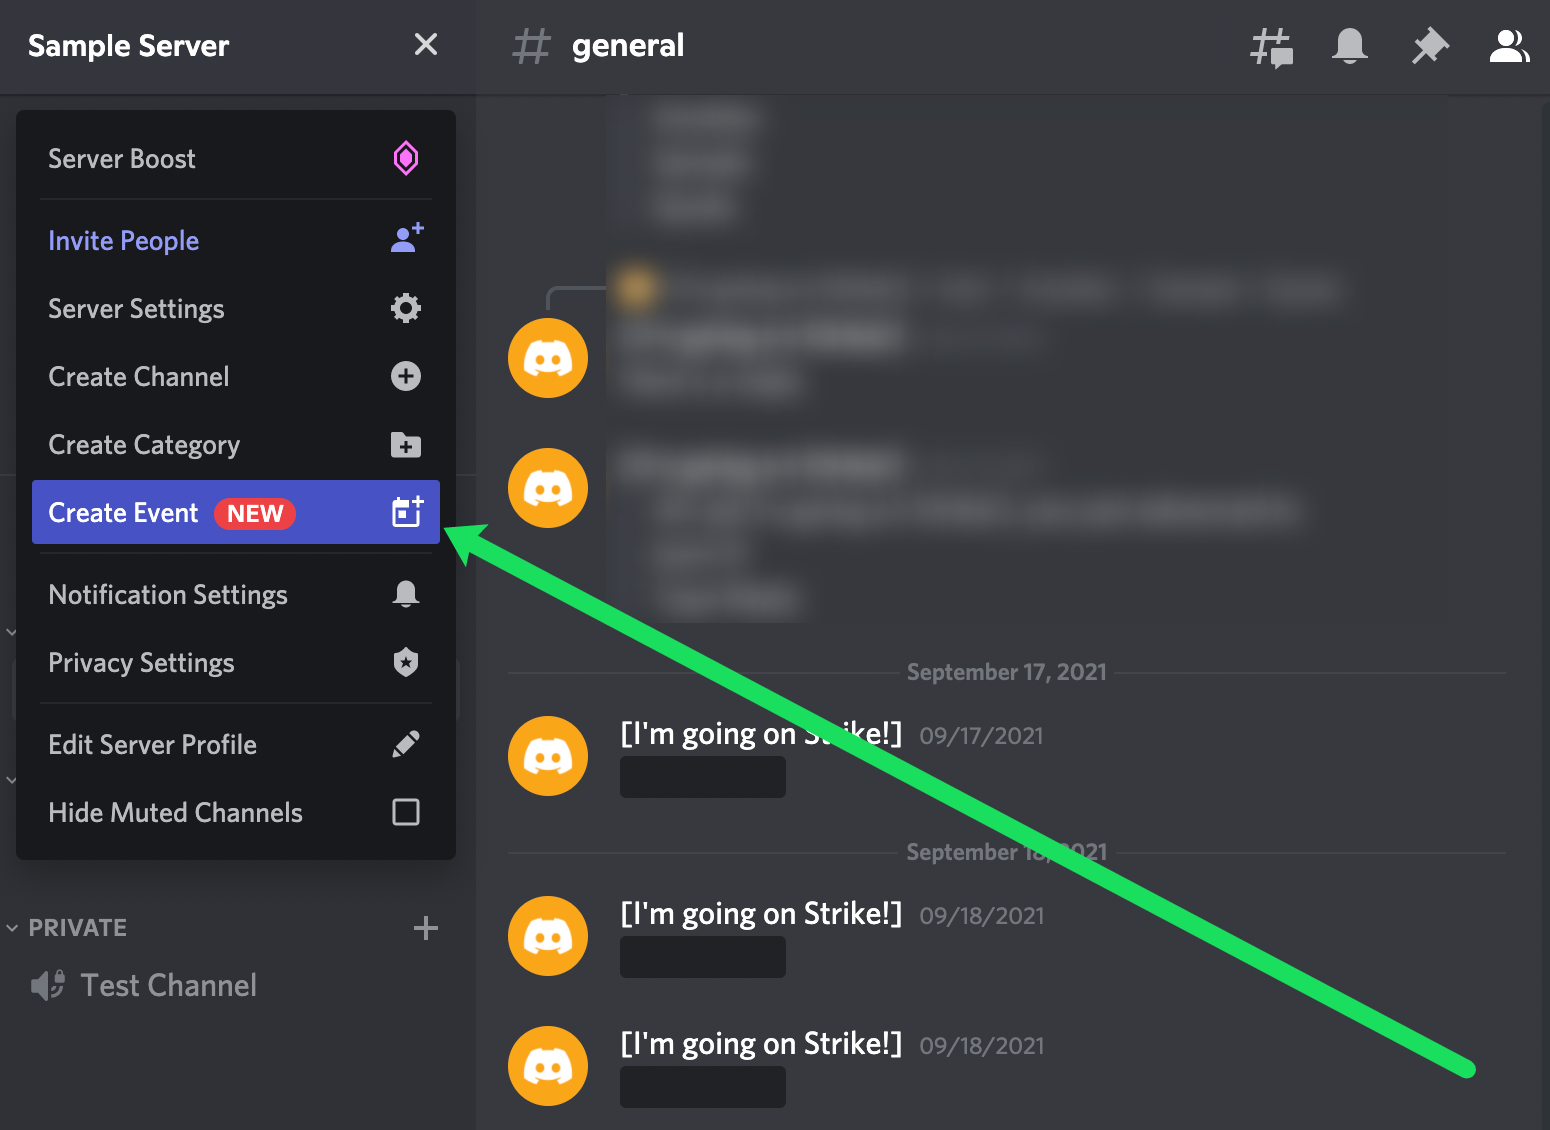
- Click on Create Event.
- Choose the source of your live stream and click Next. In this case, we’re using the Voice Channel.
- Name your event, select the date & time, add a description, and click Next.
- Click Create Event after reviewing.
- You will now see the event in the same menu as your channels. Click Event to view it.
- Click the people icon to invite members.


As Discord is one of the best VoIP apps, its users are primarily gamers that use the app to communicate with others. However, many users eager to share something in their small communities use Discord to play movies and TV shows.
Hopefully, this guide helped you learn more about how Discord works. Streaming content from Netflix may be more straightforward since you know how to do it and which device to use. Additionally, you’re now acquainted with potential problems and solutions to ensure that Discord works without any issues.
Discord Netflix Streaming FAQs
We’ve included this section to answer more of your questions about Discord and Netflix.
Can You Screen Share Netflix on Discord?
Yes, you can screen-share Netflix in your private groups and use it to watch movies together. Discord allows you to showcase your gaming skills or share what you’re doing with friends, but it offers many more features. Since it’s high-quality streaming, you can use it to help friends with projects, watch something together or play games.
How Do You Watch a Stream on Discord?
Streaming is everyone’s favorite activity on Discord, and it’s what makes the platform so popular. You’ll notice a “Live” icon if someone is currently streaming. You’ll have to click on Join Stream if you want to engage and follow the live stream. All it takes is one click.
What Is Go Live on Discord?
“Go Live” is a Discord feature that allows anyone to stream game sessions with up to 10 people simultaneously on any voice channel. The idea is to recreate an atmosphere where you’re playing a game in a room full of your friends, and you can show them exactly what moves you are making. “Go Live” works with any server, and even though it works best on Windows, Mac, and Linux apps, users can use this feature through their browsers as well.
Why Is My Screen Black When I Stream Netflix on Discord?
Black screens are something that many Discord users recognize. If your cache folder is overloaded or you have a lot of programs working in the background on your computer, the chances are high that you won’t be able to see any video content. Another reason can be that your Discord has not been updated, which is an excellent reason to check regularly.
If you’re experiencing a lot of black screens on Discord, here are several things that might help:
• Update your Discord.
• Turn off all unnecessary programs while you’re streaming.
• Clear the cache folder on Discord.
• Turn on/off your hardware acceleration settings.
Another issue is that Netflix is DRM protected, meaning you can’t always share the screen. This is intended to prevent unauthorized sharing between friends. If this is the reason, try using another web browser. Based on our tests, Chrome works just fine. However, some users state that only Firefox works for them. Switching browsers should alleviate the issues.
Is It Illegal to Stream Netflix on Discord?
At the moment, there isn’t a definitive answer to this question. According to Netflix’s Terms & Conditions, streaming content with others outside of your household is a violation unless you use the Teleparty function (formerly called Netflix Party). Whether you can get into legal trouble for streaming content from Netflix on Discord likely depends on several factors, including your region’s laws, what the purposes for streaming are, and other copyright regulations.


Disclaimer: Some pages on this site may include an affiliate link. This does not effect our editorial in any way.


