Twitch, an immensely popular streaming site, caters mainly to gamers but is picking up traction with other communities too. Anyone can set up a free Twitch account and start streaming, or sit back and enjoy some of the awesome content that others’ post.
One of the great things about Twitch, other than the community the platform attracts, is that streamers can create a loyal following and earn a profit for their hard work. Unlike other platforms where creators rely heavily on advertisers for revenue, Twitch streamers can create subscriptions and turn a profit.
This article will teach you everything you need to know about subscribers on Twitch.
Can I See How Many Subs a Streamer Has?
Unfortunately, Twitch doesn’t make the number of subscribers a streamer has public. This means that you’ll have to find other ways to uncover someone’s Sub count. Whether you’re using the information for analytics or you want to know if a channel is worth subscribing to, there are ways to figure out how many people are paying for exclusive membership to someone’s content.
In the following sections, we’ll show you some of the ways we know to see how many Subs another streamer has on Twitch.
Use a Third-Party Website
Although this method probably won’t tell you how many Subs your favorite streamer has, it will help you to better understand which streamers get the most subscribers. Especially for marketing purposes, you can use the following websites that monitor the number of Subs for some of the most popular streamers on the platform.
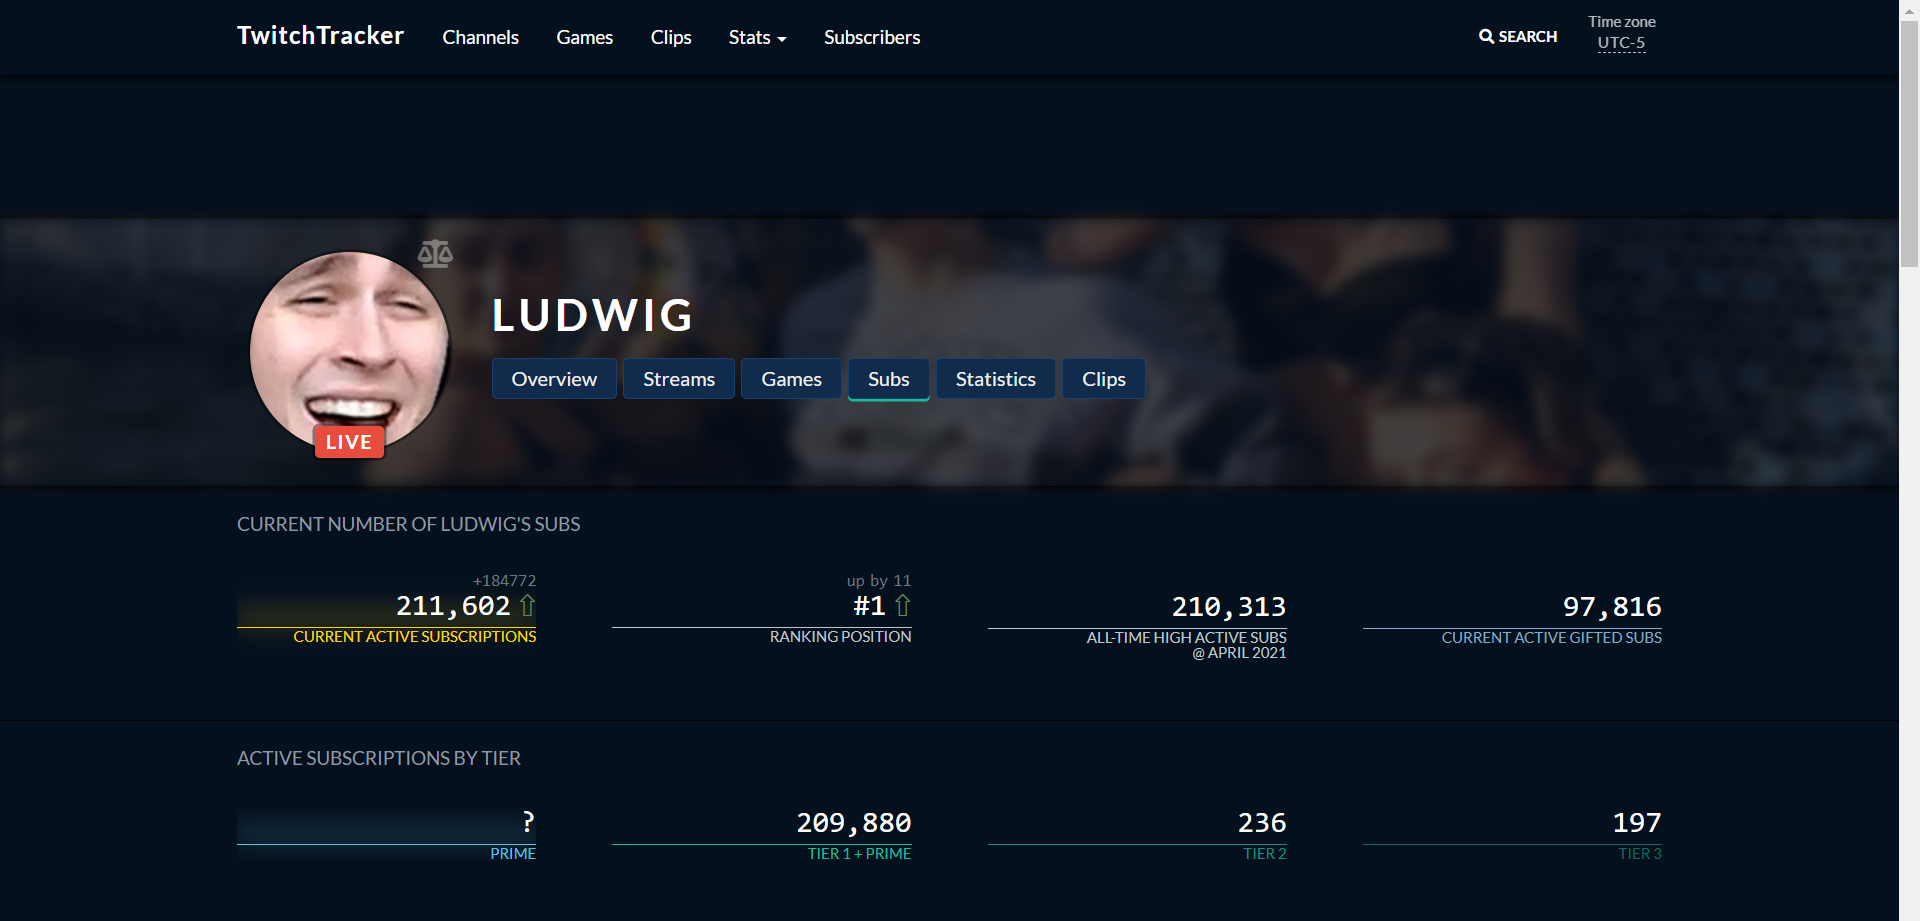
Twitch Tracker is a great resource for tracking the Sub count of top creators. The website updates the Sub count daily and creates a comprehensive view of subscribers per channel.
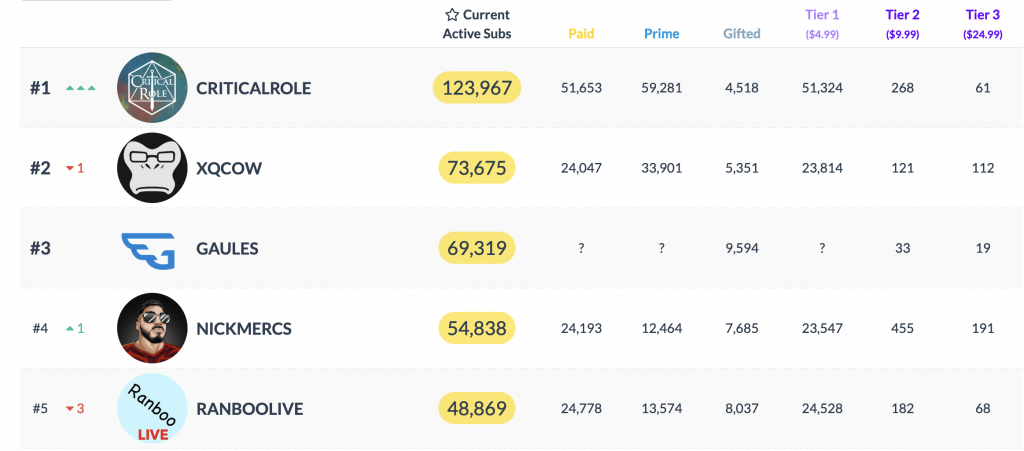
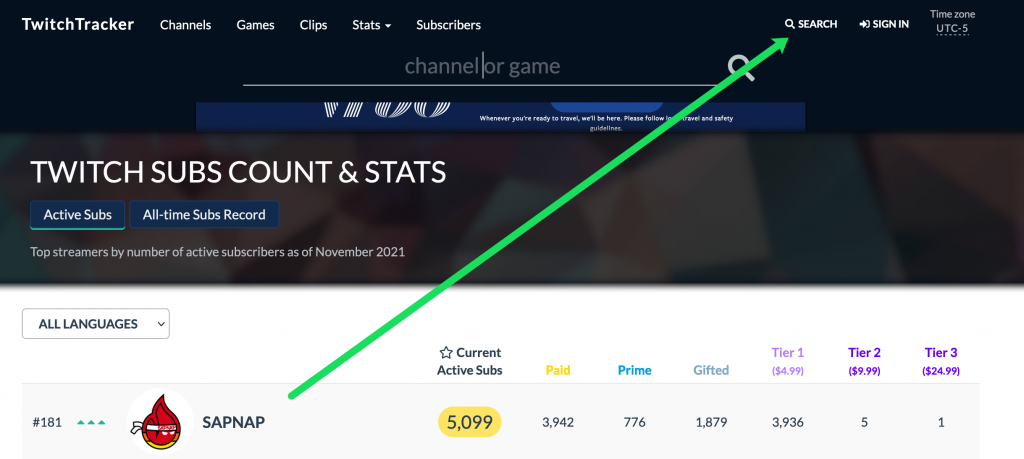
Using Twitch Tracker, you see the Sub count for hundreds of Twitch streamers. To quickly look for a streamer you’re interested in, tap Search in the upper right-hand corner. Then, type the name of the channel or streamer you’d like to see the Sub count for.
Not only can you see the number of Subs, you can also see how many Subs were gifted and how many people are members of each tier.
Another useful website you can use is Twitchstats.net. Similar to the one we mentioned above, this site will tell you the Sub count of 1,000 affiliated streamers and channels.
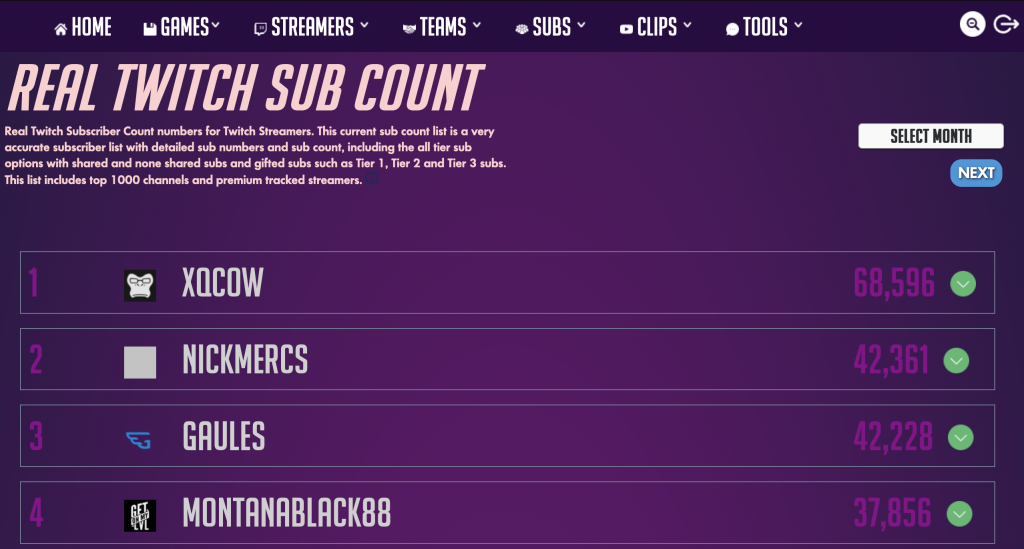
By clicking on Subs in the menu at the top, then tapping on Real Sub Count, you can see the most up-to-date information the site has to offer.
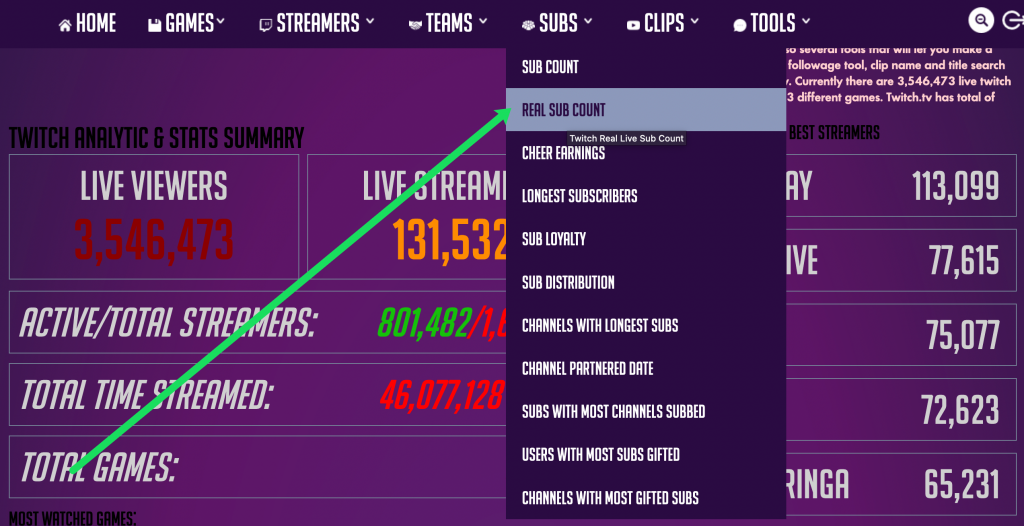
If you click on the green dropdown arrow to the right of the channel that you’re interested in, a pop-up window will appear showing you the number of subscribers per tier, gifted Subs, and more.

If you want to locate a streamer quickly, click on the magnifying glass icon in the far upper right-hand corner of the website then search for the person or channel you’re interested in.
Note: Unfortunately, there’s no way to verify that the information provided at these links is accurate. There’s little transparency on how these sites gather their data. But the overwhelming consensus seems to be that while not entirely accurate, these sites provide good ballpark figures – at least for the major streamers.
Check the Chat
No, this won’t show you how many subscribers a channel or streamer has, but knowing the difference between a subscriber and follower in a Live Stream chat can give you an idea of how many loyal fans are paying for the membership.
Twitch offers a chat function during Live streams where you can see other viewers comments and reactions. One of the benefits offered to subscribers is certain badges next to their names. A person who isn’t subscribed and doesn’t interact with the channel often will likely have no badge or icon to the left of their name when participating in chat.
To see if someone is a subscriber simply hover your cursor over the badge next to their name. A pop-up will appear letting you know if the badge you’re seeing is a subscriber badge (and which type of subscriber).

Ask the Streamer
Another option, although not the most practical depending on your relationship with the streamer, is to ask one of the moderators or the creator. Suppose you’re doing research or you’re interested in a particular channel, sending a Whisper to one of the channel admins is another way to find someone’s Sub count.
It may be a long shot, but depending on how invested you are in someone’s Sub count this may work for you.
Subscribers and Followers on Twitch Are Two Different Things
If you’re new to the platform, you must understand that subscribers and followers on Twitch are two different things. Following a streamer will add the broadcaster to your follow list and display the channel on your page when you open Twitch.
On the other hand, subscribing to a channel on Twitch means you have chosen to financially invest in the streamer. You can do this by making a monthly donation to the streamer for the channel upkeep.
There are three subscription tiers as of this writing, and half of the money you spend for the subscription goes to the streamer. The other half goes to Twitch. In return, subscribers receive premium perks such as special emoticons, custom badges, access to exclusive chatrooms, among other things.
Twitch subscriptions are the primary way for streamers to make money on the platform.
Has This Helped Make Up Your Mind?
If you want to subscribe to a particular channel you like, you should by all means do it. That’s not only a token of appreciation but very much a tangible reward that keeps the streamers going. However, remember that subscribing is optional, and you don’t need to pay to follow your favorite streamers.
On the other hand, if you want to start your own profile, keep in mind that the best way to gain subscribers is with quality content. After all, anyone willing to pay to watch your streams will only do so if your content is worth paying for.
Frequently Asked Questions
Here are some more answers to your questions about Twitch.
How do I see someone’s Follower count?
Fortunately, Twitch does make it easy to see how many followers a streamer or channel has. All you need to do is navigate to their page and tap on About. Here, you can see their follower count and other information like their Bio.
Is paying for a Sub worth it?
The answer to this question depends on you and the streamer. Subs start at $4.99/mo., a relatively low price considering the time and dedication a streamer puts into creating their content.
One of the best features of a Sub is getting rid of annoying ads. When you first join a Live stream, you’ll have to watch a 30 second ad. When you pay for a subscription to the channel you can bypass this advertisement, and you get a cool badge too!
Don’t Fret, Just Follow and Sub!
In a nutshell, there’s hardly an actual way of knowing the exact number of subscribers a particular streamer has. External resources can help you, but stand warned that the figures may not be entirely accurate.
If, however, you know of a way to find out how many subscribers your favorite Twitch streamer has, we’d be thrilled to know your method. Comment with your thoughts about streaming on Twitch, earnings, and everything in between!


Disclaimer: Some pages on this site may include an affiliate link. This does not effect our editorial in any way.