Every VR enthusiast’s dream of cable-free gaming became a reality when Oculus introduced their Air Link technology. This advancement provided greater mobility and game-playing comfort.
If you’re willing to ditch the cables and take advantage of the wireless option, this article will help you set things up and enjoy your VR adventure to the full.
What You Need for Air Link
In order for the Air Link connection to work as intended, you’ll need the following:
- A proper Windows based PC with a good graphics card (Windows 10 or later versions; a GPU equivalent of GTX 1060 with 6GB of memory or better; and a CPU equivalent of Intel i5 – 4590 or AMD Ryzen 5 1500X or better).
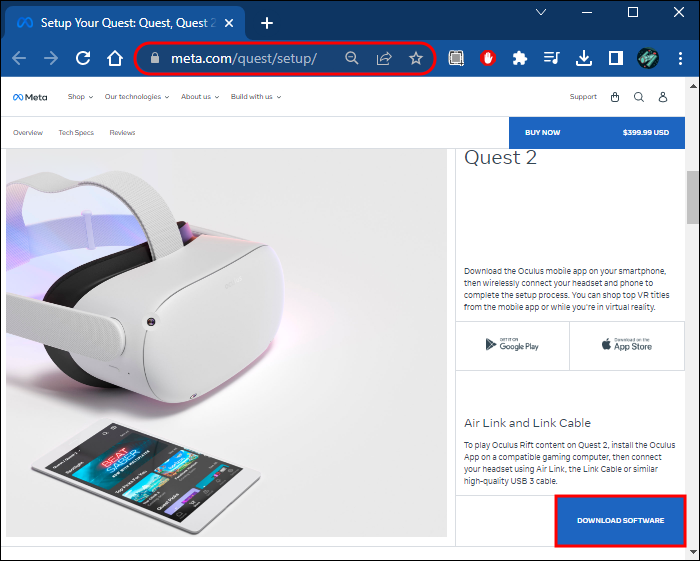
- Oculus Quest 2 software that you can download from Meta’s official Oculus page.
- A strong and stable internet connection, with your PC connected to the router via Ethernet cable (other wirelessly connected devices may affect the stream).
Air Link PC Settings
In order for the headset to connect, you need to prepare the PC by installing the Oculus software and allow the Air Link. The process goes like this:
- Download and install the PC client from the official Oculus page.
- Register an account, or register via Facebook profile since it’s Meta’s service. Once you’ve installed the software, log into your account.

- Click the “Settings” option, the last on the sidebar to the left.
- Click on “Beta” tab, at the top of the window in that menu.
- Turn the “Air Link” button “ON” by clicking it.


You have successfully enabled Air Link. However, you’re work isn’t complete just yet. Keep in mind, as mentioned under the enable button, if not used for 24 hours, the Air Link will automatically turn off.
Oculus Quest 2 Settings
Now that your PC is set up properly, the next part is adjusting your Quest 2 headset. To be able to use Air Link, your headset’s firmware should be on version 28 or newer. If that condition is met, follow these steps to enable it:
- Enter the Oculus Quest hub and find the options bar under the game selection screen. Click on the last option to the right “Settings”, marked with a gear icon.
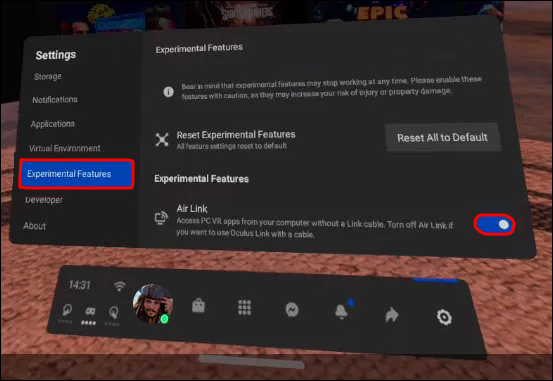
- Scroll down the menu and find the “Experimental Features” tab and the “Air Link” enable button.
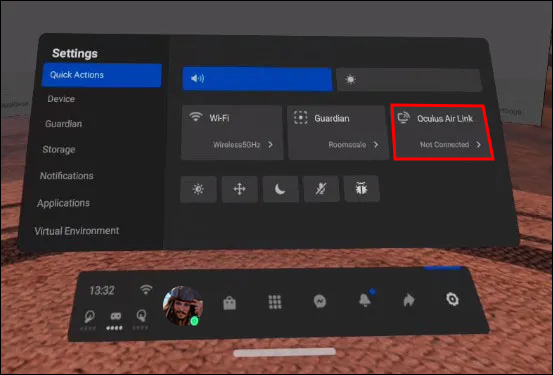
- Go back to the settings menu and click on the “Quick Actions” tab at the top.
- “Oculus Air Link” should appear as the third option. Click it and you should be able to see your computer on the list.
- Click on your computer, and then on the blue “Pair” button. This should take you back to the game selection menu.


Now your headset and PC are paired and ready for use.
FAQs
Can I use Oculus Quest 2 with Air Link on Mac?
Unfortunately, no. Currently, both models of Oculus Quest are compatible only with Windows-based machines.
Is my PC up to standard to run Oculus games?
It takes a good gaming PC to run and stream Oculus games. Fortunately, there’s no need to risk buying it blind. There’s a free tool by Valve you can use to check whether your computer is VR compatible, be it Oculus or any other headset. If your score on it is in the green area, you are good to go!
Good Luck on Your Quest!
Being able to enjoy virtual reality and immerse yourself fully within the world of gaming really shows how much technology has advanced in the last couple of decades. It also remains to be seen whether VR gaming will be just a gimmick, or will there be more advanced and story driven games for it to become a genre of its own.
Have you tried any VR headset so far? Do you think the future of gaming lies in VR? What is your favorite Oculus Quest game? Let us know in the comments section below.


Disclaimer: Some pages on this site may include an affiliate link. This does not effect our editorial in any way.