One may argue that adjusting the HUD color in CSGO brings solely visual advantages, and the function was developed for fun. However, different people see colors differently, so changing the HUD color may help you notice certain information on the HUD quicker – this, in turn, may improve your performance. If you’re interested in how to do that, we’re here to help.
In this guide, we’ll share two methods of changing the HUD color in CSGO. Additionally, we’ll answer some of the most popular questions related to customizing the HUD and other items in the game.
How to Change HUD Color in CSGO?
HUD color in CSGO can be changed through the Game Settings menu. To do that, follow the steps below:
- From the main game menu, navigate to Game Settings.

- Click the Hud tab.

- Expand the drop-down menu next to HUD Color and select the desired color.
- Confirm by clicking Apply.


How to Change HUD Color in CSGO With Commands?
Optionally, you can use commands to change the HUD color in CSGO. This method allows to change it during the match. To do this, follow the instructions below:
- To enable commands, navigate to Game Settings from the main menu.
- Select Yes next to Enable Developer Console.
- Click Apply.
- Navigate to the Keyboard / Mouse tab.
- Next to Toggle Console, select a key to bring up the command input box.
- Click Apply and exit Game Settings.
- During the match, press the key that you have bound to bring up the command input box.
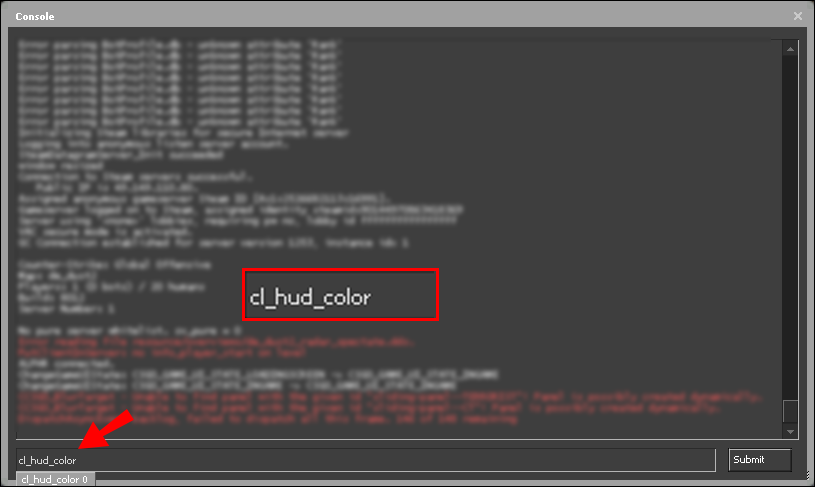
- Type in
cl_hud_color [color code], then close the command input box. The changes will be applied instantly.
Here are the CSGO HUD color codes:
Default – 0
White – 1
Light Blue – 2
Dark Blue – 3
Purple – 4
Red – 5
Orange – 6
Yellow – 7
Green – 9
Aqua – 9
Pink – 10
Frequently Asked Questions
Read this section to find out more about customizing the HUD and other item colors in CSGO.
Can You Change Colors on Other Items in CSGO Besides the HUD?
Indeed – apart from the HUD color, you can also change the colors of the crosshair, your Steam avatar shown in the lobby, radar, and fog with the help of commands. Here’s how to do this:
1. To enable commands, navigate to Game Settings from the main menu.
2. Select Yes next to Enable Developer Console.

3. Click Apply.
4. Navigate to the Keyboard / Mouse tab.

5. Next to Toggle Console, select a key to bring up the command input box.

6. Click Apply and exit Game Settings.
7. During the match, press the key that you have bound to bring up the command input box.

8. Type in cl_crosshaircolor [color code] to change the crosshair color.

9. Type in cl_color [volor code] to set the color of your Steam avatar in the lobby and your radar.

10. Type in cl_teammate_colors_show 1 to enable random colors of other players’ avatars in the scoreboard. To disable this command, change “1” to “0.”

11. Type in fog_color [color code] to set the fog color if it’s enabled.

How Do You Change the HUD Color to Rainbow in CSGO?
There’s no quick way to set your HUD color to rainbow in CSGO, but it’s possible with the help of several different commands. To do that, follow the steps below:
1. To enable commands, navigate to Game Settings from the main menu.
2. Select Yes next to Enable Developer Console.
3. Click Apply.
4. Navigate to the Keyboard / Mouse tab.
5. Next to Toggle Console, select a key to bring up the command input box.
6. Click Apply and exit Game Settings.
7. During the match, press the key that you have bound to bring up the command input box.
8. Type in bin a “+moveleft; cl_hud_color [color code]”.

9. On a new line, type in bind w “+forward; cl_hud_color [color code]”.

10. On a new line, type in bind d “+moveright; cl_hud_color [color code]”.

11. On a new line, type in bind s “+back; cl_hud_color [color code]”.

12. On a new line, type in bind space “+jump; cl_hud_color [color code]”.

13. On a new line, type in bind mouse1 “+duck; cl_hud_color [color code]”.

14. Now, you can finally close the command input box, and the changes will apply automatically. The HUD color will change the whole time depending on your moves.
Note: You can set all nine available colors for different moves, as well as select only a few of them.
How Do I Change the HUD Size in CSGO?
Apart from changing the HUD color, you can also adjust its size. To do this, follow the instructions below:
1. To enable commands, navigate to Game Settings from the main menu.
2. Select Yes next to Enable Developer Console.
3. Click Apply.
4. Navigate to the Keyboard / Mouse tab.
5. Next to Toggle Console, select a key to bring up the command input box.
6. Click Apply and exit Game Settings.
7. During the match, press the key that you have bound to bring up the command input box.
8. Type in hud_scaling [value from 0.5 to 0.95] – the higher the value is, the larger will be the HUD.

How Do I Fix HUD Not Showing in CSGO?
If HUD isn’t showing during the match, it isn’t necessarily a bug – most likely, it’s simply been disabled. To enable it, follow the steps below:
1. To enable commands, navigate to Game Settings from the main menu.
2. Select Yes next to Enable Developer Console.
3. Click Apply.
4. Navigate to the Keyboard / Mouse tab.
5. Next to Toggle Console, select a key to bring up the command input box.
6. Click Apply and exit Game Settings.
7. During the match, press the key that you have bound to bring up the command input box.
8. Type in cl_drawhud 1 to show the HUD. If you’d like to hide it, change “1” to “0.”

Customize Your Experience
Now that you know how to change the size and color of HUD, playing CSGO should become more convenient – or at least more pleasing to the eye. Color codes in the game are sorted in a logical order, so you should quickly memorize them and be able to change the HUD color faster. To alter the gaming experience to your preference even further, you may want to check out other CSGO commands. After all, in multiplayer games, every little bit that may improve your performance counts.
Do you like the rainbow HUD feature or do you find it distracting? Share your opinions in the comments section below.


Disclaimer: Some pages on this site may include an affiliate link. This does not effect our editorial in any way.

