Google Classroom makes it easier for teachers to create, share, and grade assignments. Better still, students can easily submit their work on the platform.
If you’re wondering how to submit assignments on Google Classroom, you’re in the right place. This article will explain everything you need to know.
Google Classroom – How to Turn in Assignments
Google Classroom lets students submit assignments via various devices such as PCs, Android phones, and iPhones. The platform also offers an organized way for teachers to collect and view submissions.
Here’s how to turn in assignments on Google Classroom:
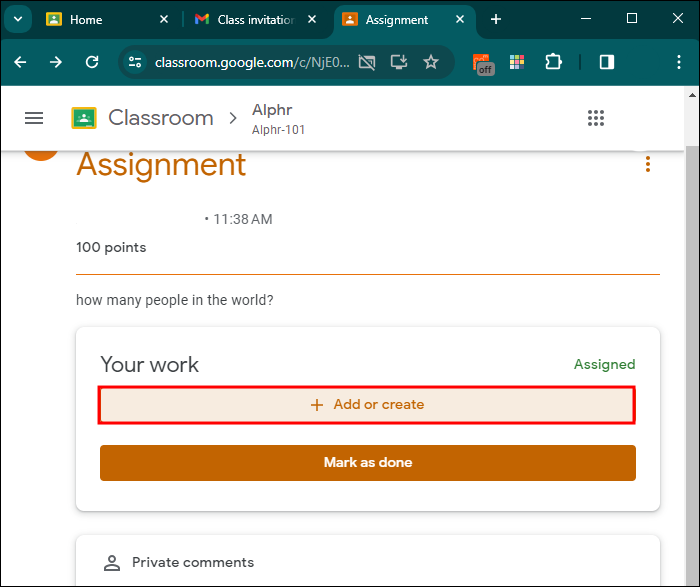
- Open the assignment and attach any required files or links.
- You can attach items from Google Drive, upload a file, or create a new Google Doc, Slides, Sheets, or Drawings file directly in Classroom.

- Next, locate the Turn in button at the bottom of the page.
- Finally, the Classroom will request that you verify if you’re ready to turn in your assignment. As soon as this appears on your screen, select Turn in from a pop-up window to finalize submitting your work.


Turn in Assignments on Mobile
It’s easy to submit Google Classroom assignments using a mobile device, whether you’re working with an Android or iPhone. The procedure is generally the same for both systems.
- Turn on the Google Classroom app.
- Check an assignment.
- Add additional files if necessary.
- Include any private comments and click/tap the Turn In button to send them out via email for assessment purposes.


To submit a file, include a Google Drive file, link, or photo from your camera roll. Alternatively, you can create a new Google Doc, Slide, Sheet, or PDF. In addition to its other features, the Classroom app has an inbuilt scanner that allows you to convert several pictures into one PDF for assignment submission.
- For iPhone users, files can be attached from Google Drive, links, and photos from the camera roll can be attached, or create new Google Docs slides sheets or PDFs. On the iOS Classroom application, you can record and submit video assignments.
- The mobile app allows learners to submit their homework assignments before the due date using the core functionality of their smartphones. Open the Classroom app, go to the assignment, and attach your work. Tap on turn-in to submit the completed assignment and change its status to “turned-in.”

Attach Files From Google Drive
Here’s how to attach a file from Google Drive to your Google Classroom assignment:
- Click Add or create under Your work.
- Choose Google Drive.
- Select the relevant file from your Google Drive storage.
- Click the Add button to attach the chosen file.


Now you can add images, spreadsheets, videos, and documents from your files located from Google Dive straight into Google classroom assignments. This will save you from having to download them first and then re-upload to access your work.
To Attach a New Google Doc
To attach a new Google document, slide presentation, spreadsheet, or drawing to your assignment, do the following:
- Click Add or create under Your work, then select Docs, Slides, Sheets, or Drawings.
- A new file will be attached to your work and open. You may now type into the document, presentation, spreadsheet, or drawing.
- After adding your work, close the document. It will remain attached to your assignment.
- The newly created Google Docs, Slides, Sheets, or Drawings file is now attached to the assignment so your teacher can view it.


This way, you can generate many Google files. Al of which can be included as attachments in one Classroom task to keep your work organized.
Attach a Link to Your Assignment Submission in Google Classroom
You can attach a link to a website or other online resource for your assignment submission in Google Classroom. This allows you to provide supplementary materials from the web to support your work.
- Under Your work, click Add or create and select Link.
- Enter the URL for the link you want to attach and click Add.


The link will now be attached to your assignment submission. Your teacher can click the link to access the online resource you provided
Submit an Assigned Document
If the teacher attaches a document with your name in the title, that should be your personal copy to edit and review. You can click “Turn in” after your teacher reviews your progress.
- Choose the class and then click on Classwork.
- Select the assignment and then View instructions.
- Include this file into Google Docs, make corrections, and save it again.
- When you are done with all the edits, return to Classroom or go to the top right side of the screen on Google Docs and click Turn in.


Once submitted, this changes an assignment’s status from Not Done to Done.
FAQs
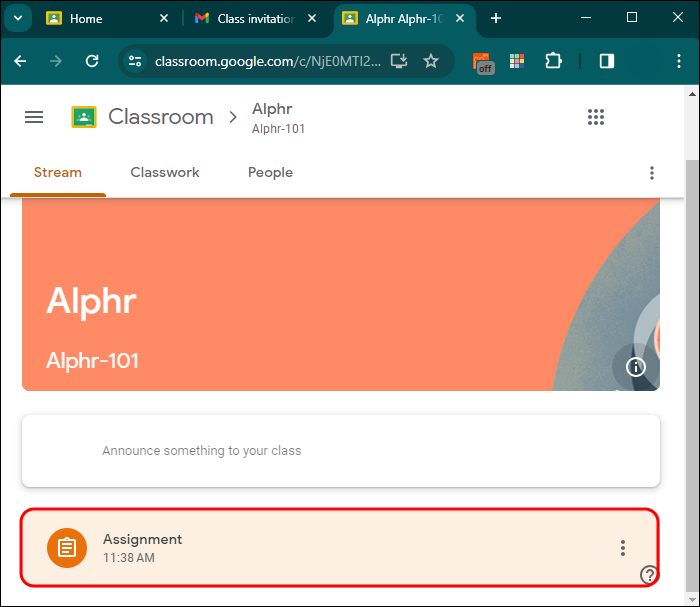
How do you locate the specific assignment you want to turn in?
To find a particular assignment in Google Classroom, click on your class from the main page. This will bring up all materials. Under the Classwork tab, you can find the assignment. Assignments are listed with the most recent at the top. Clicking on the title or image shows where your work can be added.
How do you submit an assigned document in Google Classroom?
When assigned a document by your teacher, open it from the assignment page by clicking on the image of your name. Edit the file and save changes before turning it in either through the Turn in button on the doc or the submission page of assignments.
How can I submit my assignment using a mobile device such as an Android or an iPhone?
To turn in the assignment using a smartphone, launch the Classroom app from your mobile device, go to the specific assignment, attach any files, and click on Turn in.
Where are the directions for the assignments posted on Google Classroom?
Open the Classwork page and go to Assignments. Once you have done so, assignment details will pop up. Above it is a link entitled View instructions which will lead you to a full set of teacher’s instructions.
Can I attach files from Google Drive to an assignment in Google Classroom?
To attach Google Drive files, click Add or create under Your work. Go to Google Drive, then pick your file. Finally, click Add so that you can have the file attached.
The Key to Successful Assignment Submissions
The efficiency of Google Classroom depends on how well you navigate the submission process. Students who want to complete their assignments in good time will benefit most from this process. After all, handing in assignments on time is part of being a good student who values the teacher’s feedback.
Are you a student or an educator? Have you been impressed with Google Classroom? Let us know in the comments section.
Related Posts
 How to Make a Copy for Each Student in Google Classroom
 How to Detect Plagiarism or Cheating in Google Classroom
 How to Leave a Google Classroom
 How to Turn Off Trending Searches on Google
 How to Turn Off Labels in Google Maps
 How To Turn Off Dark Mode in Google Chrome
 How to Turn Off the Voice in Google Maps
 How to Turn Off the
Disclaimer: Some pages on this site may include an affiliate link. This does not effect our editorial in any way.