McAfee antivirus software is considered the best in the game. The company ensures its virus databases have up-to-date information about all the latest computer viruses lurking around by meticulously scanning the internet.
However, McAfee can also be rigorous about deploying popup notifications. This can be annoying. If you prefer McAfee to protect your computer quietly, we’ll show you how to reduce the pop-ups. We say reduced because McAfee doesn’t allow for turning all pop-ups off. It will still need to notify you when you need to install something vital.
In addition to showing how to reduce pop-ups, we’ll discuss how McAfee works to protect your device as well as share useful information on the different types of computer viruses out there.
How to Stop McAfee Pop-Ups
To reduce your McAfee pop-up notifications:
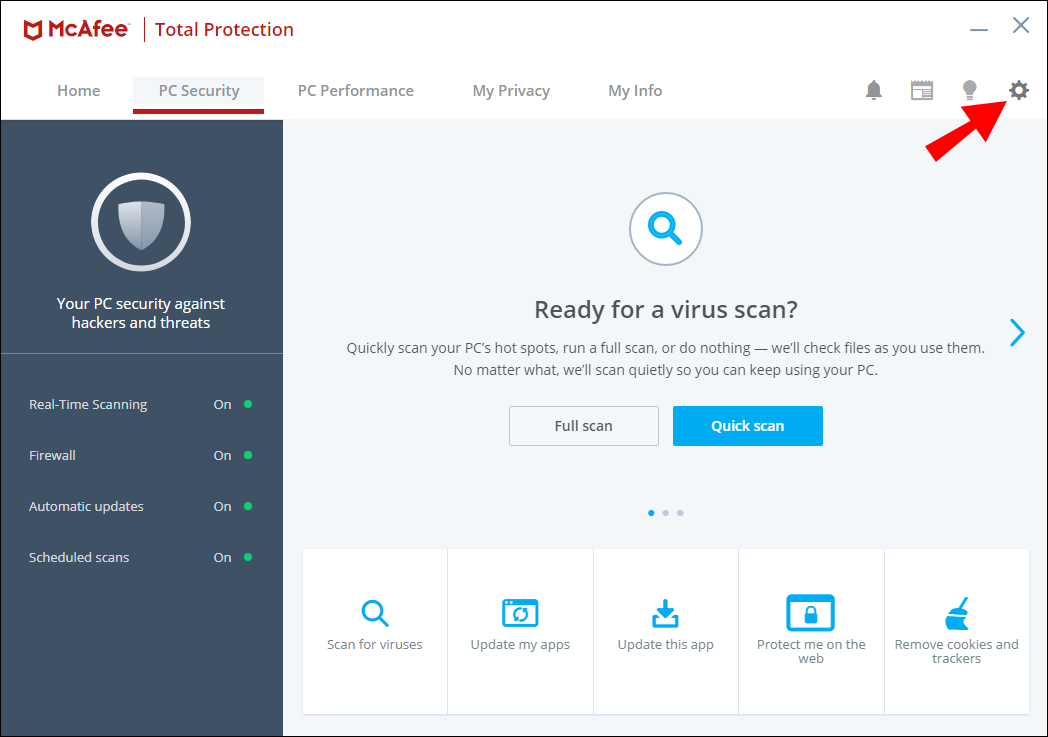
- Access the McAfee dashboard.

- Select Navigation from the top-right corner.

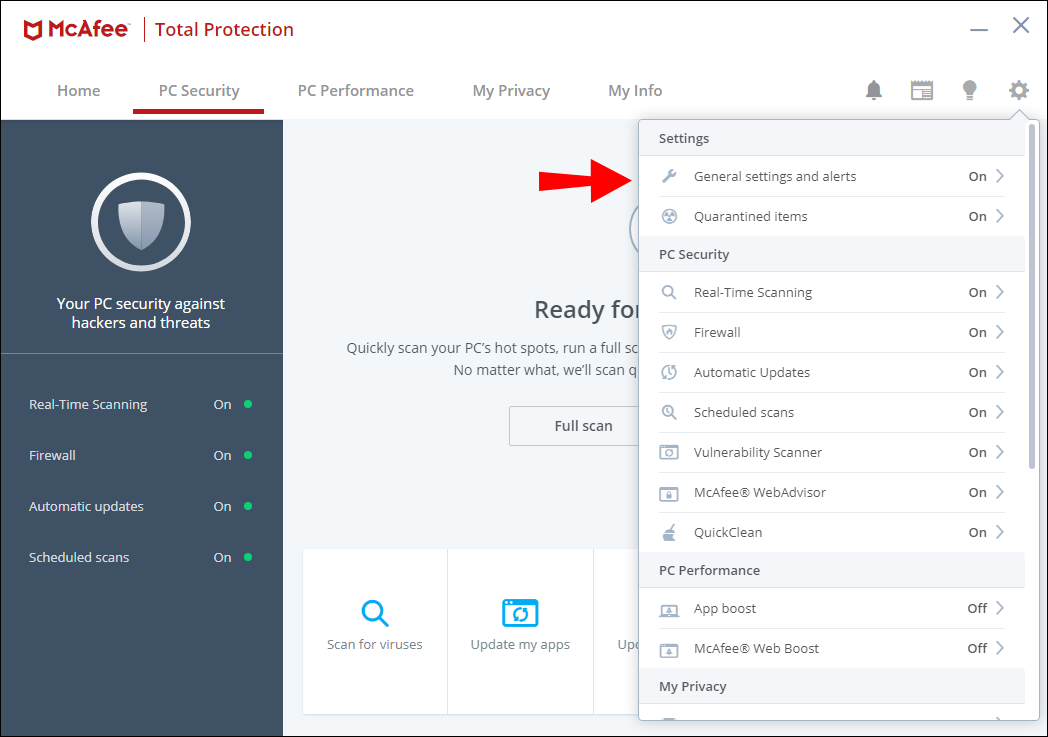
- From the Next tab, select General settings and alerts.
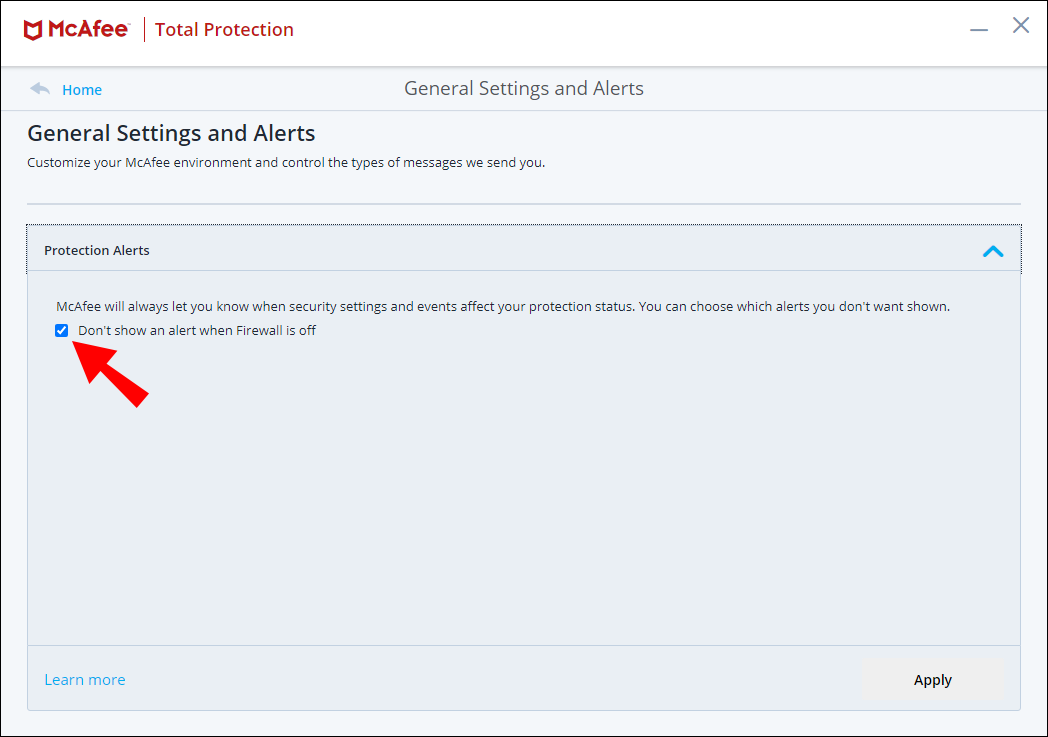
- To manually turn off pop-ups, select the Informational Alerts and Protection Alerts option.
- Uncheck the boxes to stop receiving pop-up alerts.
- Click OK to keep your changes.


Active Shield Prompts
To disable Active Shield notifications, switch off the security warnings via the McAfee Security Center:
- Launch the McAfee Security Center, then beneath Common Tasks click Home.
- Beneath Security Center Information, select Configure.
- Under Alerts, choose Informational Alerts, then Do Not Show Informational Alerts.
- Click OK to keep your changes.


Get Rid of the McAfee WebAdvisor Extension
To temporarily disable the McAfee WebAdvisor extension in Chrome:
- Launch Chrome.
- Towards the top-right, click on the three-dot menu icon.
- Select More Tools, then Extensions.
- Remove the checkmark beside McAfee WebAdvisor.


In Internet Explorer:
- Launch Internet Explorer.
- Select the Tools menu.
- Choose Manage add-ons.
- Select Disable beside McAfee WebAdvisor.


In Firefox:
- Launch Firefox.
- Towards the top-right, click on the three-dotted menu icon.
- Click Add-ons.
- Select Disable beside McAfee WebAdvisor.


Uninstall McAfee
To uninstall McAfee software in Windows 10:
- In the Windows search box enter Settings.
- Select Settings from the results.
- Beneath Windows Settings, click Apps.
- Enter McAfee into the search box, then choose the product you wish to remove.
- Click Uninstall.
- Click Uninstall again to confirm.


Once your computer has restarted you’ll see the program has been uninstalled.
To uninstall McAfee using the McAfee removal tool in Windows:
- Navigate to the McAfee website to download the MCPR tool.
- Once downloaded, double-click the MCPR.exe file.
- Click Yes, Continue. If you receive a security warning, click Run and then click Next.
- Go through the license agreement and click Agree to continue.
- Type in the characters displayed on the Security Validation screen, then Next.
- Wait while the software is removed. It may take a few minutes.
- Once the Removal Complete message is displayed, click Restart.


To uninstall McAfee on your Mac:
- Launch the Terminal app.
- Enter one of the following commands:
- For versions 4.8 and prior:
sudo/Library/McAfee/sma/scripts/uninstall.ch - For versions 5.0 and later:
sudo/Library/McAfee/cma/scripts/uninstall.ch
- For versions 4.8 and prior:
- On your keyboard hit the Return or Enter key.


McAfee’s Noise Reduction
McAfee’s rigorous internet scanning technology keeps you up to date on all computer viruses, making your computer system malware-proof. It’s designed to notify you of viruses it’s found and actions it’s taken, but it can become disturbing when you receive the notices continuously as you work. Luckily, McAfee lets you switch off notifications that you don’t need to know about.
Now that we’ve shown you how to reduce your McAfee pop-ups, has it made a significant difference? Have you ever experienced a computer virus and, if so, what happened? Let us know in the comments section below.
Related Posts
 How to Add Pop-Ups in Squarespace
 How to Stop Pop-Up Ads on an Android Phone
 All Power-Ups in Super Mario Bros Wonder
 How to Disable Pop-Up Blocker in Google Chrome, Safari, and Edge
 How to Turn Off Pop-Up Blocker on iPhone
 How To Disable Chrome Notifications
 How To Fix Not Getting Notifications on an iPhone
 How to Silence Notifications on iPhone
Disclaimer: Some pages on this site may include an affiliate link. This does not effect our editorial in any way.