Disclaimer: Some pages on this site may include an affiliate link. This does not effect our editorial in any way.
Device Links
The HBO Max app is a must-have for premium streaming and access to HBO’s extensive content. But what happens if you’re away from home and want unrestricted access to the HBO content you’re used to seeing? Well, don’t worry, because you can make this happen with a virtual private network (VPN).
A VPN will hide the IP address of your physical location and replace it with an IP from a location of your choice. So, if for example, you’ve set your virtual location to New York while enjoying the sun in the Maldives, you’ll have access to the U.S. catalog.
The best VPN service provider for streaming online content is ExpressVPN. In this article, we’ll take you through how to change your HBO Max access location using ExpressVPN.
How to Change Location in HBO Max on a Firestick
Change your virtual location using ExpressVPN to access HBO Max via your Firestick by doing the following:
- Visit ExpressVPN and choose your subscription plan.
- Enter “ExpressVPN” via the search on the home screen.

- Select it from the results then click “Download,” or, depending on your Firestick, “Get.”

- When ExpressVPN has finished installing, click the “Sign In” option and enter your details.
- You’ll be asked whether you wish to help ExpressVPN enhance its service. Select your preference then “OK.”
- Click “OK” to accept ExpressVPN’s connection request.
- You’ll now see a Power button and a “Smart Location.” To change your virtual location, if you’re happy with the suggested “Smart Location,” hit the Power icon.
- To choose a different location, click the ellipsis icon on the right.
- Look through the different server locations or enter a specific one, then click the Power icon to connect.
- When you open the HBO Max app, you’ll appear as accessing from the virtual location you’ve connected to.


How to Change you Location in HBO Max on a Roku Device
Changing your location on a Roku device is not as quick as it is on the Firestick since it doesn’t support VPN by default. However, there are 2 separate ways you can get around this. The first is by installing a VPN at the router level. Check out our guide on this for more details and find your specific router’s instructions. The second is by setting up a virtual network on your computer or laptop for Roku to connect to. Since your Roku account location information must match the location of your IP, you’ll need to reset your Roku details then re-add them including the virtual location set in your ExpressVPN account. You can follow along with setting up a virtual network and resetting your Roku below.
Here’s how this is done via a Windows 10 PC:
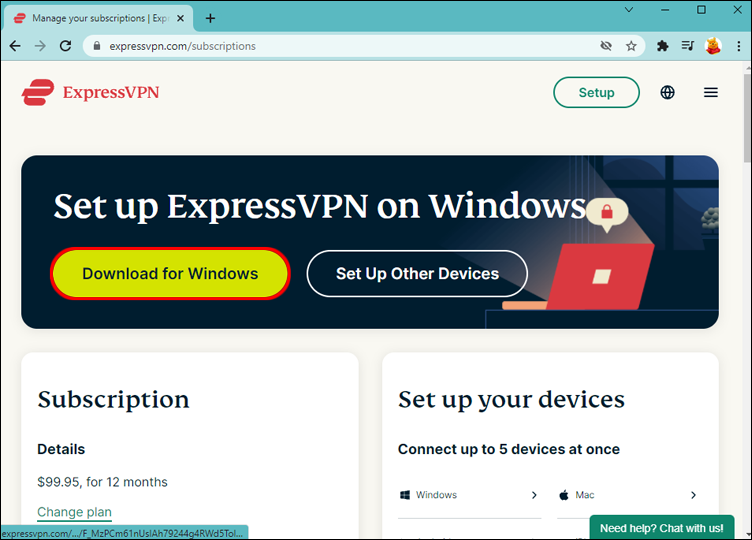
- Go to ExpressVPN to choose your subscription plan and create an account.
- On your PC or laptop, download and install the ExpressVPN app.
- Click on “Start,” “Network & Internet,” then enable “Mobile hotspot.”
- Under “Share my internet connection,” click on “Wi-Fi.”
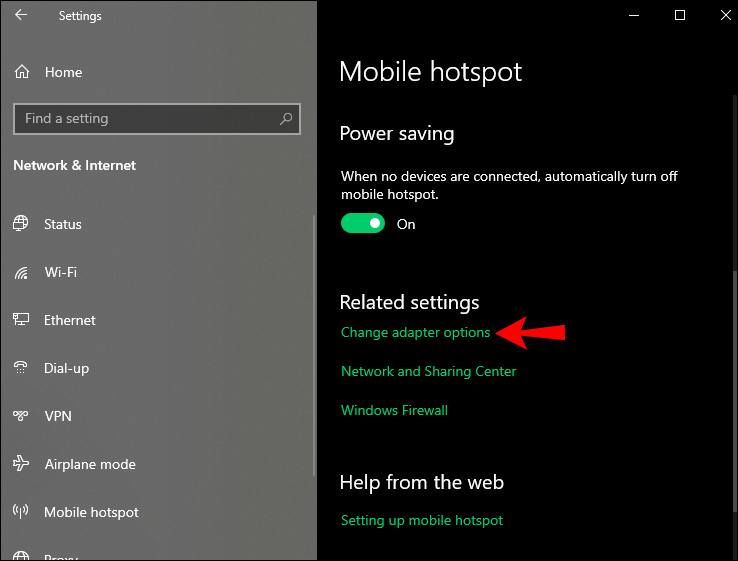
- Click on “Change adaptor options” under “Related Settings.”
- Via the “Network Connections” screen, your new mobile hotspot will be shown as the “Local Area Connection” network.
- Find the network with the “ExpressVPN Wintun Driver” description. Right-click it and select “Properties.”
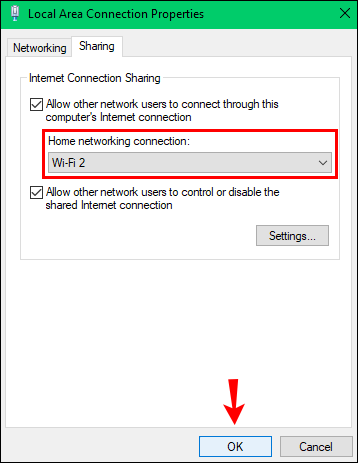
- From the “Local Area Connection Properties” window, select the “Sharing” tab.
- Select the “Allow other network users to connect through this computer’s Internet connection” checkbox.
- Below “Home networking connection” choose the name of your new mobile hotspot then “OK.”


To change your location on ExpressVPN:
- On your computer or laptop, sign in to your ExpressVPN account.
- Decide whether you’d like to share your information to help ExpressVPN enhance the user experience. If so, click “OK.”
- Select “OK” to accept ExpressVPN’s request to connect.
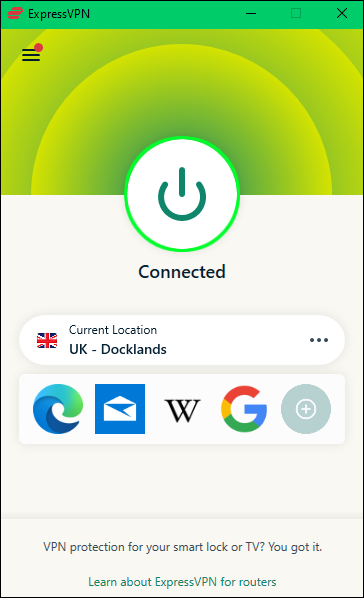
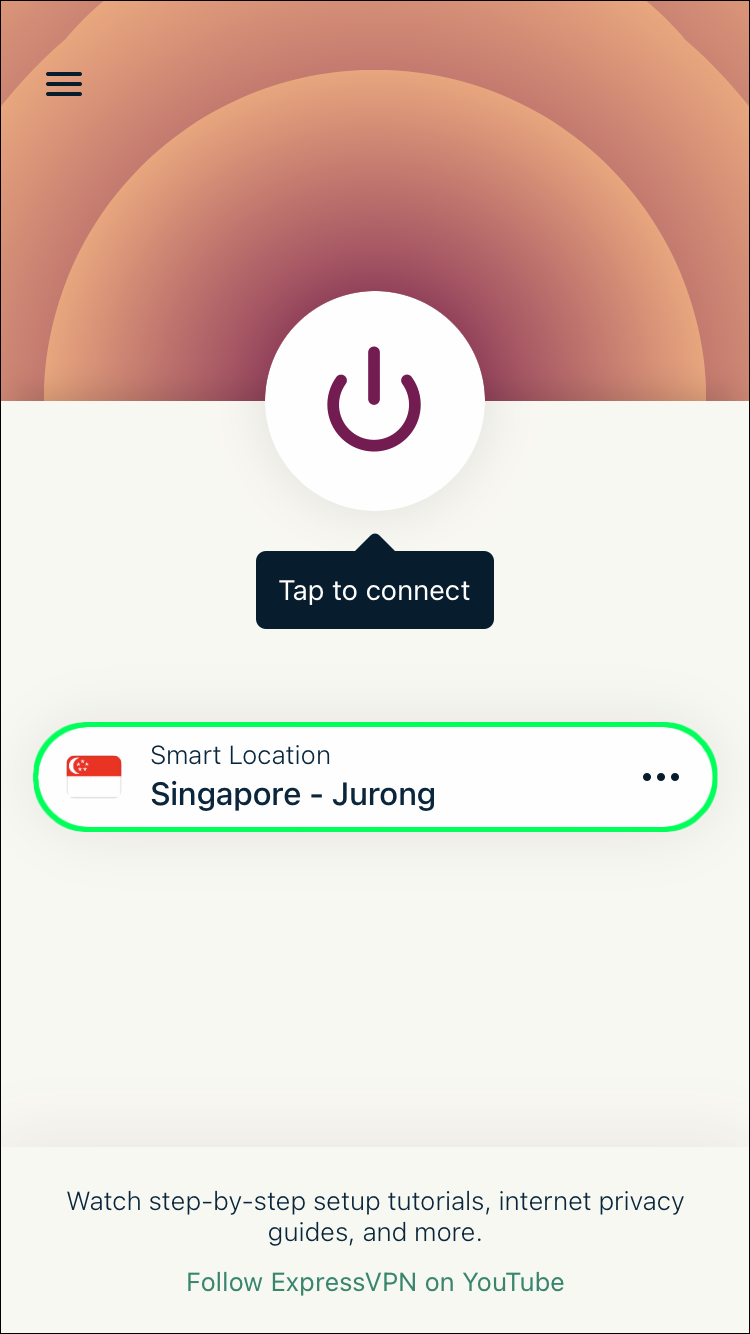
- The next screen will display a Power button and “Smart Location.” To make the suggested “Smart Location” your virtual location, click the Power button.
- Or click on the menu to the right to choose somewhere else.
- Once you’ve found a virtual location, click on the Power button. “Connected” will display beneath the button.


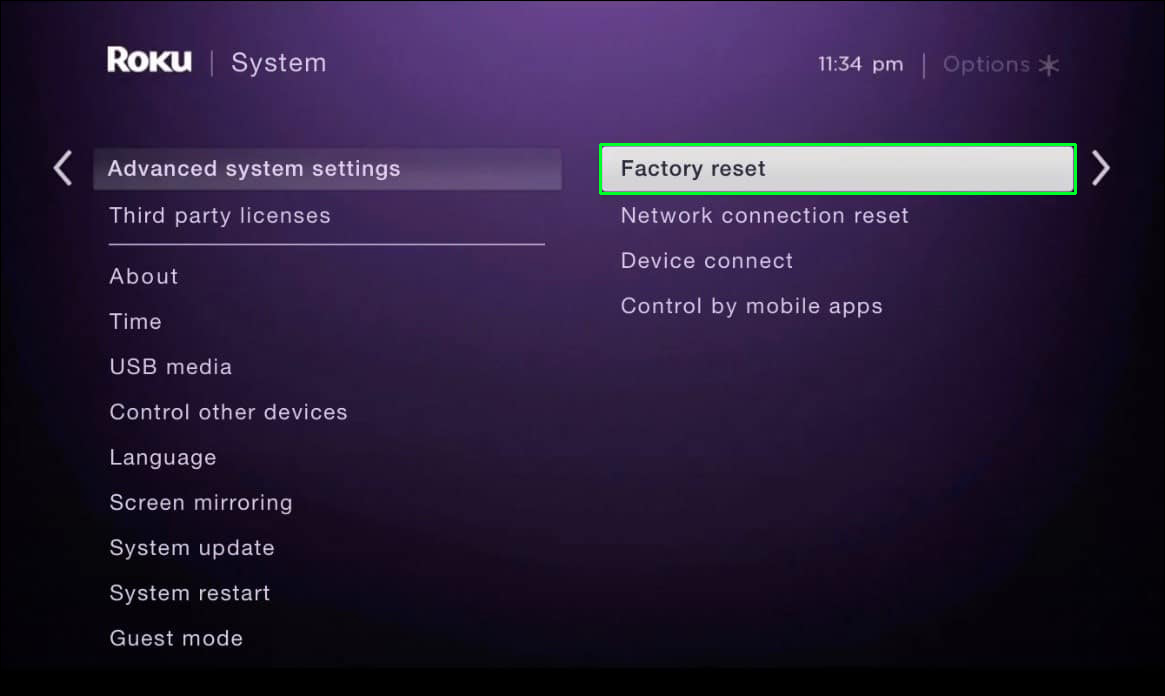
To factory reset your Roku device to clear your account details, then re-create your account:
- Press the Home button on your Roku device.
- Click “Settings,” “System,” then “Advanced system settings.”
- Click on “Factory reset.”
- Enter the code, then “OK.”
- Click on “Start factory reset.”
- When the factory reset is complete, follow the account set-up instructions. Don’t forget to add the virtual location connected to ExpressVPN as your location on your Roku device.
- When you need to connect to a Wi-Fi network, choose the mobile hotspot set up earlier.


When you next access HBO Max via your Roku device, you’ll appear to be accessing the content from the virtual location (such as a different country) you’ve connected to, therefore gaining access to that country’s catalog.
How to Change Location in HBO Max on a PC
Here’s how to change your virtual location using ExpressVPN to access HBO Max content via your PC:
- Set an account and subscription plan by going to ExpressVPN.
- Install the ExpressVPN app on your PC.
- Log in to your account, then complete the prompts to create a new connection.
- Eventually, you’ll come to a Power button and suggested “Smart Location.” To change your virtual location to the one suggested click on the Power button.
- To change it to something else, click on the ellipsis icon on the right.
- Choose a virtual location from the “RECOMMENDED” or “ALL LOCATIONS” tabs or enter search criteria.
- Click on the Power button.


Now enjoy HBO Max content from a virtual location via your PC.
How to Change Location in HBO Max on an iPhone
Here’s how to access HBO Max content from a virtual location on your iPhone:
- Visit ExpressVPN to set up an account.
- Go to the App Store to install the ExpressVPN app.
- Select “Open” to log into your account, then go through the prompts.
- On the screen requesting permission to add a VPN configuration, tap “Allow.” ExpressVPN does not monitor or filter network activity.
- Type your passcode or use Face or Touch ID to continue.
- After deciding if you wish to help ExpressVPN get better, you’ll see a Power button and a suggested “Smart Location.”
- Select the Power icon if you’re OK with using the suggested location.
- To choose another one, tap the ellipsis icon on the right. Go through the locations listed under the tabs or enter search criteria to select a different location.
- To choose another one, tap the ellipsis icon on the right. Go through the locations listed under the tabs or enter search criteria to select a different location.
- Click the Power icon. “Not connected” should change to “Connected.”


You can now access the HBO Max content available in your chosen virtual location.
How to Change Location on HBO Max on an Android Phone?
Use the following steps to set a virtual location on your Android phone for access to the HBO Max catalog in a different country:
- Set up your ExpressVPN subscription by visiting ExpressVPN.
- Visit Google Play to install the ExpressVPN app.
- Open and sign in to your ExpressVPN account.
- Continue through the prompts. On the connection request screen, approve the request.
- Tap “OK” to the data privacy information.
- You’ll now see a Power button and a suggested “Smart Location.” If you’re happy to set your virtual location to the smart one, hit the Power icon.
- If you wish to change it, tap the ellipsis icon on the right. Go through the tabs or enter search criteria for a specific location.
- If you wish to change it, tap the ellipsis icon on the right. Go through the tabs or enter search criteria for a specific location.
- Click on the Power icon to connect.


When you next sign in to your HBO Max account you’ll have access to content in the location set as your virtual location.
Accessing HBO Max From a Virtual Location
Using a VPN service provider like ExpressVPN is perfect for hiding the IP address of your physical location and replacing it with a virtual location. They have extensive server coverage globally, so you’ll be spoiled for choices in deciding where you want to appear to be accessing from.
Changing your virtual location for streaming apps like HBO Max unlocks access to geo-restricted content. This is great when you’re away from home and want to see the content you’re used to.
What HBO Max catalog would you like to access and why? Tell us in the comments section.


Disclaimer: Some pages on this site may include an affiliate link. This does not effect our editorial in any way.


