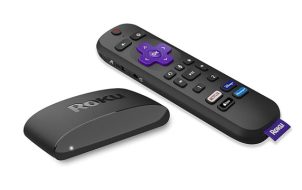
TLC’s Roku Smart TVs are award-winning televisions that offer impeccable video and audio quality and all the benefits of a Roku streaming platform. Although they have various upsides, people are unsure whether they can connect their cable box to these modern televisions.
If you’re one of those that still haven’t cut the cord, you shouldn’t worry. Roku TVs don’t differ from regular TVs when it comes to connectivity. If you have a cable subscription and a cable box (or just a coaxial cord) at home, you can easily connect it to your Roku TV. This article will explain how to connect the two.
How to Connect the Cable Box to a Roku TV
To connect a Roku TV to your cable box, pay attention to both devices’ audio and video inputs. Your Roku TV has various input ports located on its left or right side (depending on the series), and it includes several HDMI ports (including Arc), USB port(s), a Coaxial In port, and an AV-IN input with an adapter. Of course, each model can differ slightly, but those inputs are what you get primarily.
- Check your cable box and see which input is required. If you have an old device, you’ll probably need an AV-IN input with an adapter. On the other hand, newer devices use either a coaxial cable or an HDMI input (best option).
- Ensure that you have a Roku TV remote (usually comes with Roku TVs) and use it to turn off the TV.
- Connect the two devices with the appropriate cable.
- Turn the TV back on to confirm a successful connection.
Accessing Cable with a Roku TV using HDMI
When connecting the cable box and the Roku TV, it should be effortless to access cable television. Turn on the cable TV, and then use the remote to turn on the Roku TV. Afterward, follow these steps:
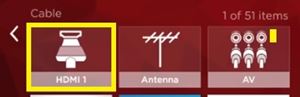
- Press the Home button on the remote to access the Roku’s home screen.
- Navigate to the Quick Access Menu to the right using the arrow keys on your remote.
- Highlight the HDMI 1 block on the screen.

- Press the OK button on your remote. This should display the content from the cable box, and you may be able to use your Roku TV remote to browse through the channels, but sometimes, the box uses a special remote.

When your cable box gets powered on, and the cables get plugged in, everything should work correctly. If you can’t see the image, turn on both devices and check if the connectors are plugged in well. Then, turn them on and try again.
Accessing Cable with a Roku TV using Coaxial Cable
If your cable box requires a coax cable to connect to the Roku TV, the method is slightly different than using an HDMI connection. Follow these steps:
- Plug the coaxial cable into the cable box and into your Roku TV’s Coax In.
- Turn on the Roku TV.
- Hit the Home button on your Roku remote.
- Use the arrow keys on your remote to navigate to the Antenna card/block.
- Select OK using the remote to confirm.
- Choose Start finding channels to set up the cable box tuner (or cable signal via coax without a box) and find all the available channels.
- Choose No, channels 3 and 4 are not required if you are using coax without a cable box (digital channels over coax that the digital TV tuner finds). Choose Yes if your cable box uses a coax output (delivers a non-HD analog RF signal to channel 3 or 4 on the TV).
- Wait for the TV to scan for all the available channels.


After the scanning is finished, the TV will notify you of how many channels it found, alerting you that the cable box is successfully set up. As long as your cable box is connected to your Roku TV, you’ll be able to access it via the Antenna card/block.
Take note that cable boxes with a coaxial “Out to TV” connection still handle the tuning of channels. No matter what gets selected on the box, the signal gets transmitted to the TV via analog channel 3 or 4 and is NOT high definition. These cable boxes are ancient versions, but some semi-old models still offer the coax out.
You can always upgrade your cable box via your service provider to get rid of the old analog channel 3/4 output to tv and use an HDMI cable instead!
Accessing Cable with a Roku TV using Audio/Video RCA Inputs
Today, most receivers and cable boxes don’t use RCA AV-IN inputs to transfer media from the device to the TV screen. However, if you own an older cable box, you’ll probably need to use these cables instead of HDMI or coaxial. Luckily, all Roku TVs have at least one set of RCA AV-IN ports on the back of the device.
To connect the devices via AV inputs, you’ll need composite AV cables (RCA A/V cables, NOT component), which are the old-fashioned red, white, and yellow cables. These cables contain three different colored male-end plugs on each end. Each connector is colored differently to represent each specific input:
- The Yellow RCA plug is for video.
- The White RCA plug is for left-channel audio.
- The Red RCA plug is for right-channel audio.
Follow these steps to connect the devices:
- Turn off your Roku TV and connect the RCA plugs into the A/V ports with the matching color (yellow plug into yellow port and so on).
- Turn on the TV and press the Home button on your remote to access the home screen.
- If you plugged everything in correctly and the TV recognized the cable box, your AV card/block will display a small preview of what’s currently on the cable screen.
- Use the arrow keys on your Roku remote to navigate to AV, then press the OK button to launch the AV screen.

Perfect Quality – Multiple Devices
As you can see, anyone can easily connect their Roku TV to a cable box using one of the available cable ports. The process doesn’t differ from connecting any other TV to a cable or a satellite receiver, and at the same time, it provides a clear image and much better audio when using HDMI. Of course, HDMI-CEC delivers the ability to have connected devices communicate with each other or adjust the TV’s volume using the device’s remote to do cool things like turning both devices on simultaneously.
Thanks to the variety of available ports, you can connect multiple devices to your Roku TV. For example, you can connect a cable box with a coaxial cable while connecting a Chromecast or another streaming platform in a USB port—each one providing you with countless high-definition content.
By understanding the various input options on your Roku TV, you can adapt your cable box connection to allow other devices too!


Disclaimer: Some pages on this site may include an affiliate link. This does not effect our editorial in any way.