Few things are more annoying than your remote failing to follow commands. However, these issues happen more often than you think, and the Firestick TV remote is no exception. If your Firestick remote failed you, you’ve come to the right place.
In this article, you’ll see common reasons why your Firestick remote may not work and solutions for each issue. Whether it’s your battery, an update glitch, volume issues, or another problem, you can usually resolve it.
Below are some of the most common problems, along with instructions on fixing them.
Solution 1: Dead, Weak, or Incorrectly Installed Batteries
How to Check for Battery Problems in Your Firestick Remote
Batteries that are improperly inserted or low on power can cause issues with Firestick remotes. Sure, we all know how to install and replace batteries, but accidents can happen. One might think that the batteries work because they functioned effectively a second ago, but that doesn’t mean there is enough “juice” in them to keep working.
Here are the ways to check for battery problems in your Firestick remote:
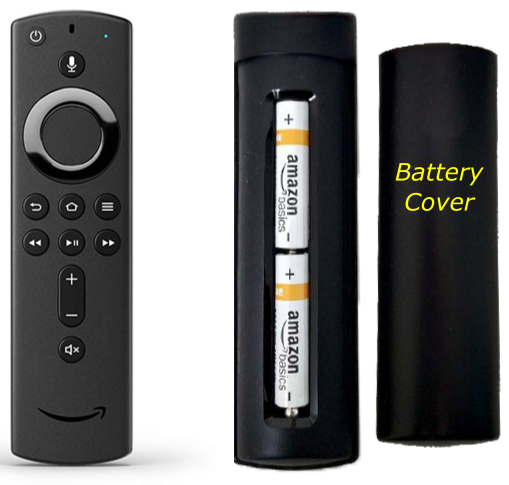
- Remove the batteries from the remote, paying close attention to how they got installed.

- Check the direction marks on the Firestick remote to ensure nobody installed them incorrectly. They often get changed/interchanged by kids or borrowed for another device and can easily get reinserted in the wrong direction.

- If the batteries got installed correctly, replace them with fresh ones. Ensure you use matching batteries—mixing brands/types is never recommended (potential for leaking, exploding, etc.).

The issue is likely somewhere else if the remote still doesn’t work. Also, if you’re using rechargeable batteries, try alkaline ones, as those batteries may no longer hold a charge very well. Rechargeable batteries tend to weaken after repeated cycles and continue to do so until they no longer work effectively. Alkaline is the best choice. Amazon ships the remotes with their brand of alkaline batteries.
Solution 2: Fire TV Remote Not Working on Your CEC-Enabled TV
Pairing Your Firestick Remote to TV for CEC-Enabled Setups
Remotes that are unpaired from the Firestick won’t operate your TV when using CEC-enabled settings and CEC-enabled TVs. However, remotes with Infrared (IR) functionality (2nd Gen, 3rd Gen Alexa Voice Remotes) can work with your TV when within line-of-sight, as long as you are not using the CEC settings to control your TV. Re-pairing often solves the problem of CEC functionality. However, you must also have a CEC-enabled TV and a Wi-Fi network to make it work. Wi-Fi is required for the remote (2nd Gen. or newer) because the Fire TV Stick or Cube uses Wi-Fi Direct to communicate with the remote.
In other words, you have the IR option to control your TV or the CEC-enabled option over a Wi-Fi network. The Firestick and Cube use either Bluetooth or Wi-Fi Direct. CEC can control the TV from great distances as long as it can connect to the Wi-Fi network. IR requires line-of-sight to function.
When using CEC, you’re not sending the remote’s signal to your TV; you are sending it to the Firestick, which then sends the command signal to the TV via its CEC-enabled HDMI plug. 1st Gen. remotes use Bluetooth, while 2nd Gen. and newer typically use Wi-Fi Direct. No programming steps are required to make the remote work on TVs like universal/multi-device remotes. Here’s how to do it.
- Turn the TV on and ensure you connect the Firestick to power.

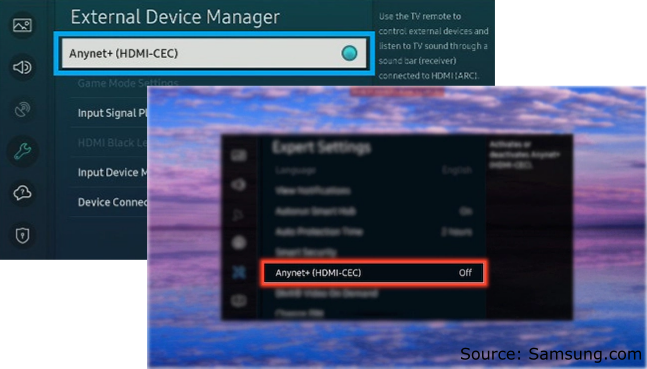
- Access the TV’s settings (varies by make and model), then look for CEC options and enable CEC functionality. This step allows the Firestick to turn the TV on and off.

- Press the Power button on the Firestick remote to see if it turns your TV on/off. If it works, you can stop now. If the remote doesn’t turn the TV on and off, continue to “Step 4.”

- Turn on your TV manually or with its remote, then verify if the Firestick remote is working for the Firestick. If it fails, continue to “Step 5.”

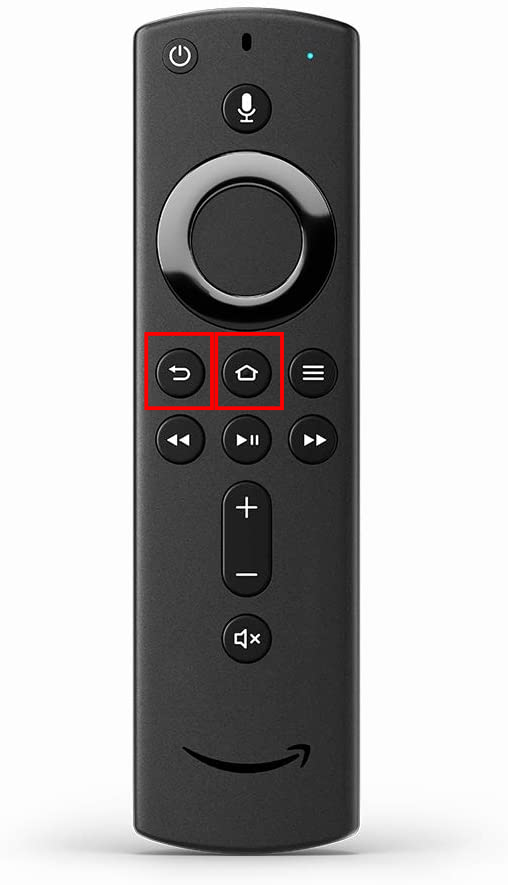
- When the remote doesn’t work for the Firestick either, press and hold the “Back” and “Home” buttons for 10 seconds; You have now cleared/unpaired the Firestick.

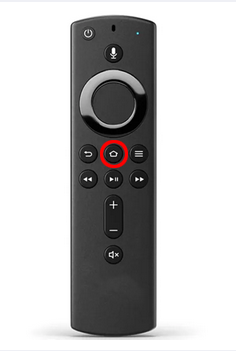
- Pair the remote again by pressing the “Home” button for 10 seconds, then test it on the TV. Repeat the process a few times if necessary.

If pairing didn’t work, you might need to reset the remote. There are different resetting commands for each model. Check out how to reset your Firestick remote on Amazon.
Solution 3: Firestick Not Responding to the Remote
Check Your Remote’s Distance from the Fire TV Stick
2nd Gen Firesticks and newer use Bluetooth rather than infrared. The theoretical range is about 30 feet, but the “actual” distance is generally lower. If you have a large living room or are trying to use your remote from another room, it may not work unless you use Wi-Fi/CEC instead of Bluetooth.
To check whether the distance is the problem, move the remote closer to the Firestick and ensure no obstructions exist between them. If the remote only works when you’re close to the TV, consider using the Firestick extension dongle (usually included) to reposition the device.
Note: The batteries also affect the Fire TV remote’s distance capabilities.
Re-Pair the Remote to the Firestick
Just like when your Fire TV Stick remote doesn’t work for your TV, re-pairing it often makes it work for the Firestick again. See the instructions/process above for details.
Solution 4: Remote Incompatibility
How to Confirm Your Firestick Remote’s Compatibility
Have you replaced your old Firestick remote with a new one recently? If the new one isn’t compatible with your Fire TV Stick, it may cause issues.
If your remote isn’t compatible with your Fire TV device, you can use your smartphone as a remote until you replace it. Download the Android Fire TV App or the iPhone Fire TV App. Just follow the steps below to use your smartphone as a remote.
- Download the “Amazon Fire TV” app on your smartphone.

- Turn the TV on by pressing its “Power” button or using its remote, then log into your Amazon Fire TV account on your smartphone app.

- Select your Fire TV device from the app.

- Copy the code that shows on the TV into the app to finish the process.

Solution 5: Damaged Remote
Check Your Fire TV Remote for Damage
External damage and internal faults can cause your remote to stop working. The remote can sometimes become useless whether there is water damage or failed components.
Solution 6: Firestick Remote No Light/Not Working
If your Firestick remote shows no light, try unplugging the Fire TV stick from the back of your device and wait 20 seconds. Plug it back in to see if the issue got resolved. Usually, the lack of communication with the Firestick often stops the remote from lighting up, assuming the batteries are working correctly.
Pair Fire TV Stick Remote to TV to Fix The ‘No Light’ Issue
If unplugging and reconnecting the Firestick didn’t help, maybe your Firestick remote isn’t paired to the TV. Following the steps below.
- Power up your Fire TV Stick using the remote.

- Get the remote close to the TV and press the “Back” and “Home” buttons for 10 seconds. You have now unpaired the Firestick.

- Press the “Home” button for 10 seconds to pair it again. Repeat the process a few times if necessary.

If the above steps don’t fix the remote light/LED issue, ensure you’re close enough to the TV. As previously mentioned, the Firestick remote is also a Bluetooth device, meaning it can only work within a certain distance.
As previously mentioned, the Firestick remote is also a Bluetooth device, meaning it can only work within a certain distance.
Also, don’t forget to check if someone installed the batteries correctly. Perhaps they are just running low on charge and need to be replaced.
Solution 7: Firestick Remote Not Working with Volume
Many Fire TV Stick users experience volume problems with their remotes. The issue occurs for several reasons. The most common way to fix the problem is to pair your Firestick remote through the Equipment Control setting by using your smartphone instead.
Manage the Equipment Control Options
In the Equipment Control settings on your Firestick, you can use the Change TV option to reconnect the remote to your particular TV, which may solve your volume control issue.
- Install the “Amazon Fire TV” app on your smartphone


- Turn your TV on via its remote or use its power button. Ensure you have set the correct input to display the Firestick, then navigate to “Settings -> Equipment Control.”

- Go to “Manage equipment,” then choose “TV.”

- Navigate to “Change TV” and click “Change TV” again.

- Select “Continue” and choose the type of TV you have from the list.

- Press the “Power” button on your Fire TV remote to turn the TV off.

- Wait 10 seconds, then press the “Power” button to turn the TV back on.

Solution 8: Firestick Remote Not Working After Reset or Update
If your Firestick remote stopped working after an update, try the following five methods. If the first one doesn’t work, go through the steps until the issue gets resolved.
- Hold the “Home” button on the remote for 10 seconds. This action should pai r the remote to the TV if it is unpaired.

- Unplug your device from the outlet and try the remote again.

Otherwise, the best course of action would be to follow some of the solutions listed above.
If someone or something damaged your remote, the new update might not support working with it anymore. If none of the above steps help, consider replacing the remote.
Wrapping Up
In closing, not being able to use your Firestick remote is never a pleasant experience. Thankfully, there are solutions to everything, and the remote is no exception. The most common solutions include resetting and re-pairing the remote or inserting new batteries. However, if none of the suggestions from this article work, you may want to contact Amazon’s customer service or replace your remote.
Disclaimer: Some pages on this site may include an affiliate link. This does not effect our editorial in any way.


