If you blog on WordPress, sometimes, you may want to offer visitors to your WordPress site further information in the form of a file they can download and keep. It’s a way of extending the reach and impact of your site even further. But to make these files available, it’s important you know how to upload them in the first place. This guide will provide detailed instructions for easily uploading and adding files to your WordPress site.
How to Upload Files on WordPress
For seamless website media management in WordPress, understanding file uploads is crucial. Thankfully, the process is simple and only involves a few clicks.
- Log in to the WordPress admin page of your website.
- On the left-hand navigation menu, hover over Media.
- Click on Add New Media File from its submenu.

- Click the Select Files button in the Upload New Media section.
- Select files from your local machine by clicking them on the hard disk, then click Open. You can select many files simultaneously if you need to since WordPress supports bulk uploading.


Insert Uploaded Files
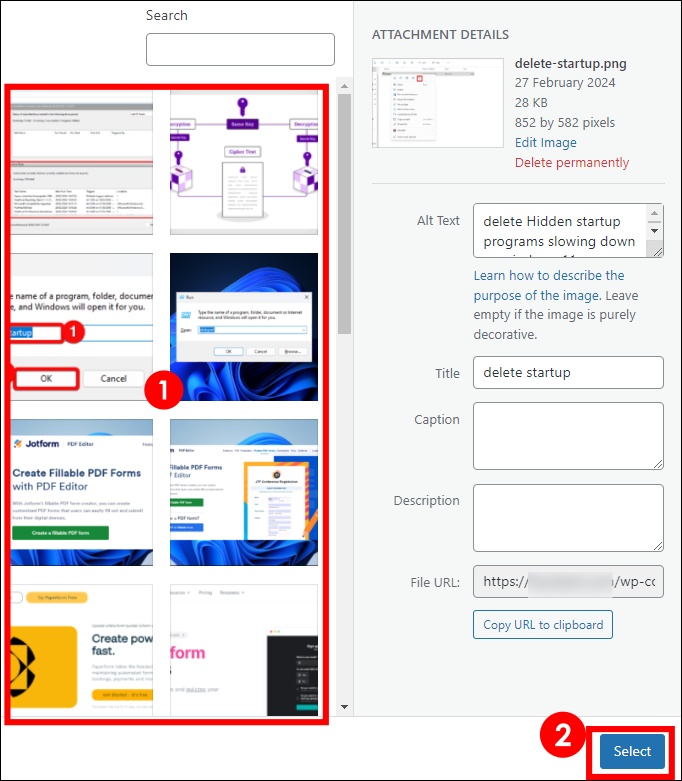
Once you have uploaded your files, you can easily place them in the content of your WordPress site. In most cases, this will be on a page or post. The steps are similar regardless.
- Log into your WordPress dashboard.
- Open the page or post where you would like to insert the file.
- Click the + sign, search for the file type you uploaded, and click on it. Depending on what you uploaded, some options may be Image, Audio, File, etc.
- Select Media Library.
- Click on your desired file and click the Select button. It will be placed immediately into your content at your cursor’s location.

While we have inserted an image in the example above, the same process will work regardless of the file type. WordPress allows you to upload from a very diverse list of file types, including the following:
- Images: .jpg, .jpeg, .png, .gif, .ico, .webp
- Documents: .pdf, .doc, .docx (Microsoft Word), .ppt, .pptx (Microsoft PowerPoint). .odt (OpenDocument Text Document). .xls, .xlsx (Microsoft Excel), .psd (Adobe Photoshop).
- Audio: .mp3, .m4a, .ogg, .wav.
- Video: .mp4, .m4v (MPEG-4), .mov (QuickTime), .wmv (Windows Media Video), .avi, .mpg, .ogv (Ogg), .3gp (3GPP), .3g2 (3GPP2)
How to Increase the Upload Size Limitations of Your WordPress Site
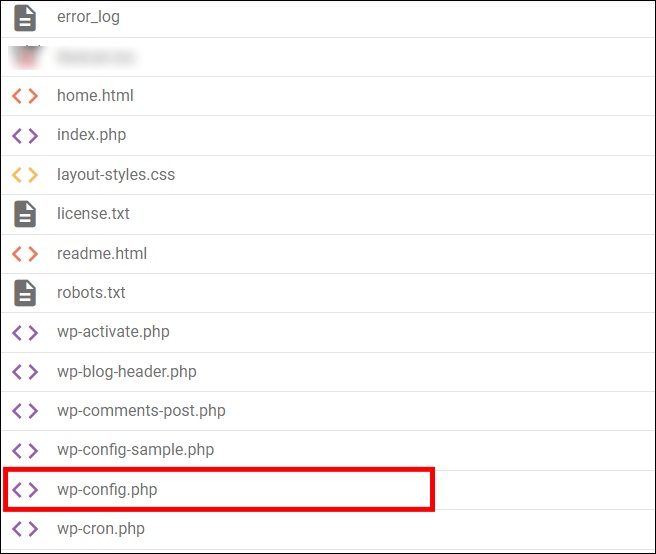
Your WordPress web host might have limited the size of files you can upload individually and in bulk. File uploads will be successful if they do not exceed specified web host limits. By default, these limits are generally between 2 MBs and 10 MBs. You may tweak specific values in the WPConfig file to change the limit.
- Log into your CPanel.
- Locate the wp-config file in your public_html folder and open it.
- Add the code below to the bottom of the wp-config file and click the save icon to increase the upload limit to 32 MB.
@ini_set( 'upload_max_size' , '32M' );
@ini_set( 'post_max_size', '64M');
@ini_set( 'memory_limit', '128M' );
Fix Common Upload Issues
There’s a possibility you may experience technical issues during the file upload process on WordPress. You need to identify the root cause to solve failed uploads or timeouts.
Typically, wrong file formats, excessive file size, unsuitable file permissions, plugin conflicts, and limitations imposed by web hosts are common causes of upload problems. When you check error messages correctly, it becomes easier to identify the culprit.
Firstly, ensure that media formats like images, videos, and documents align with your WordPress and web hosting specifications. Oversized files can be compressed or divided into smaller parts to overcome size barriers. Changing folder or file permissions through FTP (File Transfer Protocol) in compliance with recommendations given by WordPress will also assist.
It would be best to start by disabling plugins one at a time to determine any incompatibility issues causing blocks on uploads. If restrictions create continual difficulties, you might have to shift to a WordPress-optimized web hosting provider.
Demystifying File Upload in WordPress
File upload to WordPress may seem complicated, but it becomes easier if you know the features associated with the procedure. Careful file selection and monitoring the progress of uploads to the site are essential in enhancing your website’s media content. This will all form an integral aspect of building a business website.
FAQs
There aren’t any media folder options built into WordPress. However, some plugins can help add this functionality. These tools enable you to categorize, tag, or organize your media library.
Yes, WordPress’ native image editor enables you to assign values such as image title, alt text, caption, and description, which contribute towards SEO and accessibility purposes.


Disclaimer: Some pages on this site may include an affiliate link. This does not effect our editorial in any way.