Device Links
No one is a fan of poor video quality. If you’re a creator, poor quality can result in equally poor reception to your content and adversely impact your brand. Similarly, a blurry video can ruin what was intended to be a cherished memory for casual users.
Fortunately, there are several ways to enhance video quality, both before shooting the video and after the damage has already been done. Keep reading to learn more.
How to Enhance Video Quality on an iPhone
The iPhone camera is lauded as one of the best in the smartphone industry. Images and videos captured using this camera are typically of top-notch quality.
However, plenty of factors can contribute to an unsatisfactory result in terms of video quality, including shaky hands and poor lighting conditions. If you end up with a low-quality video, you can use video enhancer apps to rectify the problem.
Alternatively, the default video quality might not be suitable for your needs. If that’s the case, you can also adjust the quality settings in your Camera app before shooting the video.
Let’s explore both options in more detail.
How to Enhance Video Quality Before Shooting
By default, the iPhone camera records videos at 30 frames per second (FPS) and in HD resolution. Using a faster frame rate and higher resolution will result in a smoother video of higher quality. However, it will also create larger video files, so keep that in mind if you have issues with your storage.
Follow these steps to enhance quality before recording a video:
- Swipe left on your screen until you switch to the “Video” mode.
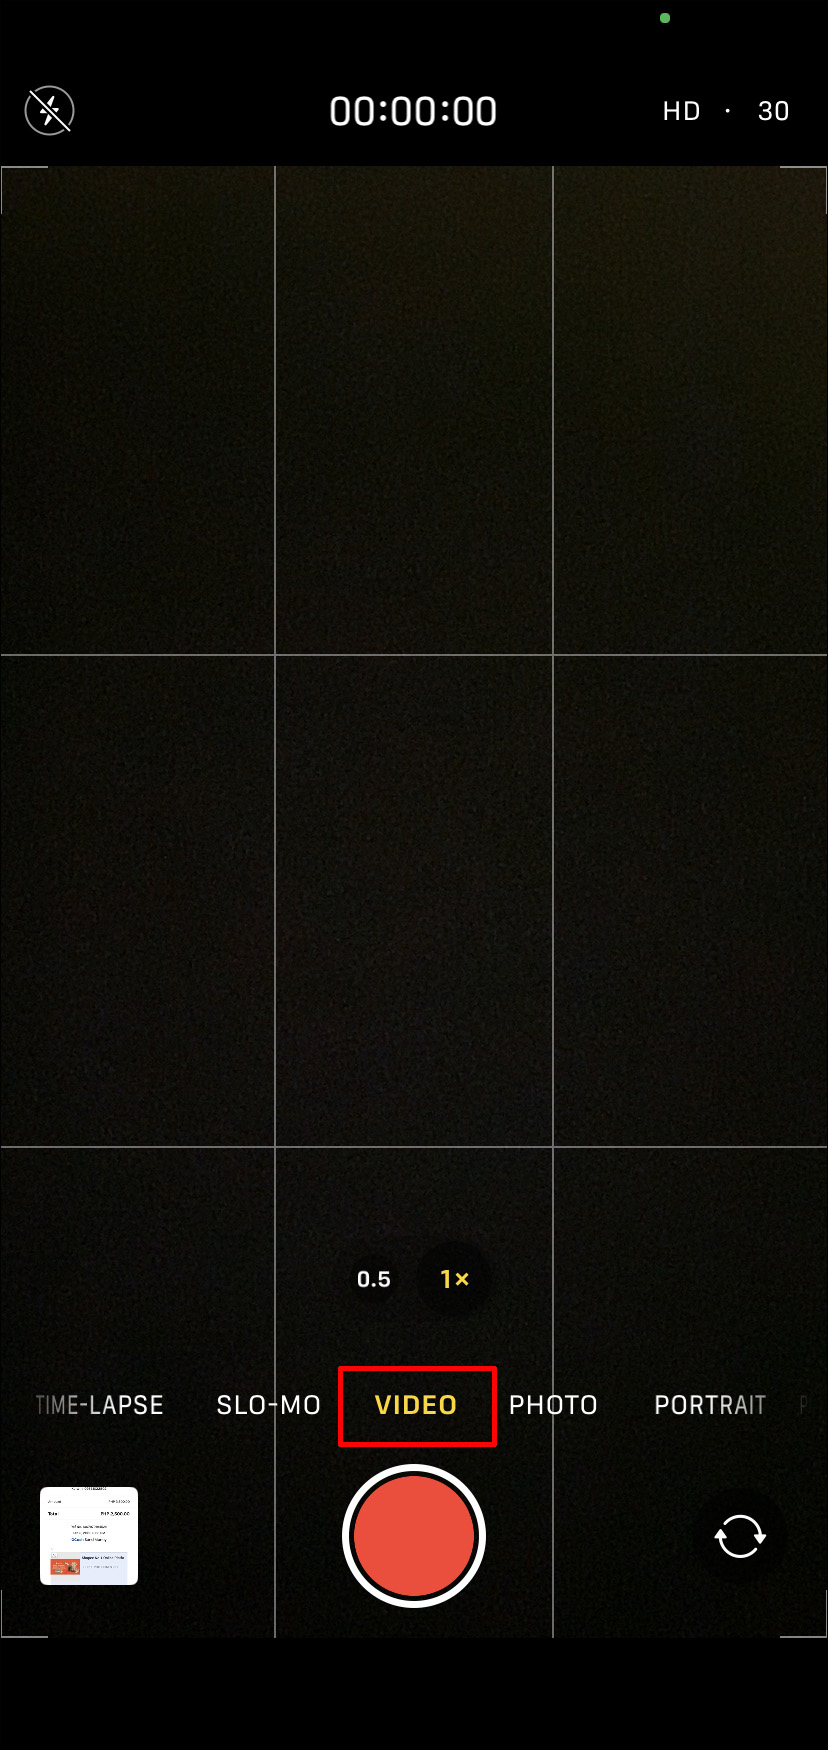
- Navigate to the top-right section on your screen displaying an “HD 30” toggle.

- Tap the “HD” toggle to switch to a higher resolution.
- Press the “30” toggle to select a different frame rate.


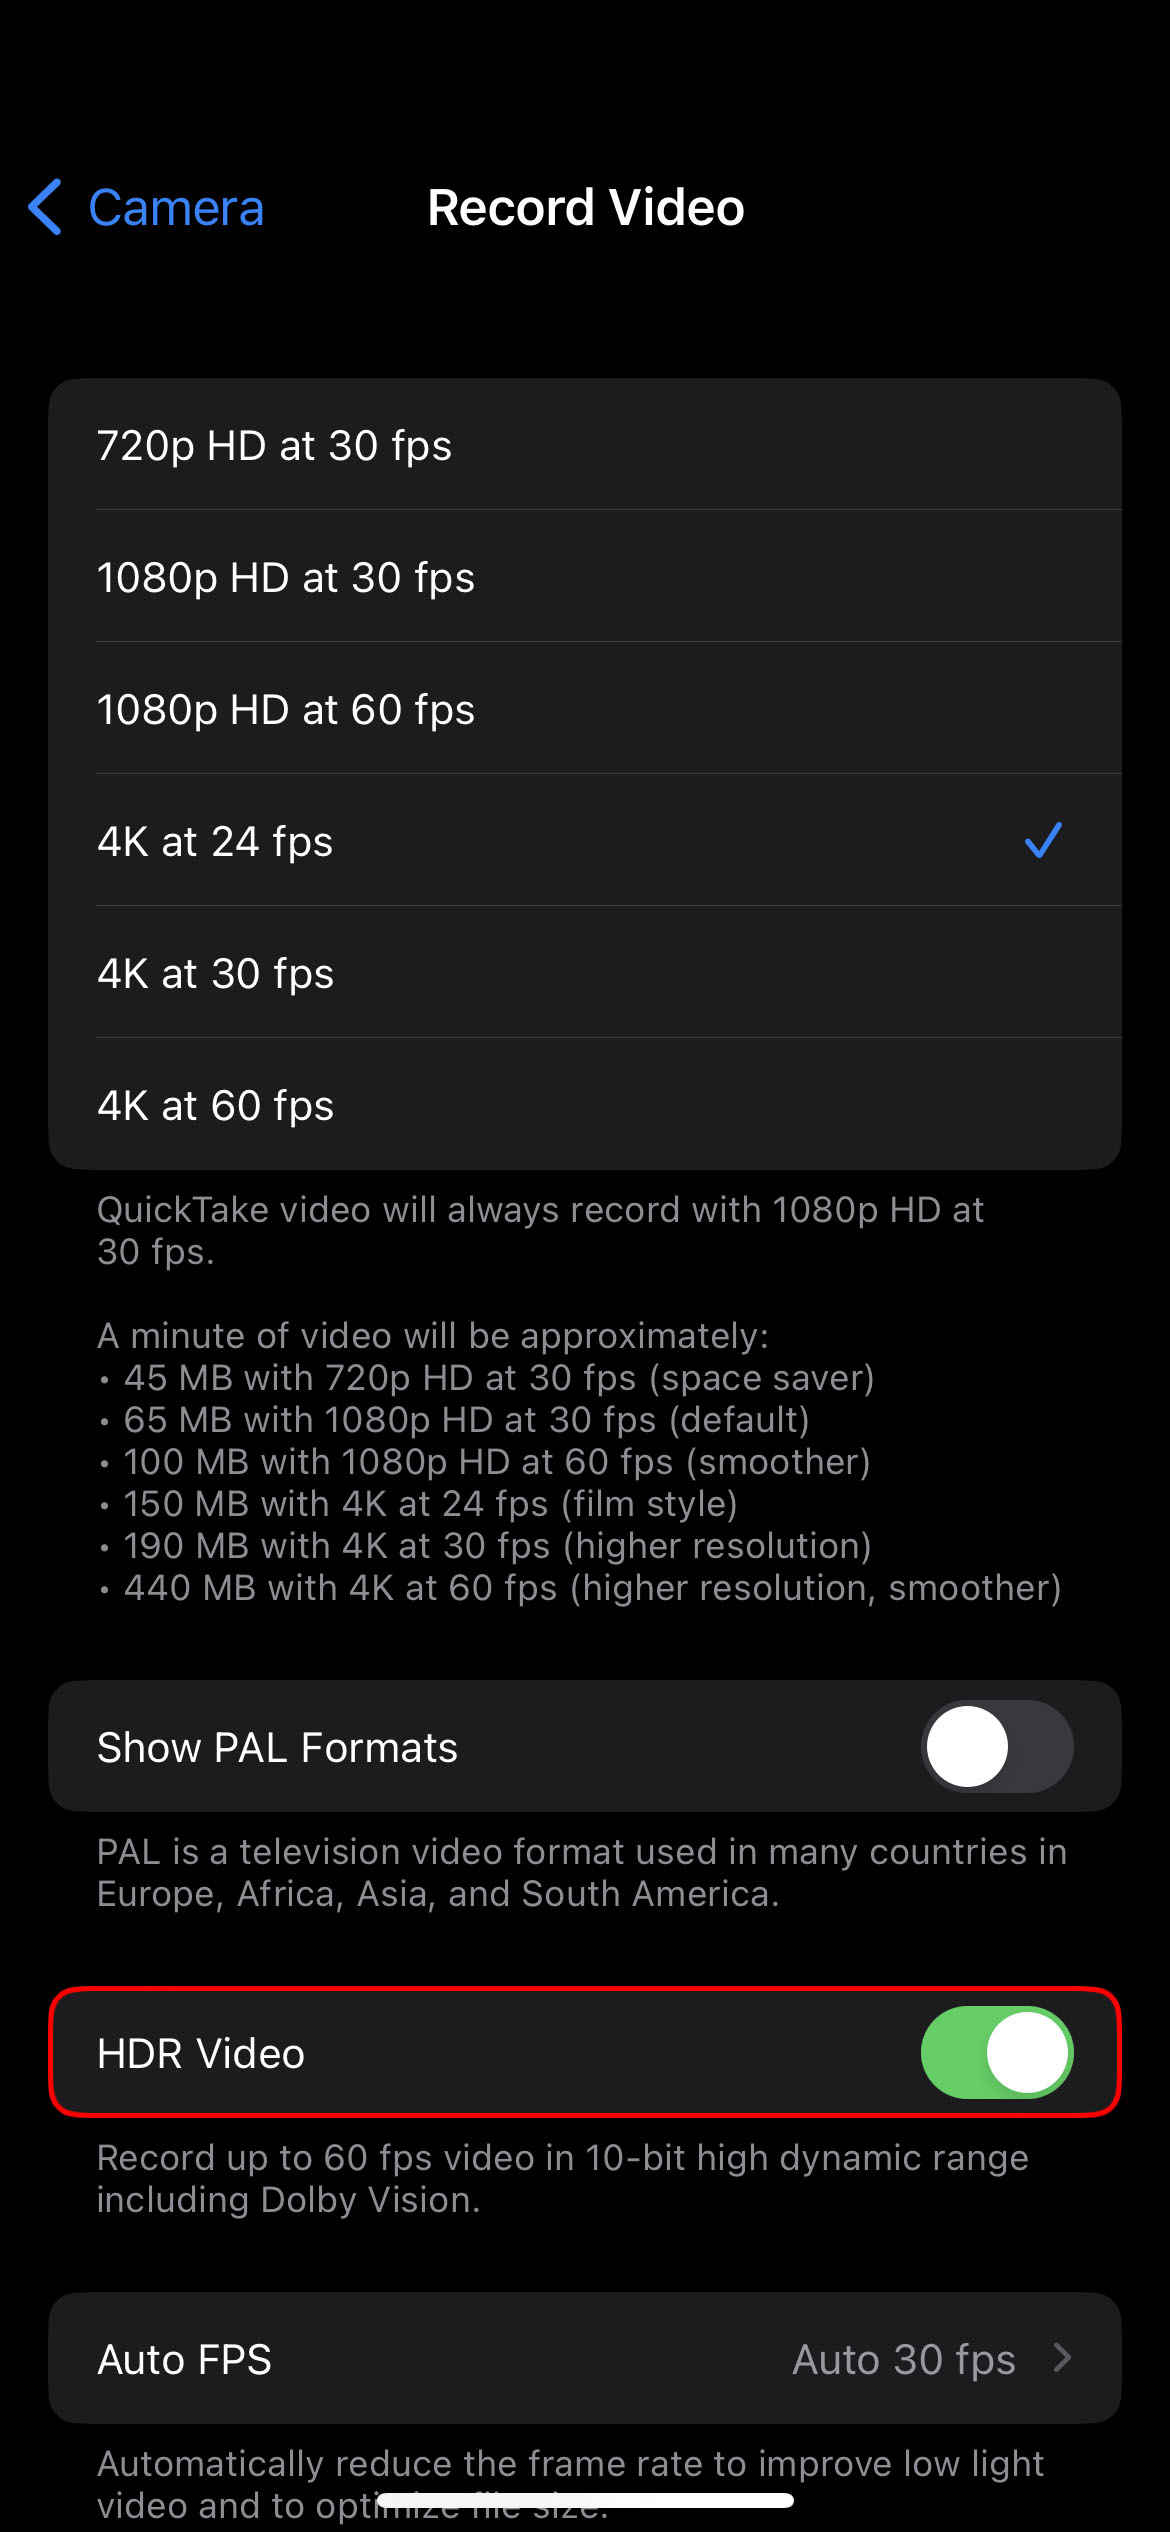
Note that selecting a faster frame rate won’t improve your video’s quality in all settings. For instance, shooting in low-light situations will produce significantly better results with a lower frame rate of 24. For this reason, you might benefit from enabling the Auto FPS settings.
Here’s what to do:
- Go to “Settings.”
- Select the “Camera” option.
- Tap the “Record Video” tab.
- Enable the “Auto FPS” or “Auto Low Light FPS,” depending on your model.


Other camera settings you can tweak to improve video quality on newer iPhone models include:
- Turning on HDR recording to capture videos of higher contrast
- Enabling the Lock Camera option to prevent automatic switching between cameras
- Turning on Enhanced Stabilization

How to Enhance Video Quality on an Existing Video
If something goes wrong and you aren’t satisfied with the quality of a video you’ve shot, you can use third-party apps to enhance the quality. Keep in mind that improving a video in post-production is a bit more challenging than adjusting the settings before shooting.
Here are the best video enhancer apps for iPhone users.
PowerDirector
PowerDirector is a free app with a wide range of video editing and making features. When it comes to improving video quality, you can use the app to change the video’s resolution and frame rate.
- Open the video you’d like to edit.
- From the editing page, select the “Resolution” tab.
- Change the settings from “SD” to “Ultra HD.”
- Go to the “Settings” tab.
- Press “Bitrate.”
- Choose the “Better Quality” option.


You can further tweak your video’s quality by using some of the premium tools:
- Video Stabilizer for reducing shakiness
- AI Noise Reduction for getting rid of background noise
inShot
inShot is a powerful app for creating and editing photos and videos. The app allows you to manually adjust specific settings on your video, thus improving the overall quality. There isn’t a one-size-fits-all answer, so the best option is to play with the settings until you achieve desirable results.
- Open the video you want to edit.
- Tap the “Filter” icon on the taskbar at the bottom.
- Select the “Adjust” option.
- Use the slider to change values for each category.
- When done, tap the checkmark icon on the right.


How to Enhance Video Quality on an Android Device
To shoot videos of the best possible quality using your Android smartphone, you should adjust the camera settings accordingly before starting filming. If, however, you’ve captured or received a video of lower quality, you can use several video enhancer apps to ensure the video is up to scratch.
How to Enhance Video Quality Before Shooting
Modifying the camera settings on an Android smartphone is a quick and simple process that results in noticeable differences in the quality of your video output.
- Launch the camera app on your smartphone.
- Tap the gear icon in the upper-right corner to open “Settings.”
- Scroll to the “Video settings” section.
- Press the “Video resolution” tab.
- Select a higher resolution option.


Depending on your Android model, you might be able to change the frame rate as well. Generally speaking, the default mode for a smartphone camera is 30 frames per second (FPS). Shooting at a faster frame rate will typically produce videos of better quality. But these videos will also require significantly more storage space.
Most Android smartphones offer specific modes that can help you create higher-quality videos. Depending on your device, try exploring the following modes:
- PRO
- HDR
- High-Res
How to Enhance Video Quality on an Existing Video
If adjusting the camera settings fails to produce satisfactory results in terms of video quality, there’s always post-production.
The good news is that you don’t need elaborate software to improve a video’s quality. The bad news is that the end result won’t necessarily be of the highest quality if the initial footage has significant quality issues.
Still, any of these enhancer apps will make a world of difference in enhancing a video’s quality.
PowerDirector
PowerDirector is one of the most popular video-making and editing apps on the Play Store. You can use it to quickly change the video’s resolution and frame rate, thus improving the overall quality. You can also try out premium features, such as the Video Stabilizer or AI Noise Reduction tool, to produce the best possible results.
To instantly enhance your video’s quality, follow these steps:
- Tap the “Resolution” tab on the app’s editing page.
- Switch the settings from “SD” to “Ultra HD.”
- Navigate to the “Settings” tab.
- Press “Bitrate.”
- Select the “Better Quality” option.


inShot
The inShot app is a fan favorite, especially for content creators, since it allows you to quickly resize your video to any format. Basically, you can use a single app to create content for all social media platforms by catering to specific format requirements.
To top it all off, you can adjust the video’s quality before posting it online, setting it up for excellent reception. Here’s what to do:
- Tap the “Video” tab on the app’s landing page.
- Select the video you’d like to edit in your gallery.
- Press the green checkmark in the bottom-right corner.
- Tap the “Filter” icon on the taskbar at the bottom.
- Choose the “Adjust” option.
- Drag the slider to change values for each category at the bottom.
- When done, press the checkmark icon on the right.


How to Enhance Video Quality for TikTok
TikTok is arguably the most popular social media platform today, so attracting attention requires a lot of effort. After spending significant time coming up with an idea and filming and editing the video, seeing the uploaded version on TikTok might be disappointing.
The reason being that TikTok tends to slash the video’s quality during the uploading process. This is done to achieve faster upload speeds and loading times and to conserve data. Fortunately, there’s a quick fix for this issue that only requires one or two extra taps when uploading a video.
Simply go through the upload process as you normally would. Once you reach the Post screen, do the following:
- Scroll down and look for “Upload HD” or Allow high-quality uploads.”
- Enable the “Upload HD” or “Allow high-quality uploads” option.


Depending on your device, the options might be available directly on the Post screen. After you enable this option once, it will stay on. Therefore, you don’t have to repeat these steps each time you upload a new TikTok.
How to Enhance Video Quality in CapCut
CapCut is an all-in-one video editing app that has taken the world by storm thanks to its ease of use. Staying true to its straightforward ways, the app allows you to enhance video quality in just a few steps.
- Tap the “New project” button on the app’s landing page.
- Select the video you want to edit.
- Press the “Add” button in the bottom-right corner.
- Scroll left on the taskbar at the bottom of your screen until you reach the “Filters” icon.
- Go to the “Adjust” tab.
- Tap individual settings and use the slider to achieve the best results for your video.


Although you can play with all the available options, the following settings will impact your video’s quality the most:
- Brightness
- Contrast
- Saturation
- Exposure
- Sharpen
Raise the Bar
Sure, watching low-quality videos from the past can be nostalgic. But these videos can also remind you how much technology has advanced, allowing you to capture new moments more clearly.
With the quality of cameras at your disposal and the countless video editing apps, you can easily produce videos of enviable quality. Whether you set the stage before shooting or spend more time in post-production, our guide has shown you how to enhance the quality of your videos.
Have you had issues with poor video quality on your smartphone or social media apps? How did you resolve it? Let us know in the comments section below.


Disclaimer: Some pages on this site may include an affiliate link. This does not effect our editorial in any way.